Friday, September 20, 2013

Christmas Market Stall FINISHED!!

My market stall was a project from a NAME Day held in Saginaw, TX in July 2012 hosted by the Mini Endeavors club.  I finished the market stall back in May 2013 but am just now getting the photos uploaded.  In my last blog (actually 2 blogs ago) I promised that the next one would be some of the finished items.  Well, here it is.


Here are some close ups of the different sides:

Front right side of counter.  The ornaments were made from my Sept. 2012 blog tutorial.  I made the little partitioned box from scrapbook paper edged with a gold paint pen.  The Feather Tree was a project from the NAME Day event.  The stacked tree top ornaments are just beads stacked on a toothpick and lots of glitter.


Front left side of counter.  Victorian cones and ribbon candy under a dome were made by my talented friend, Karen Haggard.  She also gave me the pot of Christmas Cookie pops by Jen Tuttle of Miniholiday.  The soldier is a painted metal miniature.  I made the tray of cookies and ornament under a dome.

Lower front: I dyed the pink Christmas Tree and painted the smaller one white.  All the ornaments and tree toppers as well as the ornament wreath were made from similar techniques mentioned in my earlier tutorials.  The Merry Christmas crate was donated to the NAME Day by Through the Keyhole dollhouse store.  It contains several tote bag items from the event.

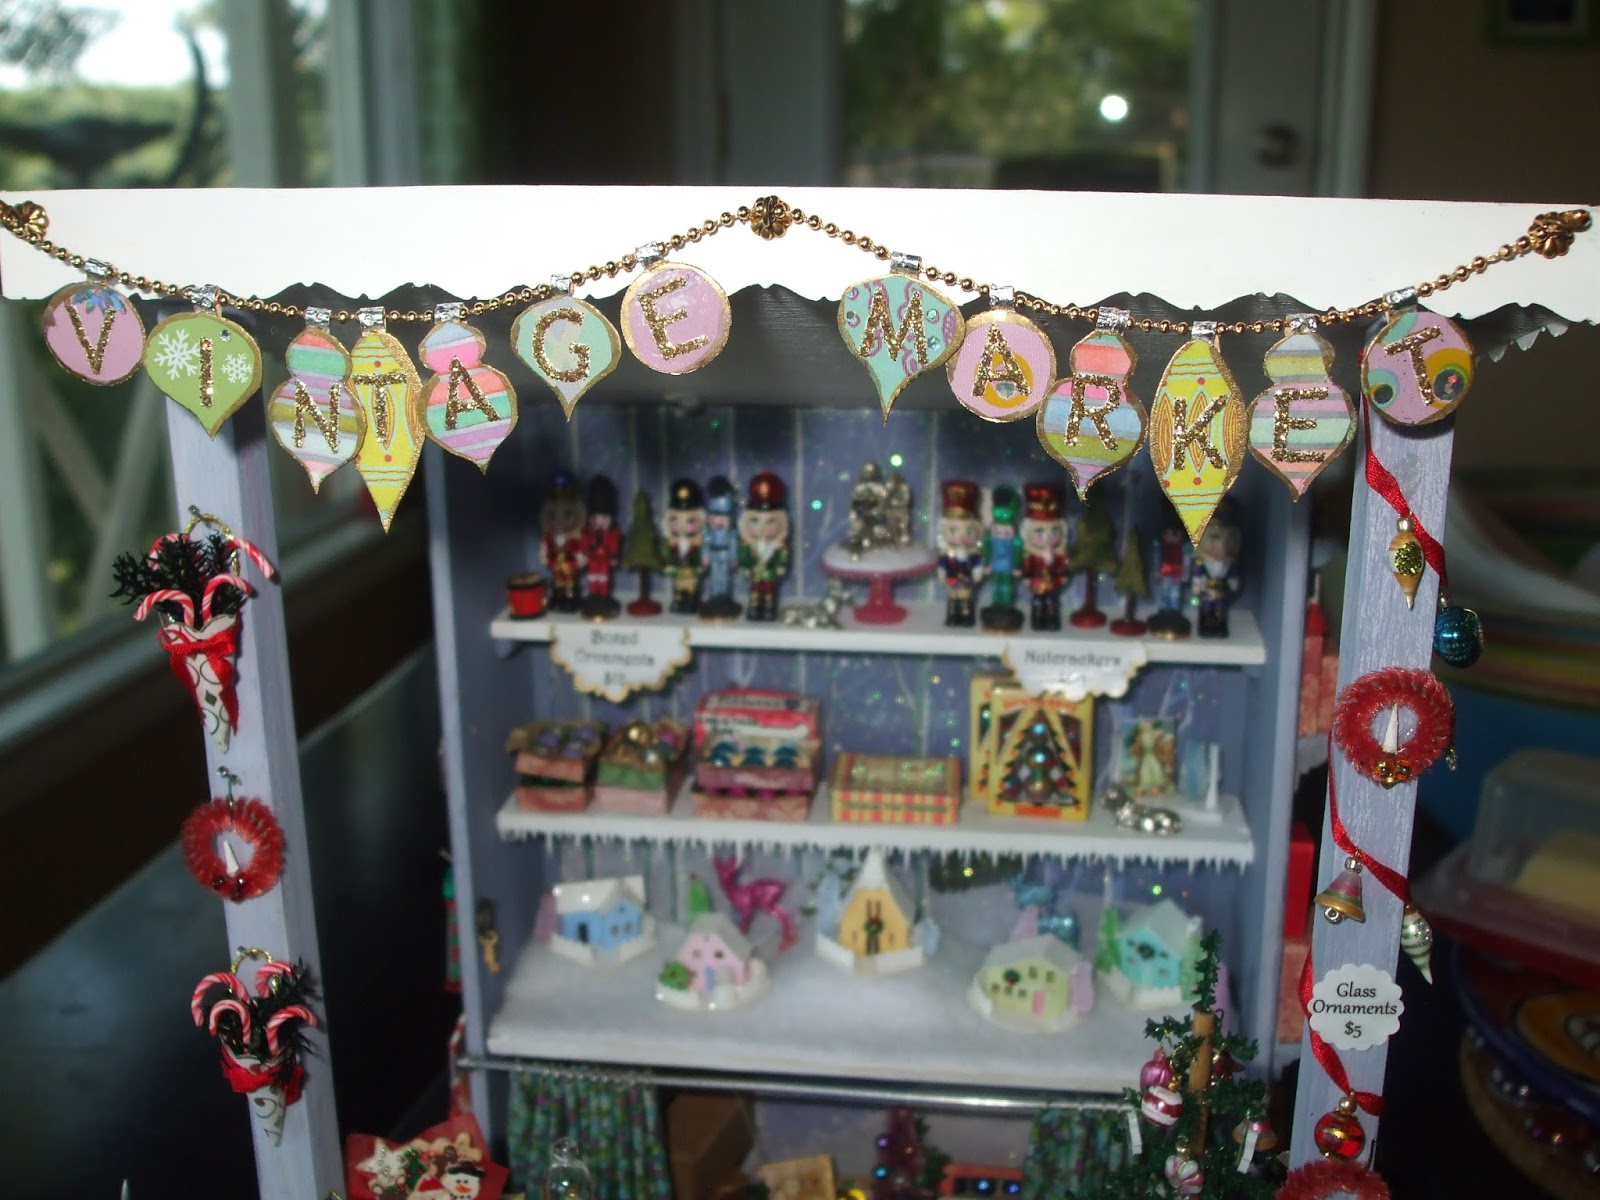
Its hard to see but the items on the shelves are:  Top shelf - large nutcrackers are from wine glass charms.  Smaller ones are painted Metal Miniatures.   Middle shelf - Boxes of ornaments including some reproduction "Shiny Brite" ornament boxes from one of my favorite Ebay sellers, Sue's Little Things. Bottom shelf - Glitter house village which I put together from a Carol Kubrican kit (True2Scale).


The left side of the stall has hanging candy items mentioned in my August 10 2013 blog.  The red and white stocking was one of my earliest miniatures purchases from way back in the 1980s.  I wish I knew who the artist was.  The two net stockings were from Lori Ann Potts of Mustard Seed Miniatures - also vintage but purchased recently.  I modified them by adding items inside the socks and adding a paper card and string.


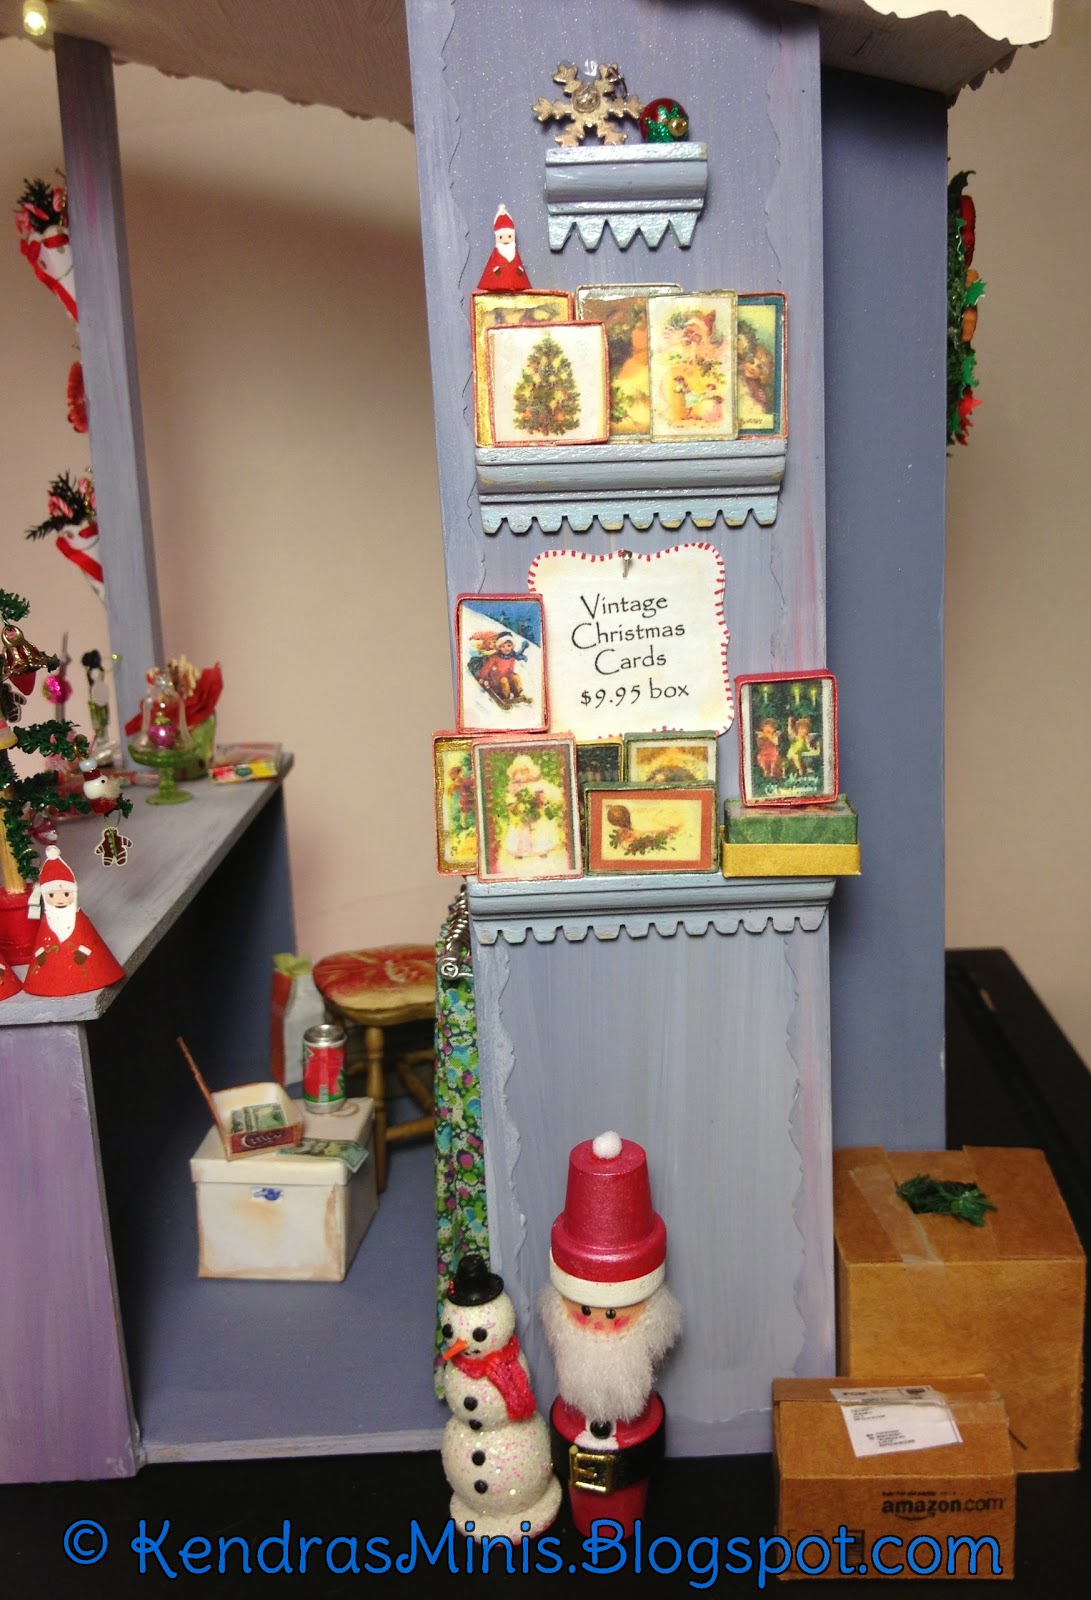
 The right side of the stall:  On the shelves are boxes of Christmas Cards made from some printies provided in the NAME Day tote bag by the late Donna Aldrich.  I wrapped blocks of scrap wood with a strip of folded antique looking scrapbook paper then glued on a card cutout and a thin film of clear plastic cut from a packaging blister.  The flower pot Santa & snowman were projects from the NAME Day event.


Inside the stall I put a little area for the stall owner to sit.  The curtains were described in an earlier blog.  The little stool is the bottom half of a Chrysnbon chair with a chair pad added.  The little filing box is just a block of balsa covered with a metallic gift wrap and a staple for a handle.  The Happy Meal was a tote bag favor.  The little box of ribbon candies (on the counter above the Happy Meal) is another item from Sue Ayers.

Well, glad that I have finished one project...only a hundred more to go!


Saturday, August 10, 2013

Mackenzie-Childs Inspired Dollhouse Miniatures

Inspired by Mackenzie-Childs
miniature wreath, Christmas tree

Christmas table with Boutonniere runner

Close up of Boutonniere Theme table

Miniature table with Holly Berry napkins, tablecloth

Close up showing napkins, napkin rings,
hanging double drop ornament


Full Size Holly Berry tablecloth and topper
(Original From Neiman Marcus)

Mini version Holly Berry stocking


Mackenzie-Childs own lovely Stocking


Miniatures inspired by Courtly Check canisters, plates


Mini hutch with Courtly Check inspired
canisters, plates


TUTORIAL -Candy Tubes, Candy Cards, Stockings

Supplies: 1/8” outer diam. clear plastic tubing (JAR-JAF Miniatures item # R-194),  Tiny candy balls (railroad fruit, no-hole beads or candy sprinkles – must fit inside the tubes), 5 mm white pom pom, 5 mm plastic flat back rhinestone,  5 mm round punch from black sequin or thin plastic (I used part of a wiggle eye), 1/8” round punched piece of fun foam, tiny black no hole beads, orange thread.


Snowman Candy Tube – cut a 18 mm length of the plastic tube using an X-acto (rolling it while cutting).  Smooth cut end if necessary with a file or emery board.  Glue the rhinestone to the bottom as a base (see top photo).  Fill with the tiny candy balls.  Glue the pom pom to the top.  For the hat, use the tiny punch from fun foam on top of the black 5mm disk.  Glue these to the white pom pom.  Glue black no-hole beads for eyes.  For the nose I used two tiny snips of orange thread (for a carrot).  I kind of twisted them together at one end to make a point.

Santa Candy Tube – For this one I used a slice of a Fimo cane (a thick slice) that was about ¼” diameter for the top.   It had a Santa face design.  I used metallic no-hole beads for the ‘candy’. 


Candy Cards – these were made using various scrapbook stickers (Jolees, etc) in small shapes like Christmas socks, Christmas bulbs, etc.  The plastic bubbles were either pill blisters or wiggle eyes with the back sliced off.  Fill with purchased Fimo candy (or buy the canes and slice them yourself).

Finished side of stall with candy cards:

Below is another pic of the candy cards and candy tubes.  


Stockings - The red and white stocking above was an early miniature purchase from 1986 (artisan unknown but I recorded that I paid $6 for it).  The other two stockings were bought in a lot on Ebay and were made by Lori Ann Potts of Mustard Seed Miniatures.  They originally were hand sewn (red tulle netting, I think) around the edges and contained only Fimo candy.  I embellished them to add the Santa and Angel figures, the red & white trim around the edges and the labels.  Here is how I did the red and white trim (below).

I bought the green ribbon at Christmas time from Hobby Lobby.  I trimmed off the tiny candy cane edge trim and glued it around the sock.  I had to notch it around the toe so it would fit the curve.  I made a card on the top from just a clipping from a wrapping paper catalog (Container Store).

Next time I will show finished photos of the entire project and give sources for some of the items.

Friday, August 9, 2013

Vintage Market Stall - Ornament Garland

It’s been a long time since I’ve updated this.  The stall has been completed and was exhibited at Texas Miniature Showcase in Dallas, May 2013.  Here are some more photos and “How-tos” for some of the decorations.

I needed a sign for my market stall.  I wanted something that didn’t look manufactured (like it came from those ‘Dept 56’ Christmas Villages).  I decided on a hanging garland of vintage looking ornaments – just card cutouts.


Most of the supplies used: index card, scraps of Christmas wrap, some tiny gold bead garland (you can find this on Ebay), gold scrapbook letters, snowflake nail stickers, a half inch circle paper punch.  Plus your basic tools (scissors, X-acto knife, Crafter’s Ultimate glue.


I sketched the shapes and sizes I wanted to use and compared them to the letter stickers to make sure the stickers would fit.  I cut the shapes first out of a folded piece of paper as a pattern.   I glued gift wrap to index card (on both sides).  I then cut ornament shapes from the double sided index card. I used a small ½” paper punch for the round ornament.  The others were cut using patterns.

I used tiny strips cut from silver paper doily on the tops of the ornaments to attach them to the  beaded garland (also served as an ornament cap).  When I attached the ornaments, I didn’t actually glue them to the garland, instead I glued the strip of silver to the back of the ornament.  I wanted them to swing freely and to be able to adjust how close they were to each other.


To attach the letters, I had to use an X-acto to position them.  I also had to darken the glitter letters a little because they didn’t show very well.  I just used a little diluted brown paint.

I attached the sign (garland) by drilling small holes and threading the plastic bead garland through eye pins pushed through a bead cap into the holes.

Finished Garland sign.    Next time some of the candy!

Thursday, March 21, 2013

TUTORIAL Vintage Ornament Wreath

Supplies:
  • 8mm, 6mm and 4mm round colored pearl beads (plus a few very tiny ones)
  • textured ‘foil’ like beads, same sizes (Hobby Lobby brand “In Bloom")
  • gold beads oval shaped about the size of a grain of rice (I cut these off an old necklace but they are sold in craft stores)
  • 34 gauge brass wire and tiny gold seed beads for ornament caps and rings
  • ULTRAFINE glitter, gold, silver and various colors to match the beads and cover the bead holes
  • Crafter’s Pick ‘Ultimate’ glue (my favorite) put in a bottle with a tiny dispensing hole

I think it looks best when you use a variety of sizes and shapes (oval ‘rice’ beads, fluted beads). I didn’t start with finished ornaments – I made the basic wreath of plain beads then added the bead caps and rings to some of the beads after the wreath was done. This way I only put them in a few places and didn’t waste the work of making the wreath from all finished ornaments.

 
Draw a 1-1/4 inch circle on index card and place it under a sheet of wax paper


Select 12-14 beads (8mm) and see if they fit on the circle. Fill the holes with glitter to match the bead color.


Place beads around to get colors where you want them.


Glue them down. This is your first layer.


Select some smaller beads for the 2nd (right) and 3rd (left) layers.

Use a few very tiny pearls to fill in some of the bigger spaces when you're done (you'll see what I mean)

Note: some of the silver beads in pic above were metal spacers that I added glitter to. Bead spacers come in many shapes and sizes and even ridged or fluted styles that look very vintage! I also added glue & glitter to both ends of the rice shaped beads and sort of squished them to a point when they got a little dryer (to make an ornament that looks pointed on both ends).

Glue the second layer to the wax paper just inside the first layer.


Final (3rd) layer goes on top, arranging them so they look best for color, shape, etc.

Before all the glue is dry, make a few ornament rings from the wire and beads (see my Shiny Brite Tutorial, Sept. 2012). Fill in some of the bead holes with these rings.

Here is a photo of some other ornament wreaths I made in other color combinations:


Have fun making wreaths! Great way to use up your bead stash.

Wednesday, December 26, 2012

Glitter House Village

I planned to use one shelf in the market stall for a glitter house village. I used kits purchased from True2Scale. I love how these turned out. Here are some hints for doing these kits:
  • If you want trees next to your little house there won’t be room on the small bases unless you remove some sections of fence.
  • If you shorten the wires on the tiny LEDs you can use sandpaper to remove the red or green coating. She says this in her blog tutorial but I didn’t find it in any of the kit instructions.
  • To color the trees (white chenille stems) I used diluted paint and after painting the stem I wiped it up and down the length with paper towel to remove excess paint so it looked tinted
  • I unintentionally painted the inside of the green house with green also and it kind of gives it a greenish glow – I think that could be used to make each little house glow with color.

 I wanted my village to look hilly so I put some blocks of scrap wood (above) on the shelf before covering it with white fleece for ‘snow’. I painted the blocks (below) so they wouldn't show through the fleece.

 I thought the red and green wires might show on the white ‘snow’ so I painted the wires a little.

After finishing my village I decided it would be helpful to have a trap door in the back wall big enough to fit the coin size 3V battery holder so the entire village shelf could be removed if one of the lights went out. I wish I had thought about this before I had assembled and painted the stall (I didn’t think THAT far ahead!).

It was very difficult to cut an opening through the 1/8 inch plywood covered with wallpaper paste and a Christmas card. I use my dremel with cutting wheels and even that took a long time. I had to finish using an X-acto and sawing/rocking motion but finally cut a very messy opening. It will be hidden under the shelf so it won’t be noticeable.

 Trap door to hide coin battery and allow removal of entire village (closed).

 Trap door open (see interior wall covering).

 Finished with the village shelf! The entire shelf can be removed and coin battery is hidden in the false back wall. You can't see the trap door because it is way up under the shelf.


Here is how the false back looks from the back of the stall.  All wires are enclosed in the little 'shed' and false ceiling of the roof.  The two battery packs (one for the shelf and ceiling light string and one for the glitter house village shelf) are accessible through the little door with the hand made latch:


 Next blog - some of the decorations!

Tuesday, December 25, 2012

Vintage Christmas Market Stall – Electrical Pt 2

Finishing the false wall and hinged battery door.


Battery Door - in the last blog I mentioned a door I made in the back wall extension to provide access to the battery pack for the lights.  Here is how I finished it.   I cut the door opening in the flat back wall BEFORE assembling the box.  After painting the false wall section to match the rest of the structure, I added hinges.


I made a sliding latch from scraps of trim wood to keep the door closed.


After trial fitting the wiring cover with the door closed I realized it needed to be reinforced around the opening to prevent the door from pushing in too far.  I cut scrap wood and glued around the back side of the door opening then painted it to match.


For the top of the roof, I cut a piece of white shirt cardboard to cover the balsa and be the outer roof.  I decided on cardboard because the wires still poked up a little past the balsa spacers so I needed something more flexible than wood.  Photo below shows clamping the shirt cardboard after gluing over the spacers to enclose the ceiling wiring.


On to the Glitter House Village! (see next blog on village!).