Sunday, July 29, 2018

Tutorial - Slip Covered Slipper Chair Part 2


Here is part 2 of the Slipper Chair tutorial.  Seat back with faux pleat and seat cushion.

Supplies for Part 2:
  • Sewing machine, matching thread
  • Fray-Check (sewing seam sealer)
  • Shirt cardboard, index card
  • Small blob of polyester fiberfill (or fluff from an old pillow)
  • VERY FINE glue applicator filled with craft glue (I used Sobo in my applicator)
  • Pattern sheet (link here)

  1. For the seat back slip cover, cut the two pattern pieces “C” and “B” from fabric. (note that in photos my piece “C” is not straight across the bottom because I was using a scrap piece).
  2. Down the center back of the chair is a faux pleat.  To make this, “draw” down the centerline of the back piece (wrong side of fabric) with a THIN line of glue.  Make it wide enough so that when you cut on it, it will be sealed on both sides of the cut.  The glue line is hard to see in the photo. Don’t cut this yet.
  3. Using a sewing machine and very small stitches (I used a stitch length of 2mm long), sew the back to the front RIGHT SIDES TOGETHER on the seam line (see photo).
  4. Put a line of “Fray Check” seam sealant all around the raw edges on both sides. Don’t let the solution spread past the line of sewing.
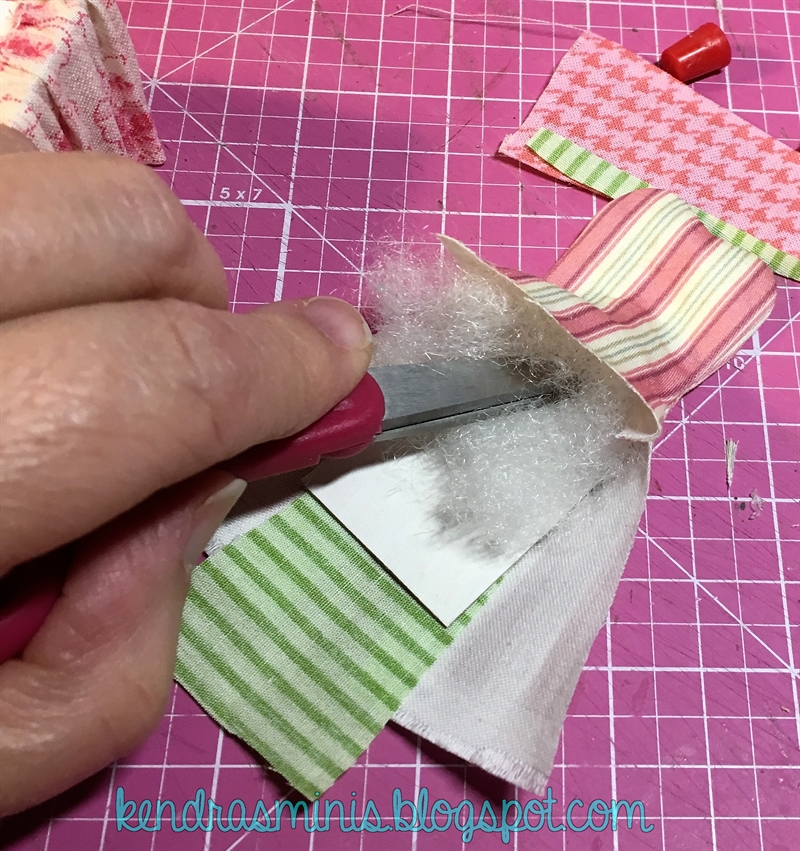
  5. Clip into the center of the heart where marked on the pattern but be sure NOT to clip through the stitching line.  Trim the seam to about 1/8 inch.

  6. Turn inside out.  Cut a piece of shirt cardboard to pattern “A”.  Slip the cardboard piece “A” up into the back and make sure it fits.  Remove cardboard piece and set aside (link to pattern - see supplies).
  7. If the glue on center back cut line is dry, cut on the line almost to the top (about ¼ inch from the top seam).
  8. Cut a “gusset” or faux pleat of a contrasting fabric using pattern piece “D”.  Glue the gusset inside the split.  Before it was dry I pinched the split together a little near the top, so it would look like it was bulging (and bows added later were holding it together).

  9. Place cardboard “A” piece up into the slipcover.  Stuff the FRONT of the seat (side opposite of the gusset) with a little fiberfill.
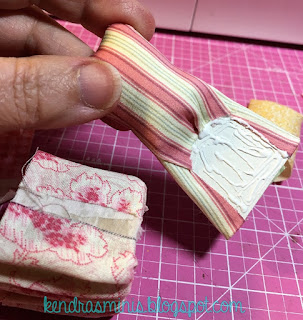
  10. Glue down the open seams below the sewing line as needed to keep the sides together.  You can see where this needs to be done when you have the cardboard inserted.

  11. Glue the back cover to the cardboard down both sides, covering the cardboard.  Glue the raw edge of the cover against the cardboard just to seal in the stuffing (it should just touch the base when the back is glued on).
  12. Trim off any extending gusset.  Fold up a ‘hem’ on the bottom edge of the slip cover and the gusset.  I allowed mine to extend slightly past the bottom of the chair to look sort of like a train.

  13. Glue the back against the base covering the raw edges of the ruffled fabric skirt on the base.
  14. Cushion – (sorry I didn’t take many photos of these steps).  Cut pattern piece “E” out of shirt cardboard or index card.  Trim to fit your seat (a tiny bit smaller). Glue a small blob (size of a grape?) of stuffing to the middle of this cardboard seat.  Cut fabric about ½ inch larger than seat on all sides.  Fabric was wrapped over the stuffing and glued to the bottom of the cardboard.  To do a neat job on rounded corners, first glue down the center of each side.  Then when that is dry enough to handle, clip little tabs of fabric at the corners to try to minimize thick folds.  Glue down the tabs on all corners neatly as possible, smoothing out any wrinkles.  After covering with fabric, I ‘tufted’ two small dents using a needle and thread tying it at the bottom of the cardboard.
  15. Glue seat in place.  Finished!
  16. To decorate the back, I tied three bows using my BittyBow bowmaker (you can buy it from the link at the right side of my blog!).

Tutorial - Slip Covered Slipper Chair Part 1


This is another item from the two-sided dome project.  I needed a small chair since there was not much room inside the dome.  So the slipper chair was made from scratch.  It’s kind of complicated so I’m spreading it over two blogs.  I used a sewing machine for faster gathering but you can hand-sew if desired. In this part I will cover the seat base with skirt.  In Part 2 I will cover the seat back and cushion.  Read on for tutorial:

Supplies:
  • Acoustical Ceiling tile - 24” x 24” x 5/8” thick (building supply store).  Cut in half.  Use half to make a pinning board and cut up the remaining to make the seat base (it will be more than you need) Pin Board Instructions HERE
  • Razor saw or mini table saw to cut ceiling tile
  • Sewing machine, matching thread
  • Steam Iron
  • Glass head pins
  • Bug’ pins (optional)
  • Strong tweezers or thin needle nose pliers (clean, not rusty!)
  • Wood glue (for gluing ceiling tile) & Tacky type for other steps
  • Fabrics (plain white, 3 coordinating fabrics for seat, back and gusset)
  • Scissors … mechanical pencil … cutting mat… the normal toolbox stuff

  1. You can see a prototype in the photo (teal and red).  This was one I made many years ago that I was using for a pattern and for size.

  2. For seat base cut 3 blocks from ceiling tile about 1-1/4 inches square (I used my Dremel table saw but you can use a razor saw).  Stack them and glue together with wood glue.  When dry, sand the four sides so there are no big lumps.
  3. Cut a piece of solid white fabric to cover the entire base.  Glue around all four sides and bottom.  This is just to prevent the ceiling tile material from showing through the patterned fabric.
  4. For the ruffled skirt, cut a piece of fabric about 2-1/2 inches wide by about 8 inches (double the measurement of the four sides).  Iron a ¼ inch hem on one long edge.
  5. Make a mark with a pencil about 1-5/8 inches above the folded hem.This will be your gathering line.  Sew a gathering stitch on this line along the entire length using a long stitch length.
  6. Pull the gathering threads to gather the fabric to a length that will cover 3 of the 4 sides of the block (about 4 inches).  You can leave the two short edges raw (don’t fold any hem on those).  Tie the gathering threads so the gathers won’t come out and adjust the gathers evenly.
  7. Using the ceiling tile pinning board and regular glass head pins, place a pin into one side of the gathers just at the point where the threads are knotted.  Pin the other side in the same place along the same line of the graph paper keeping it straight.  Place more pins JUST BELOW THE GATHERING THREAD all along the top. All pins should be angled upward.  I used the regular glass pins here since the top gather where the pins are will eventually be cut off (so pin holes will not be visible).
  8. Now start pinning the bottom edge using ‘Bug pins’ if you have them (if not, just use the thinnest pins you can find).  The bug pins leave almost no holes in the fabric when they are removed.
  9. Pin across the bottom pulling tightly as you pin. It helps to use strong tweezers or needle nose pliers.  Angle the pins downward as in the photo.  Steam the gathers with a steam iron.  It’s OK to get the fabric wet.  Let dry overnight then pull out the pins and carefully peel the ruffles off the wax paper.
  10. To attach the skirt, cover one side of the block with glue. Line the hem up with the work surface (“floor”) and glue to the block starting at the center front.
      Glue to the other 2 sides keeping the hem straight along the ‘floor’.
    Wrap the un-pleated outer edges around to the back side.  Flatten any ruffles so the last side is smooth.  It’s OK if it doesn’t meet in the center, this 4th side will be covered with the back piece.   Let dry a while (about an hour?).
     
  11. Trim off the gathering edge about ¼ inch above the block and glue the fabric over the edge of the block onto the top.
See my next blog for Part 2 - making the seat back of the slipper chair.  Enjoy!