Showing posts with label Christmas. Show all posts

Tuesday, January 28, 2020

Guys from Texas Room - More Tutorials - Vases removable Christmas Filler

This is a continuation of a recent project I'm calling "Guys from Texas Room Box".  I wanted strong colors - not my normal color scheme (pinks, pastels, etc).  But because it has such a prominent fireplace it had to be used for hanging stockings.  So my compromise was to make it Christmas sometimes!  So I made removable Christmas decorations.  Last blog I described the greenery sprays.  This blog I describe some vases or urns with removable fillers.


The porcelain vases were made by Ron Benson.

Here is how I made the removable fillers:
To make the decorations removable, I lined the vases with Saran Wrap.  I filled the bottoms with glue and silver beads.  I added sprigs cut from faux pine needles to the center of the beads and a couple of sprigs of the pine needles with glitter berries (previous blog).  I left the filling in the vases until they dried so they would keep the correct shape.  When dry I trimmed off all the excess Saran Wrap.


The key to making these look nice is using varying sizes of silver beads, including tiny ones, and filling in any visible bead holes with silver glitter.  Here is what they look like when removed from the vases (glue was not entirely dry when photo was taken):


Christmas Tree – This was just a purchased brush tree.  I coated the bristles with glue and ‘flocked’ it with railroad loose greenery.  You can find how to make many of the ornaments as well as the wreath hanging above the fireplace in my earlier blogs here.  Most of the round ones are just pearl beads with colored glitter dots (to look like those old fashioned ‘indent’ ornaments).


Some of the other items in the room:
Etched mirror by Arjen Spinhoven (Etsy)
Lamps -  Brooke Tucker (White Foo Dog possible future blog)
Chest by Neil Bateson
Black & White Staffordshire Dogs (on shelves) by Le Chateau
Crystal Christmas tree figurine on shelves – Iris Arc
Santa Candlesticks – artist unknown
Blue birdcage – the Kummerows
Brass Foo Dogs – artist unknown (Ebay from China)
Turned wood lidded vases – artist unknown

Glitter nativity in faux walnut shell – Kathy Christensen
Chairs by JBM Miniatures (recovered in new fabric)
Crocheted Christmas “thread dolls” – by Carrol Baker (Ebay)
Black Lacquer Worktable with painted scene by S & W Golland
Snowman Stocking – worked by me using kit by C.J. Originals
Blue “Snowy Village” stocking worked by me using kit by Janet Granger
Red velour stocking with bear - unknown
Painting above fireplace – Lyn Trenary (framing – future blog)
Ornament Wreath Tutorial - from my earlier blog here

I still have some more planned projects for this room – some sconces for above the fireplace and I also plan to finish the “foo dog” lamps and maybe change the beige wall color.  Maybe I will get it done for next Christmas??

Saturday, December 28, 2019

Guys from Texas Room - Christmas Greenery Decorations Tutorial


As promised here is the second installment of the ‘Guys from Texas’ room.  Below are mini-tutorials of how I made some of the Christmas Greenery for the room.

Greenery Sprays (including one with stocking hooks)– There are two sprays, both made very similarly.  One above the mirror (see photo above) and another on the mantel.  For both I started with very narrow wire greenery sold on spools at Hobby Lobby (see second photo below).  I made the base form by cutting and shaping the stems.

For the mantel one, to make it removable, I glued the greenery to pieces of plastic cut from grocery store clear plastic spinach cartons.  I glued the greenery and some wire stocking hooks with Quick Grab glue.


I thought the greenery was too dark so I lightened it by brushing on a mix of lighter leaf green and metallic green.


To the base greenery shape I added snips of artificial pine needles bundled together with glue.

Added small glue dots (using very fine glue applicator) and sprinkled with red glitter for “berries”.
Holly Leaves – cut from green paper using scrapbooking holly leaves punch.  Edged with light green paint and scored a vein down the middle with the back of an X-Acto Knife.


Placed a few of these leaves among the greenery then added ornaments (glittered beads).


That's it!  The stocking greenery just sits on top of the mantel and can easily be removed.  The hanging one above the mirror is held on with blue-tac and removed after Christmas.  Next blog I will cover how I made the removable vase fillers in the ceramic vases from silver beads and sprigs.

Well, I have achieved one goal this year - to do one blog post a month (well, actually I skipped a couple and doubled up to make up for it but STILL that is 12 posts for one per month AVERAGE!)  Whew!  Hope my readers have a wonderful New Year in 2020!


Wednesday, December 25, 2019

Guys from Texas Room


To my readers – I am so sorry I skipped November!  I was trying to have at least one blog per month and I missed my goal last month.  So I will make two posts before the end of the year!

The roombox that is the subject of this post was designed by Jon Fish and Larry Osborn (The Guys from Texas).  You can see many examples of their work on past blogs by Goodsam Miniature Showcase  and on pinterest.  They are well known for their wonderful resin molded architecture pieces, detail and accuracy.  They are also very generous with their knowledge.  Taking a class from them was an awesome experience.  Unfortunately we lost Larry this year (2019) but I think Jon is still doing miniature work.

The lovely lady who had taken the workshop and completed the original roombox was downsizing and donated this room to S.A.M (Society of American Miniaturists).  I snapped it up at their 2017 auction. What I love about it is the hidden room (behind the bookcase) and arched front.  It is also electrified and has a very nice fireplace.  Here is a photo of it when I bought it.

I wanted to re-do the room in strong colors – not typical of what I normally do (in other words, not pink!).  So I decided on a blue and green color scheme.  Here is the current design – still unfinished.

Since it has such a nice fireplace, AND that fireplace is so close to the front, I had to use it to display my petit point stockings.  So if it had stockings then it had to also be decorated for Christmas.  I decided to make removable decorations so I could put them up at Christmas time.  Here is the room with the decorations added:


So... I know these decorations are a little "overdone".  I am still working on this. I love the glittery nativity set on the wall but it is really too large for that space.  But I thought I would share how it is looking so far.  Merry Christmas to my blog readers!  Tomorrow I will post how some of them were made.

Wednesday, June 17, 2015

Some Christmas Pretties

I am about to update the photos at the side of my blog since the Christmas theme items have been there for a while.  But if I remove them I realized they can't be seen again unless I put them in a blog post.  So I decided to create this blog post for future retrieval.   These are all 1:12 scale.  Enjoy!


 (above) A collection of Christmas trees, wreaths and jars of ornaments I made back in 2012.  Some were sold on Ebay (I don't sell very often - just when I need to fund a trip or event).  The ornaments are ones described in an earlier blog here.


(above) A Christmas skirted table in silver, red and white theme made back in 2012 and sold on Ebay.

Another tree, wreath with "Mackenzie-Childs" theme.  The nutcracker is a painted metal miniature.  See the tree top ornament - it is made to look like the Mackenzie-Childs double gourd style tree topper and is made from a plastic bead (with painted checkers), a T-pin for the point and another gold tube bead.  I make the bows using a small block of wood with two nails as a bowmaker. Here is a close up:


Since this is June, I guess my blog readers are getting a little Christmas in June.

Thursday, February 27, 2014

More Belated Christmas - Diorama Ornaments & TUTORIAL

This blog is overdue.  In January I wanted to update my blog with some Christmas gifts I received and also some I made.  But, a grandbaby, miniature event and several other things have pushed this out so now I am getting it done (diorama ornaments follow below).

Christmas gifts from my sweet daughters:
Mixer from Chelsie & Brad
Ceramic vase from Cara (age 17)

My gifts to both of them were ornaments with scenes inside.  I was inspired by a friend who had shown me some she had made.  she had put cute quarter inch scale Christmas scenes inside a full size ornament:
Charlotte Serrold's Christmas Ornament

 So Charlotte inspired me to make some.   Here are the ones I made my girls.  They are not very traditional in colors but I made them to fit their tastes:
Chelsie's Ornament front
Chelsie's Ornament back
Chelsie's ornament has little dolls representing her (pregnant) self and her husband, Brad.  Also quarter inch scale cat and dog just like their own pets.  I reproduced her Christmas wreath and (loosely) the Christmas stockings Brad's mother made them.  The back of the ornament has a decoupaged scene cut from an old Christmas card.

Cara's ornament front
Cara's ornament side view
Cara's ornament in one of her favorite colors (purple) depicts her doing her favorite thing - sitting with a fire and a blanket with one cat on her lap and the other at her feet.  She also loves nutcrackers so I included a tiny one by the fireplace.

HERE'S THE TUTORIAL PART:


These ornaments were fun to make so I will just briefly tell how I decorated and filled them.  The papier mache ornaments were from Hobby Lobby.  I cut an opening in them.  The double round one was actually plastic underneath the paper mache so a little harder to cut.

I painted the inside with Gesso then two colors of glitter.  I cut a piece of foam core to make a base for the furniture to sit on.
The little figures were just pipe cleaner wrapped with silk ribbon and painted.  I used a small bead for the pregnant belly.

I used scraps of fabric to dress the 'dolls'.  Really just wrapped the arms and legs for sleeves and pants then cut tiny slits in another piece and worked it over the sleeves for the shirt.  Seams were glued down the back.

The sofa and chair were from a kit from Karen Benson


The little figures and chairs.  Quarter inch scale is not my specialty!


Here is a closer look at one of them.

These were fun to make.  I really want to do some more next year.  Hope you are inspired to try some too!

Monday, January 6, 2014

Have A Merry Little (Belated) Christmas


With Christmas now over I am behind in getting anything put on my blog for November or December so here is a belated mini scene for Christmas.  The tree is my interpretation of Mackenzie Childs Christmas tree.  The snowman basket was crocheted by my talented friend, Karen Haggard.  Chair is by Jack Cashmere.

We have a new miniature added to our family - my new grandbaby Landyn Scott born Jan. 3rd.  He is our first grandbaby and very precious!  In the last picture with his eyes open he is 3 days old!


Friday, September 20, 2013

Christmas Market Stall FINISHED!!

My market stall was a project from a NAME Day held in Saginaw, TX in July 2012 hosted by the Mini Endeavors club.  I finished the market stall back in May 2013 but am just now getting the photos uploaded.  In my last blog (actually 2 blogs ago) I promised that the next one would be some of the finished items.  Well, here it is.


Here are some close ups of the different sides:

Front right side of counter.  The ornaments were made from my Sept. 2012 blog tutorial.  I made the little partitioned box from scrapbook paper edged with a gold paint pen.  The Feather Tree was a project from the NAME Day event.  The stacked tree top ornaments are just beads stacked on a toothpick and lots of glitter.


Front left side of counter.  Victorian cones and ribbon candy under a dome were made by my talented friend, Karen Haggard.  She also gave me the pot of Christmas Cookie pops by Jen Tuttle of Miniholiday.  The soldier is a painted metal miniature.  I made the tray of cookies and ornament under a dome.

Lower front: I dyed the pink Christmas Tree and painted the smaller one white.  All the ornaments and tree toppers as well as the ornament wreath were made from similar techniques mentioned in my earlier tutorials.  The Merry Christmas crate was donated to the NAME Day by Through the Keyhole dollhouse store.  It contains several tote bag items from the event.

Its hard to see but the items on the shelves are:  Top shelf - large nutcrackers are from wine glass charms.  Smaller ones are painted Metal Miniatures.   Middle shelf - Boxes of ornaments including some reproduction "Shiny Brite" ornament boxes from one of my favorite Ebay sellers, Sue's Little Things. Bottom shelf - Glitter house village which I put together from a Carol Kubrican kit (True2Scale).


The left side of the stall has hanging candy items mentioned in my August 10 2013 blog.  The red and white stocking was one of my earliest miniatures purchases from way back in the 1980s.  I wish I knew who the artist was.  The two net stockings were from Lori Ann Potts of Mustard Seed Miniatures - also vintage but purchased recently.  I modified them by adding items inside the socks and adding a paper card and string.


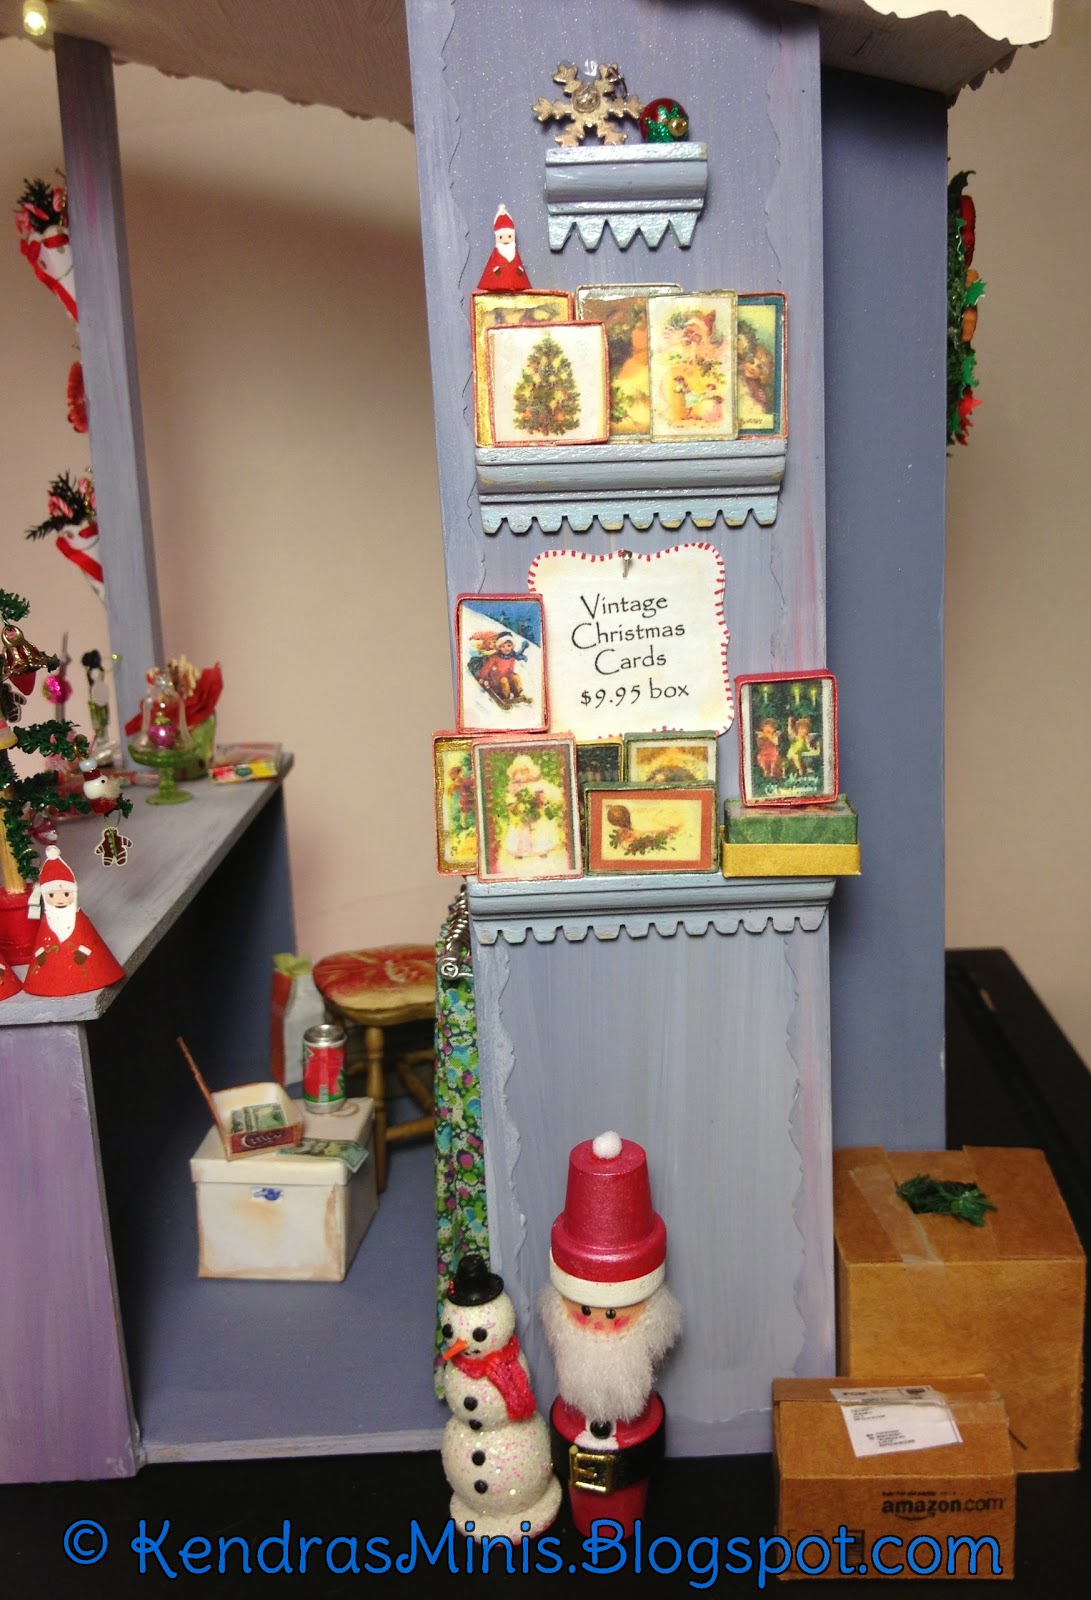
 The right side of the stall:  On the shelves are boxes of Christmas Cards made from some printies provided in the NAME Day tote bag by the late Donna Aldrich.  I wrapped blocks of scrap wood with a strip of folded antique looking scrapbook paper then glued on a card cutout and a thin film of clear plastic cut from a packaging blister.  The flower pot Santa & snowman were projects from the NAME Day event.


Inside the stall I put a little area for the stall owner to sit.  The curtains were described in an earlier blog.  The little stool is the bottom half of a Chrysnbon chair with a chair pad added.  The little filing box is just a block of balsa covered with a metallic gift wrap and a staple for a handle.  The Happy Meal was a tote bag favor.  The little box of ribbon candies (on the counter above the Happy Meal) is another item from Sue Ayers.

Well, glad that I have finished one project...only a hundred more to go!