Showing posts with label Curtains & Drapes. Show all posts

Monday, April 23, 2018

Tutorial: Window Shades, Tie-Back Draperies & Rods with brackets

Side One of dome - Long Drapes with Shade
I have done a couple of blogs on curtains.  I will give a reader’s digest version of the two window treatments I used in this project.  This project is a dome with a wall in the middle of the base.  Since I was doing an interior scene on both sides of the window, my window treatments had to coordinate – I didn’t want to see one room’s curtain from the other side of the window.  So I decided I had to put the shade on both sides.

Shaped Shade
Side 2 of Dome - Two layer Shade (no drapes)
This fabric covered shade (Side 2 of dome) is two layers - two pieces of index card, each covered with a different fabric.  I covered the striped one first, clipping the curves and folding the clipped tabs to the back (sorry, I didn't photograph that step).  I used Crafter’s Pick Ultimate Glue.


Then I cut a second index card about ¼ inch shorter.  I covered the shaped edge first (bottom edge).  Then I placed it on top of the striped one (already finished) and wrapped just the side tabs around to the back attaching both layers together.  This was glued into the window frame.

Back side - floral fabric wraps around striped fabric card
On Side 1 (long drapes side) I put a simpler version of the shade with only 1 layer of fabric.  Since both shades are the same size and shape, each one covers up the back side of the other.

Long Drapes
For the draperies, I started with a piece of fabric about 11 by 6 inches. 


I ironed a wide hem at the bottom (about 1-1/2 inches) and top hem of about ½ inch:
After folding hems (hems were not glued)

I used the largest Pretti-Pleater (one inch scale) to pleat the fabric.  You can see some fusible interfacing in the photo but I didn’t use it until after I pinned them.

  Next I sewed jump rings between each pleat.  You can see them in the next photo.  I think they were about ¼ inch (8mm) in diameter.
Pinning - pliers used to pull down for pinning

Next I pinned and steamed them to get the swag shape (like they were pulled back with tiebacks).   It’s best to pin with the curtains and rings already on the rod.  That way it will hang nicely just as you want it to on the wall.  I placed a bamboo skewer through the rings and held it with pins.  My pin board was a wax paper covered ceiling tile board with graph paper under the wax paper.

This next step is a little tricky.  In general, you want to keep the outer few pleats on each panel straight (pin them) and re-shape only the inside pleats (inside = center where they would draw open).  I usually use the thin bug pins (especially with fine, thin fabric) but this time I just used glass head sewing pins.  Bug pins make smaller holes but are harder to work with since they bend so easily.  Method for shaping the swag:
  • Starting with one of the panels (let’s say the left one as an example), pin the OUTER EDGE (Left edge) straight down from the ring to the bottom to secure it so the pleat will stay in place.  Be sure to put at least one pin right in the center, where the tieback will be.
  • Now put a pin into the INSIDE edge just BELOW where the tieback should go.  Sort of drag the pin and pull fabric up and to the LEFT, pinching the fabric together where the tieback will be.  Secure the pin into the board, pinching the pleats together tightly against the outside edge (center pin - bent one in photo).
  • Now try to arrange the pleats BELOW THE SWAG – use pins to sort of smash them together and pull each one straight down and pin so they look natural (tweezers or clean needle nose pliers help).
  • For the swag above the pinch point, just use a pin to move and arrange the pleats so they look nice.
  • Repeat above steps for the other panel.  When done, the bottom hems should gently angle up and to the center between the panels since the center was pulled up and is shorter than the outside.
Two hints to make these more scaled and realistic:
Hint #1 – Pinch them very tightly at the place where the swag is (middle).  Make it as small as possible there.
Hint #2 – don’t let the bottom sections fan out, try to keep each side of the panel parallel to each other.  Real drapes hang straight down from the gathered area. (though you can see in later photos mine did fan out a bit after a while because I hadn’t secured them yet).

After you steam them (yes, this is the second time now!) and let them dry, secure the pleats on the back either with lightweight white cardboard – cut to fit and glue to back, or iron on fusible interfacing.  I added tiebacks from velvet ribbon with silk roses glued on.  Even if this shows through to the other side of the window, the backing shouldn’t be too noticeable since it just looks like a white lining.

Drapery Hardware – rod, finials and brackets.

Supplies: bamboo grilling skewer (grocery store), decorative head pins for finials, tiny screw eyes, 1/16th inch thick scrapwood (I used two widths, one about ¼ inch wide and another a little smaller), blue painter's tape.

Tools: X-Acto knife or razor saw and miter box, sandpaper, pin vise and wire drill bit to match finial wire, stain or paint, glue (I used GS Hypo Cement), wire cutters, drill to match size of screw eye.

Here are the pieces in progress:
Finished rod and supplies; bottom: finger drill for screw eye hole
Rods are cut from bamboo skewers.  Sometimes you have to sand them a little because they have long splinters.  I cut them using my X-acto knife. (HINT: cut it at least ½ inch longer than you need to give yourself some room to fit into the brackets – you can trim off extra after it is painted).   I drilled a little hole in each end for the finial wire using a wire drill bit in a pin vise (tool for holding small drill bits while you drill).  It’s not as hard to drill into the cut end of the stick as you would think.
Finials – I used “fancy” head pins that you buy in the bead store.  They have a decorative end.  I just cut the pin down to about ¼ inch to fit in the drilled hole (wire cutters).  DON’T GLUE them into the rod until you are ready to hang as you will have to remove one of them to hang the drapes.

Blue Moon Head Pins:
Blue Moon Head Pins

Brackets – I layered two tiny (about ½ inch long) pieces of flat wood trim, or scrap wood about 1/16 inch thick.  I glued a smaller piece on top of a larger one.  I drilled a hole with a finger drill, #64 for the screw eye (or eye pin).  (Finger drills can be purchased from Micro-Mark but you can also use the pin vise).  I screwed in a very small screw eye to hold the rod.


I painted the rod, finials and brackets and eye pin with a gold paint pen (Krylon) because I’m too lazy to clean out a brush.  But it’s convenient!

How to hang:  Dry fit rod and curtains and mark (blue tape works great) where the brackets will go.  Trim the rod shorter now if needed (you will also have to re-drill the hole).

Glue brackets on the wall and let dry.  Glue one of the finials in its hole, fit the rod through the bracket.  Then thread the rings on the rod.  Place rod through the other screw eye and glue the other finial on.

See my other blogs on curtains, drapes or draperies (I used different keywords) if you need more detail.  I was a little brief in this post.  Now you have no excuse not to have curtains in every project!
 Here is a sneak preview of my next tutorial - coming soon:

Thursday, December 28, 2017

Reversible Draperies Tutorial - Part 1 (measuring, cutting, joining widths)

Just before Christmas I diverted from minis to my “big house” (the one I live in).  I wanted curtains for my dining room for the holidays.  I couldn’t decide between all the beautiful fabrics so I thought I would try to make a reversible drapery – with two different fabrics (it was still hard to narrow it down!).  I thought it might work because I was needing stationary panels (ones that just stay in place and don’t get pulled across the window).  The “lining” side could be a second fabric and I could just turn them around when I get tired of the front fabric.  So… it worked!  There were a few tricks I had to do to make them reversible (see the tutorial below).
The face fabric I chose with the pinch pleats (toile) is called “Villa Tuscano Toile” in Tangerine by Ronnie Gold.  On the “front” (orange toile) I made double pinch pleats instead of triple.

The ‘lining’ side is called Elton by Kaufmann in the color “Yolk”.  On the 'lining' side you can see  the  “inverted pleat” – it’s actually just the back of the pinch pleat!  I plan to reverse to the yellow side for spring and summer.  The Elton fabric is a loose weave but very lustrous when you see it up close, which I can't capture in the photos.


I didn’t use drapery hooks but instead sewed the rings into the pleats hiding them somewhat.  That way I don’t have to keep removing the hooks every time I turn the curtains around making lots of holes in the fabric.

The tricks I used that are different from regular lined drapes are  1) both the front and lining panels are exactly the same width (usually the lining is smaller) 2) making both hems aligned evenly with each other; 3) sewing in the rings instead of using hooks and 4) instead of folding the fabric around the header tape I just sandwiched it between the front and lining fabric with a seam across the top.  These fabrics were thick enough to make pleats without the extra folded layers.
See below for how to make reversible draperies. 

PART 1 TUTORIAL FOR REVERSIBLE DRAPERIES:
My measurements: Tangerine Toile – 27 inch vertical repeats, I cut 5 repeats (125 inches)
Elton Yolk needed 10 repeats for 125 inches; finished length 111 inches, 7 pleats plus 2 end rings for 9 rings total each 1-1/2 width panel)

Helpful tools: a 6 inch wide see-through quilter’s square, yardstick, water erasable fabric marking pen

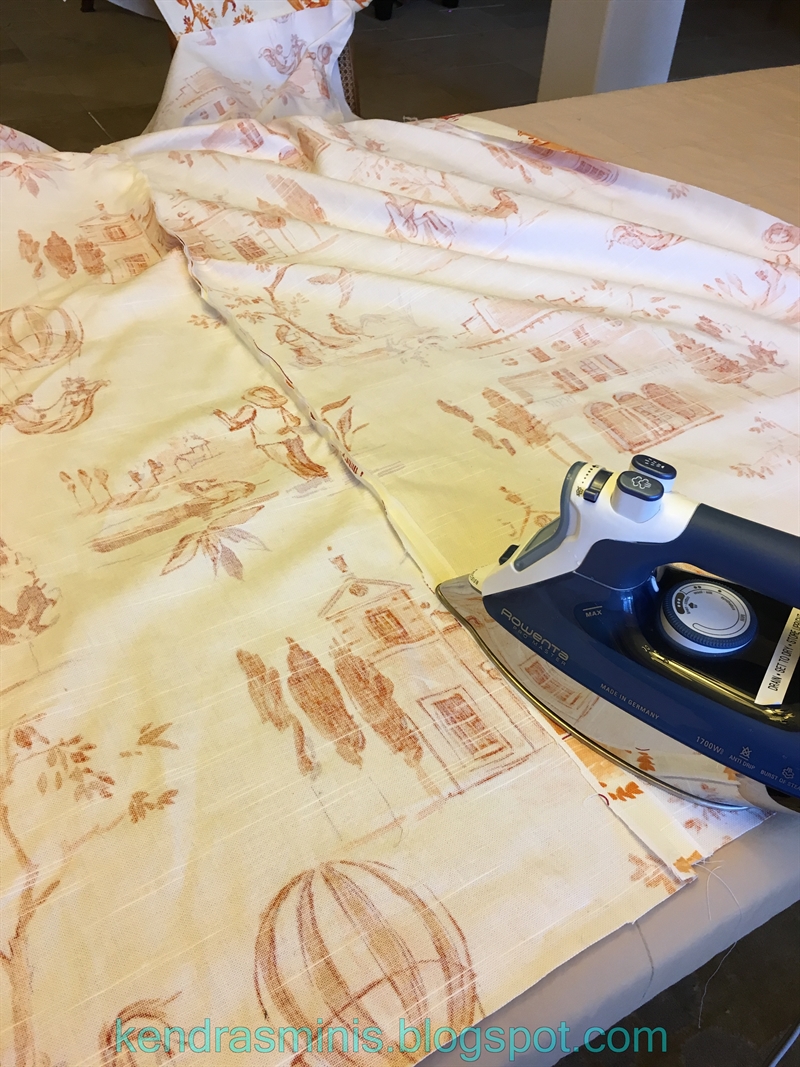
Working surface: I put all the leaves into my dining table, covered it with a blanket and pinned the blanket below the table (Note I wasn’t careful with the steam iron and raised the wood grain of my table so don’t make my mistake!!)

Notions: Drapery heading, 4 inch wide (paper type non-woven buckram, “header tape”), pins, needle and thread for basting, drapery rings – the kind with a double ring (one smaller for sewing onto the panels and one larger for going over the pole), drapery rods.

A.    MEASURING:
  1. When buying fabric that has a large vertical repeat (10 inches or more) buy at least 1 extra repeat for each cut (for 4 panels, buy at least 4 extra repeats).  Most home décor fabrics only sell in full yards so take into account.
  2. To figure how much length to cut for each window panel you need consider: a)  The finished height you will hang the curtains (usually measured to the bottom of the rod if you are using rings). b) The vertical repeat of the fabric. c) Add 8” for hem (double 4” hem)  d) Consider also the drapery rings.  Since I didn’t consider this my panels were all too long, a happy mistake since I wanted them to break on the floor just a little.
  3. For final yardage, consider whether you want double or 1-1/2 widths (1 width being 54”, for most home-décor fabrics).
  4. Measure and mark fabric with water erasable fabric marker
  5. Measure and figure out how to cut and match seams for the ½ widths.  I figured out how many repeats I needed for each panel length then cut all panels with the same number of repeats starting at the very same spot in the design.  Trim off any extra (or work it into the top or bottom hem). Then every panel will match up exactly with each other when joined and when hung.
B. CUTTING – VERY IMPORTANT before you make your first cut, STRAIGHTEN the edge.  If you don’t do this every length you cut after this will not be straight.
  1. Line up a quilter’s wide square ruler or an L-square against (parallel to) the selvege.   Place a yardstick 90 degrees against the lower edge of the square, near where you are going to trim the fabric.  Check that the design is straight against the yardstick (but it may not be).
  2. Mark along the yardstick with a WATER SOLUBLE fabric marker.  Cut on the line through both thicknesses. 
  3. Now you can measure and cut your panels using the measurements (# of repeats) you have calculated.
C. JOINING WIDTHS:
  1. DON’T TRIM SELVEGES YET!  You will need to see how the pattern matches up first; sometimes manufacturers extend the design a little bit on selveges for overlapping seams, so don’t trim it off until you have decided how to seam it together.
  2. To cut the half widths, fold fabric in half lengthwise and cut down center fold to make a half width.  DON’T SEAM THE WIDTHS AT THIS CENTER CUT EDGE – LET IT BE THE SIDE HEM!!
  3. On some printed fabrics there are registration marks, or even copyright symbols along the selvege that can be used to match widths at the right spot for the side seams, so you can match the design.
  4. Match up the full and half widths together selvege to selvege instead of center to selvege (to take advantage of the extra design for overlap on the selvege edge).
  5. Seam full and half widths together matching design then trim off selveges.
  6. Iron the seams open flat.  It will look so much nicer when they are done (and very professional).

In Part 2 I will tell how to seam the two sides together and finish the draperies.  Here is another photo of the front and back of a panel:

Thursday, December 18, 2014

Tutorial - Drapes or Curtains from Vintage Hankies


Can you sew on a button?  Then you can make these curtains.  Don't let my wordiness or the pinning and steaming deter you from trying this.  It is much easier than it looks, especially since old hankies are so soft and easy to gather.  It was hard to photograph these drapes installed because I put them inside a glass sided lantern display and had to shoot through the glass (you can see my phone in the reflection).

Supplies:  For the pinning board: Ceiling tile from Home Depot or Lowes (the acoustical type made of some sort of pressed cardboard, ask to buy a single tile), graph paper with 1/4 inch squares (here is a link to print if you don't have it on hand: http://www.printfreegraphpaper.com/gp/c-i-14.pdf), wax paper and masking or duct tape.

For the curtain panels: antique hanky with lace trim, twist jump rings about 1/4 inch or 8mm diameter, needle, matching thread, steam iron or clothing steamer (or spray bottle of clean water, no soap!), silk pins or bug pins AND T-pins or heavy sewing pins, a bamboo skewer or section of coat hanger (rod) that will go through the rings, 5 or 6 large plastic beads (double the ring size), Deft spray sealer or unscented hair spray.

Make the pinning board:
First, if you don't have one already, make a pinning board.  Don't use the tiles with a impressed pattern or frame pressed on it - you need a flat surface.  The textured type (with lots of irregular holes) should be OK.  Cut the tile if necessary to 1 or 2 feet square.  Place a piece of graph paper on the tile lining it up with two edges.  Cover the graph paper with wax paper wrapping it to the back and secure with tape.  Here is what mine looks like after years of use (the white shapes under the wax paper are left over pattern pieces from some past drapery project).

Prepare your Hanky:
For the drapes in the photo I used two very old hankies.  Both had wide lace around all four sides. 

If they are really discolored you can try to wash them.  I suggest you try it first on one hanky that you don’t care about – just to make sure it doesn’t ruin the lace.  I washed several hankies in Oxy Clean powder.  Just run hot water into a bowl and sprinkle the oxy-clean (about ½ scoop) into the bowl so it dissolves.  Then I just soaked the hankies overnight.  It might not get rid of all the discoloration but it will brighten them somewhat.  I found it to be very gentle on the old lace.  When done soaking, rinse them in cold water and squeeze them gently (don’t twist or ring!).  Then roll them up in a clean towel and squeeze the towel to absorb most of the water. 

Make sure your iron is clean.  Even if you THINK it is clean, use a presscloth (I use an old pillowcase).  It's OK to iron them when they are damp as long as you're using a press cloth.  Iron the hankies and the lace on low to medium heat.  Choose the direction you want them to hang (or cut them down to avoid stains, holes, etc).  

For one of my panels I removed the lace from two opposite sides leaving lace only on the top and bottom.  On the other I removed only one edge of lace leaving it on three sides, including the swagged side.  You can see the difference in the photos.  I just cut very close to the hem where the lace was attached keeping the original folded hem intact.  The lace you cut off can be reused for tons of projects (towels, pillow edging, photo albums, etc).  DON'T THROW IT AWAY! (That would be a sin!).

Sewing the Rings
For the top of my panels I folded the lace over to the front of the panel (since my hankies were much too long for where I wanted my curtains to go).  I just tacked on rings  with 3 or 4 stitches each, spaced about 3/4 of an inch apart along the top fold.  I knotted between each ring but didn't cut the thread, I just put the needle through the top hem to the next ring location. I ended up sewing on 11 rings per panel.  My rings sometimes had a gap where it didn't come together (see in photo by my thumb) so on these I rotated the ring so the gap was at top and put some glue on the stitches to keep the ring from rotating back down and coming apart from the stitches.


Pinning the Drapes into gathers:
Next, put the rod through all the rings of one panel.  Put the large plastic beads on the skewer (rod) at the outer edge of the panel to hold the rod away from the pin board so the rings won't smash against the board. Using T-pins or heavy sewing pins, pin the rod to the board along the grid lines so that the panel is lined up close to the edge of the pin board and far enough up from the bottom to allow the panel to stretch in length when pulled down.  Pins should be angled up so the rod doesn't pull off when pulling down on the lace.  You need the heavier pins to hold the rod up since you will be pulling on the bottom of the drapes while pinning. (Sorry I didn't take a photo when the bottom hem was pinned in place - below is after steaming and some pins still in place)


Slide the rings and the beads to one side until the panel is the width you want for your finished curtain.  Pin the outer rings so they won't slide apart. Keep the beads near the T-pins to hold the rod away from the board.  Now gently GENTLY pull on the bottom lace and pin it in place using thin silk or bug pins.  Don't worry about the swag or curved side yet!  Just try to get both sides to look natural as if hanging straight.  Pull pins out and re-adjust them as needed easing the fabric so it looks evenly gathered.  Put pins top, middle or bottom as needed but at least at the bottom.  This is trial and error and I usually remove and repin a lot.

Now if you wanted both sides to be straight move on to the next step.  If you want one side to be swagged -- as if held up by a tie back follow these steps:  Remove the pins from the outer 4 or 5 pleats while keeping all the others intact. (If you think you need more 'swag' then you can remove more pins).  Pick a place, a little higher than 1/2 way down and put a pin in the fabric on the side you are pulling back.  Pull that pin, still poked through the panel, slowly up and angled away from the outer swagged edge.  Stick it in the board.  Now using fingers or a tweezer, pull on the fabric above where the pin is and shape the folds into gentle curves. Keep arranging and re-pinning as necessary until all folds in the curve are smooth and follow the line of the swag. 


Now for the area UNDER that pin (the one that will be the tieback).  These pleats should hang STRAIGHT DOWN from the tieback (photo below, RIGHT side), not bounce away from the panel (like the photo below LEFT side - it needs to be re-pinned and re-steamed).  Re-pin the bottom hem where you removed the pins to swag it.  They should look something like the photos.

RIGHT side looks more natural; LEFT is too wide
 Steaming and Spraying:
When you have your panels how you like them us a steam iron or clothes steamer to steam the folds in place.  If you don't have either of these you can wet the panels with a spray bottle (clean water) and let them dry totally.  When dry spray with Deft (brand) Matte varnish or UNSCENTED hair spray (Aquanet works).  This is a tip I learned from Judee Williamson.  Thanks, Judee!!

Below is a photo of the finished curtains inside the lantern display. One panel is longer because that hanky was a little bigger so I just let it 'puddle' on the floor.  You can see the difference between the one with lace on the swagged side (right) and the one with lace only on the top and bottom (left).


Friday, October 5, 2012

TUTORIAL Christmas Market Stall - Skirt (Curtains with curtain rings)


I love to make modern curtains with sewn on rings.  I also love to incorporate fabric wherever I can into my miniatures.  The obvious (and probably only) place to do this in this project was to make a skirt across the back to cover up the shop owners “junk storage”.  I usually use the d. Anne Ruff Pretty Pleat 1 to pleat the skirt then I also pin it to a pin board and steam it so the pleats aren’t so uniform (and unreal looking) as they can sometimes look with the pleater.  What I don’t have a photo of is how I measured, cut, hemmed and pleated my curtain sections.  

It’s real simple, though.  For the width I measured across the back of the stall and multiplied it by 2 for skirt fullness.  Then I added about 1/4th inch on both sides for a side hem.  For the height, I measured how tall it should hang allowing about a quarter inch drop for a rod and rings.  To this height I added ½ inch (for a quarter inch hem top and bottom).  I kept it as one long piece, ironed a hem on all 4 sides, pleated it in the pleater (using instructions that come with the pleater) then I cut it in half so it would split down the center of the storage area of the market stall.  After cutting it down the center I ironed the two front edge hems.  You can glue the hems lightly if your fabric isn’t the type that spots.  I didn’t glue mine. 

Now that the skirt has been pleated I sew on the rings.  THIS IS REALLY EASY BELIEVE IT OR NOT!  The reason it is easy is you just use one length of thread running through each pleat and ring.  The rings are not individually tacked on.  See the photos for how this is done.


Sewing the rings:  For the curtain rings, I just used jump rings that were less than ¼ inch wide.  First, knot the doubled thread and start through the TOP BACK of the skirt through the folded top hem about 1/8 inch down from the top.  Then sandwich a ring between the first two pleats, placing the ring at the BACK of the pleat.  Run the needle through next pleat, then add another ring, etc. 
 
Keep poking the needle through rings then pleats until you have 4 or 5 rings.  You might want to pull your thread all the way through by then as the rings and pleats are stacking up  (pull your thread to the back of the curtain, always keep your thread to the back).  Just keep doing the same thing all the way to the last pleat.

When done it should look something like the photo above.  You will have a ring sewn to the back side of every pleat at the top of the curtain (of course I'm holding it upside down above).  It may take some practice to keep the rings a uniform distance from the top edge of the fabric but the pinning & steaming step will somewhat make up for those differences.  When the rings are all on, BEFORE KNOTTING THE THREAD, adjust the width of the top hem by squeezing the rings together or stretching them out on the thread, according to how wide you want your finished curtain to be.  Then knot the thread at the back of the last outside pleat.

 
Thread rings onto your rod (I used 3/32 inch aluminum tubing found at the model section of Hobby Lobby) through all the rings leaving it long for now so you can pin the curtain in the next step.


Pinning and Steaming the pleats:  Use a pin board (piece of ceiling tile with graph paper on it covered by wax paper taped to the back with duct tape).  You will also need a steam iron (that doesn’t drip, set on “steam” setting), a few ball head sewing pins (preferably glass head) and, if you have them, those tiny thin bug pins (get size 0, size 000 bend when you use them) from laboratory supply stores.  The ‘bug pins’ prevent the pinholes from showing after pinning & steaming.  The graph paper under the wax paper will keep your curtains straight.

Secure your curtain rod on both outer ends of the curtain and in the middle (between the two curtains) with a few strong pins, keeping the rod aligned with the graph paper.  Pull at the bottom of an outer edge pleat and use a ‘bug pin’ to pin it in place straight down from the top ring (use graph paper to align). Try to keep the outer edges from spreading out like a fan.  After pinning the outer pleat, work toward the center pinning the bottom of the next pleat, through the folded hem, adjusting the pleats so they look natural.  Usually I remove and re-pin several times before I am happy. 
When all pleats look the way you want, steam them (pass over a few times pressing the steam shot button if you have one) and let them dry.  I sprayed mine with acrylic sealer to keep them from spreading out again after I hang them (since they won’t be glued to anything).

This is as far as I got.  I set my curtains aside to install them later after I get some of the other construction problems worked out.  I will figures out a method to mount them and Blog you later! (Update - see finished curtains in my Sept. blog here, last photo)