Showing posts with label Mini Needlework. Show all posts

Wednesday, December 19, 2018

Dome Project - Mott Miniature Workshop Manual & Lithograph Dollhouse

This is the last installment of the "Dome Project".  This entire year, a total of 8 blogs for 2018, has been dedicated to tutorials from the two sided "Dome of My Own" club project - another SAM (Society of American Miniaturists) day long project (see links to join).  Next time (2019) I will have a new project to describe.

1/144 Scale dollhouse, “Patricia House” and Book Review, Mott Miniature Workshop Manual


This 1/144 scale dollhouse was a project found in the Mott’s Miniature Manual.  It isn't open in the back, and there are no furnishings, very simple and fit the need I had for being viewable from both sides of the window. 

A little about the Mott Miniature Workshop Manual.  I recommend this book for anyone who likes to build and wants to learn a lot of techniques.  It is a wonderful old book chock full of awesome, unique scratch-built furniture projects.  My copy was published in 1978 but I know there are newer versions out there.  There are no photos of finished projects, except for those on the cover but there are very nice diagrams and patterns along with instructions and nicely printed brightly colored graphics for decoupaging several of the pieces.  Some projects are more involved and require some un-common woodworking techniques (such as lathe-turning and scratch made cabriole legs).  Among the projects is a French Harpsichord (with strings and lovely graphics to decoupage).  If you happen to find a copy, make sure all of the graphics at the end of the book are un-cut.  I photo-copied the graphic for the little dollhouse so I wouldn’t have to cut it out of my book.

The little dollhouse is called “Patricia House”.   Instructions start on page 193 and the graphics for it are all found at the end of the book.  Most parts are cut out of 1/16th inch thick basswood to which the graphics are applied.  I left off the 'tower' on the left side so it would fit on the window sill (see diagram below):

I will warn you that I had to read through the instructions a few times and mark the pattern pieces so I could understand it.  There were more little pieces than I anticipated.  Here is what the original graphic looks like in the book (section marked “10-B” in photo).

I modified the dollhouse to be shallower to fit in the window sill (photo below, I used only the narrow portion of the side pieces).  I also eliminated the “tower” section (since it was too wide) and the porch posts since the back of the love seat would interfere with them.

For my final step, I added some gold highlights with a fine paint pen to the scrolly sections of the dormer and door and window frames.  I think it turned out kind of cute, something like those old Bliss litho type houses.

A Little Bit About the Other Items in this side of the dome:
Settee / Love Seat – this was made in a workshop taught by Jeffrey Steele back in (eighties?). 
Draperies, shelf niche cutouts – see links to my January (shelf niche) and April 2018 (draperies) blogs.

Dolls on shelves – Three of the four are by Angel Children.  The one with the little bed was a recent show purchase by Almundena Gonzalez.

Dolls on sofa – three on the left were estate purchases with no known artisan.  The knitted doll is actually a topsy-turvy doll, one that turns inside out with a different character inside and was made by Helen Palenski.  The pink sock monkey was by a dear friend, Janice Shaw, with whom I recently was a member of a swap club.


Doll on floor under sofa in a crocheted basket – purse was by my bestie, Karen Haggard.
The little teacups are Chrysnbon, painted by me (maybe a future tutorial??).

Next blog – hmmm.. I want to start another multi-installment project but maybe something short and quick in-between would be best?  Here are some options for the next blog.  I will see if I get any comments that suggest which should be next:
  • Skirted party table
  • Mini-kitchen
  • Teacup Pincushion with painted Chrysnbon teacups

I will probably not blog again until after the new year so Merry Christmas and a Happy, Healthy New Year to my followers!

Kendra

Sunday, December 9, 2018

Dome Project - Silk Bolster Cushion Tutorial

Almost done with the Dome project.  I have another group of related projects that I am excited to start when I have wrapped this up.   Below is a tutorial on making the silk bolster cushion on the couch.  Next blog I will describe how I made the 1/144 scale dollhouse in the window behind the loveseat.

This project involves a little hand sewing (but not much!).  You will need:
  • Small piece of aquarium tube 1/4” diameter by 1-1/8” long.
  • 2 Piece of flannel or white felt, about 1-1/2” by 2-1/2” long for padding
  • Fabric scrap, about 2” by 4”
  • Ribbon for bows, thread, needle
  • Fine needle-type glue dispenser/applicator with Sobo fabric glue or Crafter’s Pick Ultimate.
  • Scissors
  1. Roll the flannel around the tube.  Overlap and secure with overcast stitches.  Trim off even with ends of tube.

  2. Make a glued hem by folding up one short end of cover fabric and securing with a fine line of glue.  Roll the fabric around the tube starting with the raw edge (unhemmed) and ending with the hemmed edge on top.  Glue the hemmed edge down.

  3. With needle and thread, run a gathering stitch around one end, just beyond the end of the tube.  Do the same on the other end.  Pull the thread gathering the excess fabric.  Poke it into the tube with the end of a paintbrush.  You can tie off the threads and secure with a little glue.  It shouldn’t show once you have covered the ends with a ribbon bow. 

  4. Make a bow with multiple loops.  I use myBitty Bow bowmaker (see link in the sidebar) to make a 6 loop bow.
    The ribbon used here is hand dyed, from “Trenway Silks” which I purchased at a local Austin needlework store (or maybe it was Dallas?).  The color is “Pink Peony”.   I love the hand dyed ribbons - they give a nice, variegated color. 
  5. In this last photo you can see how I assure my ribbon tails don’t fray. 
    I put a little glue on my finger and just brush the forked tails across it.  If using Crafter’s Pick Ultimate glue, I rarely see any discoloration or staining of the ribbon with glue spots.  To shape the bows so the tails face down I just pinch the loops in the direction of "gravity", so they all "fall" nicely toward one direction.  Do this while the glue is damp.  You might have to hold them in place for a minute or two.

Well, that was a short one!  One more installment then on to the next project!

Tuesday, October 2, 2018

Tutorial - Decoupaged Desk

More about the two sided dome project.  I won a blue ribbon at a S.A.M. (Society of American Miniaturists) event for this project (there were only 7 entries so good odds!).  In this blog I will describe the rest of the items in this side of the dome including the desk.  The painted rug, window shades and slipcovered chair were covered in previous blogs.

The desk is a modified Robin Betterley “Lydia Pickett” desk kit.  The original desk was too deep to fit inside the dome so I sawed off about ¾ inch from the back of the desk top and used the cut off piece as a shelf over the window.
I painted the entire desk with a pale shabby pink color then applied a wallpaper to the legs, desk top surface and inside of the hutch compartments.  The legs were pretty easy since I had a pattern in the area of the wood where the laser cut leg piece was punched out.  I just used the open area as a pattern to draw the shape on the wallpaper.


After applying the paper, I ‘aged’ it with diluted burnt umber paint.

Other items in this side of the dome (made or embellished by me):
The sewing machine is a 3D printed item from “Mini Etchers” (minietchers.com).  I added painted details in blue.  This was very bumpy and I had to sand it a lot.  It still didn’t look very smooth after several sandings and coats of paint but the design was good and not too much like the common ones you find on Ebay (“Aztech”).

The framed bulletin board is a Metal Miniature frame (metalminis.com; their Catalog Item #461-A) which I painted.  The zipper and needle packet on bulletin board are from Vilia Miniatures. 
Pink clock is Metal Miniature #934a which I painted and added a clock face.
Left of the clock is a pill capsule dome containing two Ilisha Helfman (hestiahouse.com) buttons and belt buckle suspended on a piece of lace with green bow.
Right of the clock is a boxed pincushion in a Chrysnbon teacup.  At the right end of the shelf is another pill capsule dome with a silk ribbon rose on a metal stud base.
Left of the sewing machine is another metal miniature dish (metal minis catalog item #90) painted to look like Majolica with tiny ‘pins’ (no hole beads and short cut pieces of fine brass wire for pins).
Tote bins on floor – another kit from Robin Betterley.  I stuffed with fabric and trim scraps.

Other items from my collection:
Glass vase with beaded flowers next to pincushion (unknown artisan, a show purchase).
Bowl of notions at right of the sewing machine was made from mini Easter cards sewn together with thread by Karen Haggard.
Crocheted sewing basket  -unknown artist. This can be seen in the very first photo at the beginning of this blog.  I mounted it on a stand  (part of a House of Miniatures candle stand kit)
White and blue sewing basket on shelf – unknown artisan, estate purchase.
Petit Point picture “Sunbonnet Girl” above shelf – by Ligia Durstenfeld (in faux bamboo frame I made, here LINK)
Buttons in round frames above window – Ilisha Helfman (hestiahouse.com).
Doily by Suzane Herget in wood frame.
In my next blog I will focus on the other side of the dome - the side with the sofa and tiny dolls. I will also include a tutorial on the silk bolster pillow and the 'lithograph' dollhouse in the window.  Hope you enjoyed these little tidbits!


Tuesday, December 22, 2015

Blue Egg Antique Shop - Interior and Sign Tutorial


It’s been a long time since I last blogged. I promised to show some more items from the interior of my antique shop (which I will, below) but first – I wanted to tell how I made my “Blue Egg Antique Shop” sign.

Shop Sign (mini) Tutorial:

The egg shape was cut out of foam core. I printed the words using Microsoft Word and WordArt (see file here):

Antique Shop Sign Word_Document

WordArt is a program embedded into Microsoft Word that allows you to change the angle, stretch, squeeze, etc.  If you have Word you can use the above file and just edit the letters, colors, font, etc.

I glued the lettering to the egg and added a few 'shadow' strokes in brown then painted a light blue (sort of dry brushed) around the outside of the egg leaving the inside white. To cover the foam core edge I glued on a flat gold braid.  I cut a small gold foil 'Dresden' decoration (see Ebay) in half and glued it to both ends of the egg.

The fancy rectangle frame is from metal miniatures (metalminis.com – see others described below). I usually wash, dry and spray all metal minis with a flat white spray paint before painting with acrylics. This frame was painted with gold acrylic (Decoart brand “Emperor’s Gold” Dazzling Metallics). After that dried I antiqued the frame with antiquing glaze (also acrylic – sold with the acrylic paints in craft stores). To use the antiquing glaze you paint over the entire frame then quickly wipe off with a paper towel. I have to admit the frame really looked like an antique gold frame when I was done. Be careful not to antique before the first coat of paint is very dry or it will just rub the first coat off.

I filled in the back of the rectangle with just cardboard painted blue then glued the egg right on front of the frame.

Now for some interior photos promised last JUNE! (sorry) 


On the left side of the shop is a desk and wrapping paper holder (to gift wrap all those purchases).  The desk was purchased but I think it was a laser kit. On the shelves:
Top shelf - several figures purchased on Ebay
Middle shelf - two bowls made from filigree findings painted shabby pink, lamps from ceramic beads, a tiny painted metal elephant (Metal minis #368 sm) and a purchased pitcher.
Bottom shelf - two painted shabby candlesticks (metal minis # 684) with added bobeches from jewelry findings, Elaine Cannon doll in dome (vintage).
Center post - two petit point silhouettes (Ebay) framed with faux bamboo frames (see my earlier blogs).

In the CENTER section of the shelves:
Top Shelf  l to r- cruets made from glass beads (Spanish Miniatura magazine), painted platter (metal minis # 47), porcelain "Aladdin" teapot.
Middle Shelf - so many clocks, most are painted metal (see item numbers below).  Two smaller ones near front are made from findings. (Metal Minis clocks back row left: gold #934A, center gold #85, right beige/blue vase #100.  Front row left center small blue #934X, right gold alarm clock #426 lg, blue alarm clock #426 sm).
Bottom Shelf - gold leafed frame (metal minis # 463), lamp from bead, painting and Kummerows bird cage.
Center post (right) - framed signs, top one is metal minis # 806A, the other one I don't know where it was from.

Right side of shop, shelves:
Top Shelf: salt & pepper from beads (a tote bag item from this event), Staffordshire dogs - painted metal minis #725.
Middle shelf: Chrysnbon decanter set and bowl of flowers
Bottom shelf: elephant figures (Ebay), finch egg with glass elephant (made by me years ago).


On and around the chair:
The petit point rug was an estate find.  It was unfinished so I rolled it up and put a price tag on it.  The petit point picture on the wall was by Ligia Durstenfeld (60 count) framed in faux bamboo.  The chair was also an estate purchase - I added the skirt and padded seat.  The box I made using Microsoft Word and printed on heavy paper. I also wrapped the packages.


Front Window Display:
Tatted doilies were made by my friend, Karen Haggard.  Another pair of Staffordshire dogs - painted metal minis.  The swan planter is also a metal mini.  Other items were show purchases or Ebay.  The house under the dome is by Sylvia Mobley on a pedestal by  Eurosia.  The glass bird dome and blown glass goose were Ebay purchases.  Brass bird cage is a vintage Kummerows piece.  Plate was purchased on Etsy from A Lavender Dilly.  The canister with bird nest inside was made from plastic tubing and a button top.


Last photo - the door and one more metal miniature: frame #767 (Open sign).  The shop hours sign was a tote bag item.

Better late than never (getting back to my blogging).  I'll have one more mini tutorial from this project on how to make the tiny price tags and a plate stand hint.  Thanks to all those of you who follow my blog and for your nice comments, too.

Merry Christmas!

Kendra


Wednesday, June 17, 2015

Tutorial - Faux Bamboo Frame


This is a fairly easy  method of making a antique looking frame appropriate for even your nice petit-point picture or sampler.  It is unique, not manufactured looking.  You will need to be able to paint thin lines but the method eliminates the need to have a steady hand and it doesn’t have to be straight!  There are two methods – notched corners and butt joint (easier).  Both result in a nice hand made antique (sort of Tramp Art) look.

Materials:
Small dowels, toothpicks or skewers (extra long toothpicks - grocery store)
Acrylic paint, Burnt Umber or very dark brown
Folk Art (brand) Antiquing Medium (Hobby Lobby or craft stores)
X-acto knife with new blade
Artwork to frame
Small scrap of matboard (from an old frame)
Very tiny paintbrush (10/0 or similar)
Larger round paintbrush (5 or 6 round or similar)
tacky glue


Faux Bamboo Paint Technique:
For this project you want very tiny rings but you want them dark.  Squirt a little Burnt Umber paint on a plastic yogurt lid (or other palette) and put a tiny drop of water beside it DON’T MIX THEM YET!
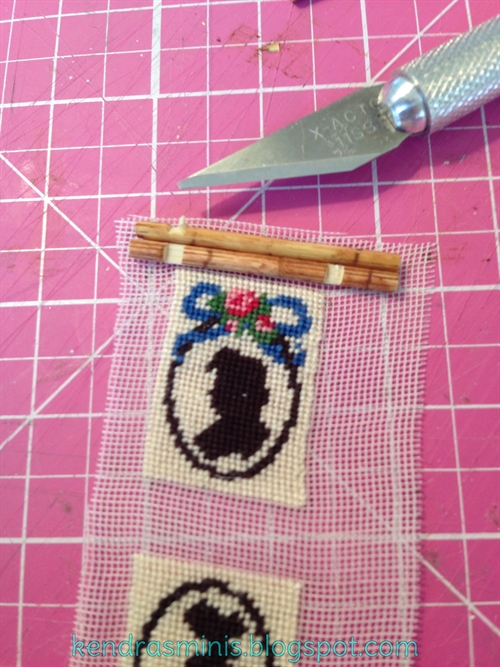

Paint the Rings: Practice on one toothpick: Get your tiny brush (10/0 or so) wet with paint.  Hold the toothpick with one end touching your work table and the other end with your thumb and index finger so you can gently roll the toothpick in place while painting the rings.  Try first with paint directly from the bottle for your first ring around the toothpick.  If it skips or seems too dry, mix in a little water – with trial and error you will find the best mix that flows smoothly while making the thinnest dark line.  (It must be dark so it will show through the ‘antiquing’ step).

Continue making rings all along the toothpick about 3/8 or ½ inch apart.  Do all your toothpicks (enough for all you want to frame). 

Comparison of steps - rings, speckles, antiqued (top to bottom)


Paint the Speckles: After the rings are done, paint tiny speckles between the rings – using 2 or 3 tiny dots (tiny as possible but dark enough to show up when antiqued).  Twist your toothpick and make sure you speckle all sides so no matter which side is up you can see rings and speckles.

Let dry thoroughly (15 min or so).

Close up of speckles and antiqued skewers


Antiquing: With your larger brush, cover the toothpick with a sort of thick coat of antiquing medium.  Because these skewers/toothpicks don’t absorb very well, I let it sit 30 seconds or so.  Then wipe off gently with a dry paper towel (not wet – it will take off too much).  Again, use trial and error to determine the time needed for the look you want.  Let dry thoroughly (the antiquing medium takes a while to dry – 30 min?).  If you decide you want it darker, wait until it is thoroughly dry before you re-coat or you will just take more of the glaze off.

Antiquing

Framing:
Mount your art:–  For mounting petit point or needlework, I used mat board scraps which I made thinner by splitting and peeling a few layers off the back.  Then I wrapped the excess silk gauze around to the back and glued it.  If you don’t want to put any glue on the actual needlework, glue the back of the mat board to a slightly larger (by the width of a toothpick) piece of index card or fabric.  Then (later) you can glue your frame to that and no glue has to touch the stitches.

If you are framing  a paper picture, consider if the mat board is thin enough by laying the mat board next to a skewer.  The skewer should be slightly thicker.  If necessary, peel some layers off the back of the mat board.

Notched look – first cut the lengths:  For a notched frame (criss-cross at each corner), cut the four pieces of painted faux bamboo so they extend ¼ inch on each side of the art (total of ½ inch longer than the side of the art).  To cut the sides to length, use your X-acto knife with a new blade (these skewers are very hard).  On your cutting surface, gently roll the toothpick while cutting.


Make the Notches:
 (Note that when making the notches, the cuts should be deep enough to feel them (when you slide your knife across the bamboo) but NOT go all the way through.  The goal is to remove a small notch of wood halfway through the thickness of the toothpick.  You will be making two notches on each side of the frame.  Both notches on each piece of wood will face the same way. 

Lay one cut bamboo piece against the art, centered along the side you are framing, and mark with the X-acto where the first notch should start (right up next to the art).  This mark should be kind of deep, so you can feel it and find it again.  Then, about 1/16 inch away from that, toward the end of the bamboo make another cut, deep enough to feel it.  Pull the skewer away from the art and deepen each cut a little (CAREFUL!  DON’T CUT THROUGH!!).  Remove the notch between the cuts by slowly and gently twisting the knife TOWARD THE CENTER OF THE SKEWER.   Keep cutting and removing until you think you have a notch about half way through.  Repeat for the other notch and for the other 3 sides of the frame.  When you have all 4 sides each with 2 notches, dry fit the notches together so they overlap and see if you need to enlarge or clean them up a little.  (mine were not exactly half way through so  two sides were a little higher than the other two after the frames were done – I was afraid to notch them too much and risk cutting through).
Positioning of notches

Match notches on opposite side pieces


Now is the time to trim the ends if they are not even or if you just want the overlap to be smaller.  Also you can touch up the ends of the bamboo with a little antiquing medium.

Glue frame pieces to the art (or to the backing piece) weight down and let dry.

Un-notched or Butt Joint method:  (see photo at beginning of blog)  Cut the shorter sides first.  Glue the shorter sides to the art, right against the edge of the mat board (its thickness is enough to hold the bamboo frame).  Clamp these if you want.

When dry, cut the longer pieces so they extend beyond the first pieces as much as you like.  Glue the last two frame pieces up against the mat board and the other bamboo pieces.  Again, clamp if desired.  When dry touch up the ends of the cut bamboo with antiquing medium.

Frames hung in my Antique Shop


Sunday, August 3, 2014

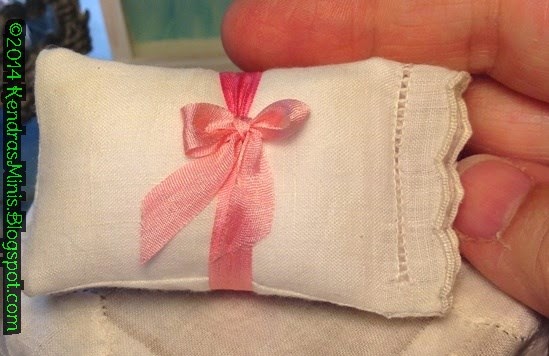
Tutorial - Miniature Pillows & Pillowcases from Antique Hankies (Part 1)

Recently I purchased some lots of vintage hankies on Ebay and was amazed at how nice the embroidery and cutwork can be – nicely scaled for miniature pillows, tablecloths, pillowcases!  How these ladies of bygone eras were able to make such delicate designs on such wispy fabric is beyond me.  It was so hard to cut them up, too.  Just think, how many tears were dried on these hankies – maybe by someone who lost a loved one to a war or buried a child.  One hanky I found among my grandmother’s things after she died I just couldn’t cut up.  But it’s nice to know these old hankies can be made into another type of heirloom – miniature dollhouse pillows and pillowcases!


Part 1 - Make the Bed Pillow Inserts (pillowcases in a following blog)


General Supplies needed:

Glue (Crafter’s Pick Ultimate works best and doesn't soak through fabric)
Metal ruler
Mechanical pencil
Sewing Machine
Fray Check (found at fabric and craft stores for sealing raw edges)
Index card (for patterns)
Tweezers or an orange stick for turning pillow inside out

Old pillowcase or man’s hanky (for bed pillows)
Polyester fiberfill stuffing
Ball headed sewing pin
Matching thread
Ribbon for trim (optional)

General Hints:

Fabric – I used men’s hankies (solid, no embroidery) or old cut up sheet or pillowcase for the bed pillows.  I used the embroidered or cut work hankies for the outer pillowcases.  These can be found on Ebay in lots for sometimes $1 each.  Look for “cutter” in the description (indicates holes or stains so they are cheaper).


Sewing on sewing machine:  You can get unbelievably tiny stitches using your machine (I learned this from Judee Williamson).  Here are my tips:
  • Adjust and your tension on your presser foot so your thin fabric doesn’t wad up.  Test stitch on scrap sheet or pillowcase fabric.  Also if you are having trouble with the leading edge getting pulled into your machine while starting or reverse stitching, just don’t reverse.  Hold the threads back behind the edge before starting and sew a little past where you want.  You really don’t need to tie threads because the seams will be fray checked and you will be clipping the seams anyway.
  • use a stitch length of 1.6 mm if you have a setting for millimeters. If not, test stitch on some scrap pillowcase or sheet fabric to get small stitches that look about like this:
 -------------------
  • Sealing edges – I used Fray Check (found in fabric and sewing stores) on clipped edges but you have to be careful when using it on very thin, delicate hankies not to get it past the seam line.  It will make a line (sort of like a water line) on sheer fabrics.

OK, now comes the "How-to" part:
Bed Pillows (pillowcase inserts)
  1. Cut a “Bed Pillow” pattern out of index card – 1-1/2 inches by 2-1/8 inches.  You will use this pattern to mark the sewing lines in the next steps.
  2. From an old sheet or pillowcase, cut a piece of intact fabric about 5” x 5”.  Fold in half.
  3. With a light pencil mark, trace two pillows onto the folded fabric using your pattern.  Space them as in the diagram below. (make sure marks are dark enough to see them while under your presser foot but light enough they won’t show through when turned). 
  4. Dotted lines show where you will sew (wavy lines are loose thread ends).  Sew on your pencil lines (don’t leave an opening for turning).  No need to back stitch or knot (you will see why later - using glue and Fray Check).
  5. Cut between the two pillows.  On one of the short ends of one pillow, clip sewing thread near the center of the 1-1/2 inch sewn line (for turning).  Remove about 3 or 4 stitches either side of where you clipped but leave the thread tails.  This is the opening where you will turn the pillow later.  DON’T GLUE THIS OR FRAY CHECK THE THREADS.
  6. Trim all sewn seams to 1/8 inch (yes, this is very small but do it!). 
  7. (Trust me on this step – it seems like you are clipping too close but it will work and make a very sharp turned corner).  ON THE TWO CORNERS WHERE TWO sewn SEAMS CROSS: cut diagonally across each corner leaving only a few fabric threads next to the seam (photo below).
  8. Clip again narrowing the 1/8 inch seam near that corner you clipped (next photo below).  This is to eliminate bulk so your corners will be nice and sharp.   KEEP THE FULL 1/8 in WIDTH OF THE SEAM IN THE AREA WHERE YOU WILL BE TURNING IT INSIDE OUT!  YOU WILL NEED THIS TO CLOSE THE PILLOW!
  9. On the other two corners where there is a fold, clip close to the seam right at the corner removing the bulk from the seam (like the above photo except the one side would be a fold ).
  10. Put Fray Check on the cut edges of the fabric (both layers) all around the pillow (if you don’t have Fray Check you can use a thin line of glue VERY THIN!)  Try NOT to let the fray check spread past the sewing line, into the inner part of the pillow where it might show.
  11. Put a tiny dot of glue on the two corners where the two seam lines cross.  Put dots of glue also on the other two corners where seam crosses the fold (put glue on the line of sewing on both front and back of pillow – 8 dots of glue total on each pillow).
  12. Now QUICKLY BEFORE GLUE DRIES turn the pillow inside out through the hole made when you removed those stitches.  If you have to make the hole a little larger that’s OK.  Just try not to go as far as the corners so they will not be messed up.  Use tweezers or an orange stick or anything EXCEPT your scissor points (you will cut the fabric) to poke and shape the corners sharp.  It will work though it seems impossible.  While that glue is still wet you need to get your corners fully turned and as pointed as possible.  Use a ball headed sewing pin if necessary to pull the folds near the corner on the outside.
  13. Stuff with a LITTLE stuffing (they should be fairly flat like an old pillow).  Push some stuffing into each corner, including the two by the opening.
  14. Neatly fold the edges of the opening to the inside creasing where the seam used to be (you might be able to see the old seam from needle holes).
  15. To close the hole you can either slip stitch by hand or fold the raw edges inside and put just a little glue in the opening and pinch closed (my favorite method).  I think gluing is more invisible (In the photo above the top pillow shows a sewn seam and the bottom one has been sealed with glue). 
That's it!  They get much easier as you make more.  Your first ones might not be perfectly square or maybe the corners won't be very pointed but you learn as you go (as with anything worthwhile!)

Next blog - the pillowcases!