Showing posts with label Kitchen. Show all posts

Monday, September 27, 2021

Tutorial: Kitchen Cupboard Hardware - French Country Handles and Knobs

French Country Kitchens may not be as popular as they once were but I still love the style.  In fact, I'm REALLY thinking about updating my Brooke Tucker Kitchen in a more modern country style...(doesn't everyone renovate their dollhouse displays???)...but I digress.   Here is a tutorial for making drawer pulls and knobs that would be great for French Country but also, any style.  The upper cabinet knobs are supposed to simulate those “bird cage” style popular with French Country (handles or knobs with a hollow basket look). It's so hard to find nice hardware that doesn't look manufactured - that's why I like to make my own.  Also I think it can be more delicate and scaled when made from scratch.

 Drawer Pulls

Supplies:

  • Fine wire, about 24 gauge
  • Scrap wood about 1/16th or 1/18th inch thick (wire bending jig)
  • Straight pins or sequin pins (for wire bending jig)
  • Seed beads, a couple different sizes
  • Eye-pins from commercial drawer pulls (such as Houseworks #1124 Batwing pulls)
  • Hand drill and Wire drill bits to fit your wire and eye pins
  • Wire cutters
  • Spray paint (and acrylic paint same color for touch ups)
  • Super glue

First, make a bending jig with pins and the wood scrap, drilling holes using the pin vise (hand drill) and tiny drill bits.  You can see the measurements and spacing of the pins from the photo.


Cut the wire into small lengths – about 2” long and wrap around the pins to make the “U” shape (narrower spaced pins face down in these photos and form the bottom of the "U".  Thread on beads in a pattern you like.  I put one larger seed bead in the center with two smaller seed beads on each side (for a more hollow "birdcage" style use a filigree bead in the center and flatten it to more of a tube shape first).

Glue these in place with super glue.  Then glue on the two eye pins as in the photos.  Finally glue on the upper beads that will hold the eye pins in place.  DON’T CUT WIRE YET.

Spray paint this assembly and let dry.  Then cut the wire just beyond the upper beads.  You will touch up the cut off wire after gluing them to your cupboards.

Drill holes in your drawers to match the spacing of the eye pins.  CAREFULLY Glue the eye pins in with super glue (they may fall off easily because they are very thin).  Then use acrylic paint to touch up the cut off wires.

“Bird Cage” cupboard knobs

Supplies:

  • Metal filigree beads, 4mm (I used Darice brand)
  • small crimp beads – about 1.3mm inner diameter
  • brass head pins
  • Spray Paint
  • Super Glue
  • Hand drill and Wire drill bits to match your head pins

These are very simple.  Just thread a filigree bead onto the head pin followed by the crimp bead.  Glue with super glue and let dry.  Spray paint and cut off the wire.  Drill a hole and glue in.

Here is a photo of the kitchen I used these in. 

The kitchen cabinets in the photo above were kits from B. H. Miniatures (I think)?  Upper cabinet doors were backed with nylon netting that I spray painted black (to look like chicken wire).  I faced the drawers with molding (might have been door/window trim).  The stove was a workshop I taught some years ago (2008?).  The counter tops are just printed photos of granite glued to illustration board and glossed with Mod Podge.  I hope you enjoyed this little tutorial!  I will stew over what to post next month.  It may be simple since my daughter is getting married right before the time when I usually make my monthly blog post!

Friday, March 26, 2021

Tiny House Kitchenette Part 2 - Microwave and Stove Burners

This is a continuation of last month (Feb. 2021) Kitchenette Part 1 which described how the open cabinets and appliance doors were made.  This post will describe how to make the microwave, stove burners and counter top.  The stove burner 'drip pans' extend below the surface of the counter through a hole cut in the counter (kinda hard to see in the photo above).  This is to make it more realistic and dimensional.

As was done for last month, there is a downloadable instruction sheet:

[click here for Kitchenette Part 2 Downloadable file and pattern sheet].
 

A few tips and notes from the instruction sheet.

Supplies - these are listed in the linked file.  The Perler beads can be found at any craft store (or Target).  The washers were purchased at Home Depot (instruction sheet gives sizes needed).  The long curved tube beads used for appliance handles were purchased from Ebay (came from China).  Sizes of these are also in the instruction sheet.  Here are some photos of some of the parts used:

Perler Beads (burner knobs)

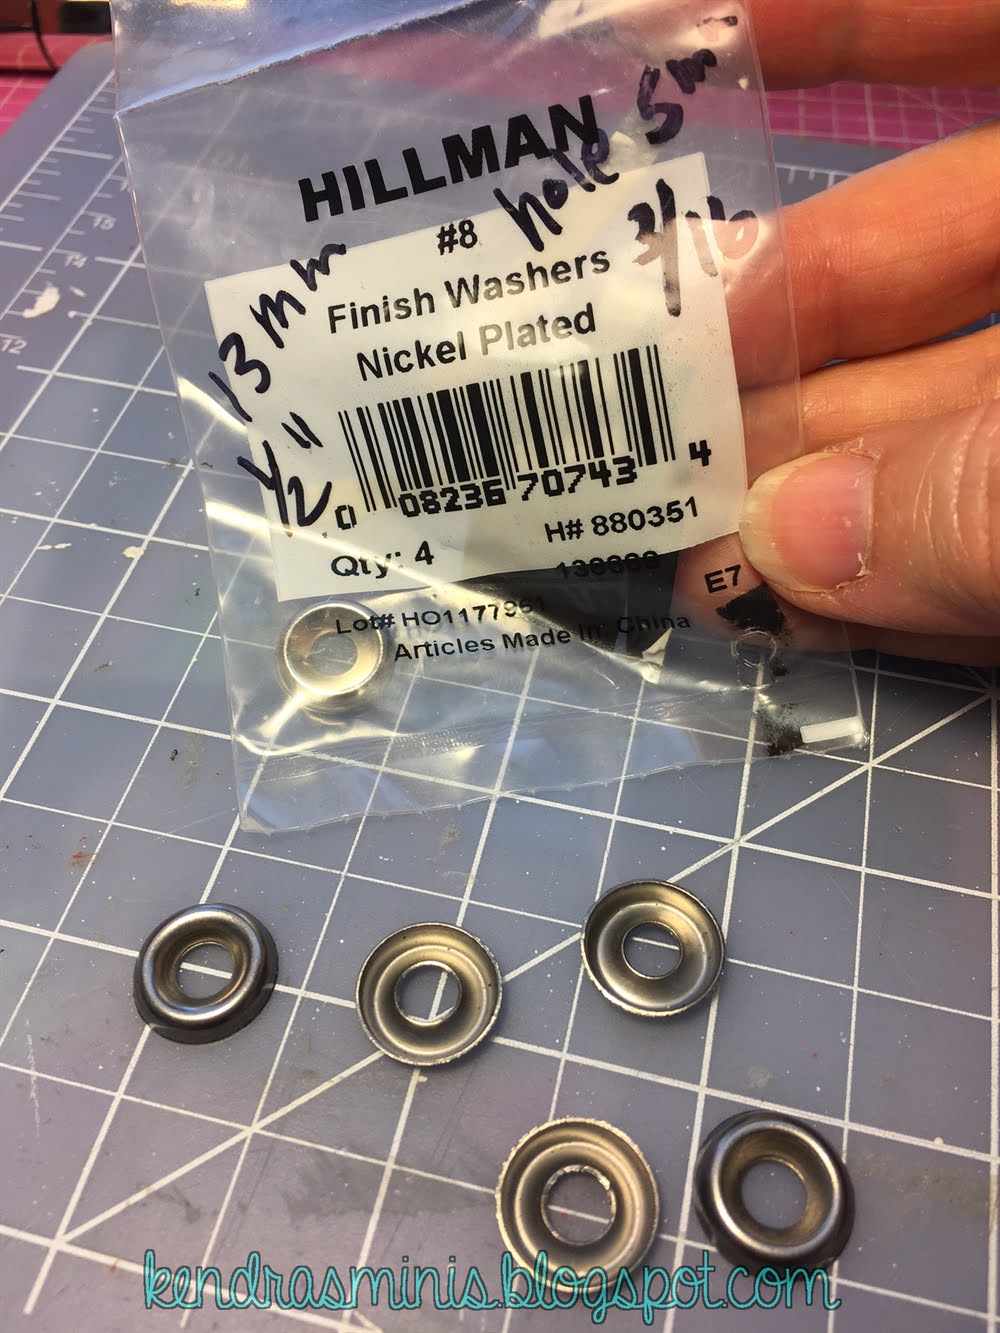
Cup Washer (or "Finish" Washer) - burner drip pan

Star Washer (internal teeth lock washer) for stove burners

Microwave handles were made just like was done for the refrig door but I used a little smaller bead, 2 mm by 20 mm.  Here is how they looked in the package (from China).  The larger beads at bottom of photo had been sanded so the ends were at a point for better fit against the frig door.  But I didn't do that to these smaller beads.

Tube Beads for appliance handles

All the instructions are in the file (see link above) but here are a few main points about making the Microwave:

  • It is basically a wood block with a faux glass door made from clear plastic glued to one side.
  • Wood block can be any kind of scrap wood.  My husband cut mine from a pine 2 by 4
  • Microwave is glued between two shelves then the back of the microwave is glued to the foam core wall.  This made it easier to 'hang' the shelves since the microwave  supported the shelves.  At least this was the intended design for simplicity (remember this was a group project for 85 people).  I changed the design for my own prototype and split my shelves around a window (photo below). 

A few points about the Stove Burners:

  • The burner base is a piece of plastic painted silver with two half inch holes
  • Burner pans (silver cup washers) are glued UNDER the holes
  • Burners (star washers painted black) are glued OVER the holes
  • The entire thing is set into an opening cut in the counter top so the burner pans sit below the surface of the counter


Sink – this was a square shaped tub from Sponge Bob "Krabby Patty" candy sprayed silver- refer to old blog (March 2020) for sink and faucet.

Here is the tiny house kitchenette finished (below).  Because I wanted a window over my sink, I cut my shelves in half and put the microwave on one side of the window.  I also added a third shelf.  Since it is hard to mount heavy things to foam core, I mounted the individual shelves (left of window) by gluing a separate piece of wood (same as shelves were made of) between them.  That piece of wood served to space the shelves equally and was what was glued to the wall. You can also see another spacer above the microwave which attaches the third shelf to the microwave shelf and wall.


Next time...??  What shall we make?

Sunday, February 28, 2021

Tiny House Kitchenette - Part 1

Here is a tutorial for a mini kitchen – a kitchenette from the Tiny House project (subject of most of my blogs for 2020).  The Tiny House was a group project that my club sponsored as a day-long workshop for members.  The kitchenette was designed to be simple (so it could be taught to 85 people in about 2 hours), inexpensive and compact (it was for a tiny house, after all!).  It is basically a short wall of open shelves, lower “cabinets” from foam core and has all the necessary appliances. In that tiny space it has a 2-burner stove, microwave, refrig and dish drawer (dishwasher).  I think some of the techniques shared here could work for travel trailer (think Airstream!) and Gypsy wagon type miniature projects too.

The sink and faucet were the subject of my first post on this project back in March 2020 (click here for link to Sink Faucet Tutorial).  For Part 1 of the Kitchenette covering the cabinet base and appliance doors, most of the instructions and photos are available in this downloadable file and pattern sheet:

[click here for Kitchenette Part 1 Downloadable file and pattern sheet].

Since I had made up these instructions for the event it was just easier to modify them for this blog post rather than uploading all the photos to the blog.  Here’s a summary of the important points if you decide to try to make this kitchenette:

Lower “cabinets” – these are just open shelves of foam core.  Construction is basically just one long piece of foam core scored and folded.  Then the center dividers and bottom are glued in.  If you want, you can add your own cupboard doors but due to the simplicity and small size of our project, we didn’t include doors or drawers.  The front edges and area under the sink were trimmed (disguised) with thin wooden coffee stir sticks.

Appliance doors – For the frig and dish drawer – the doors are made from foam core and covered with a vinyl film that looks like stainless steel.  There are several different companies that make a product like this.  One is by ConTact brand.  The one I used for this project is made by Cricut.  See photos below.  It is not the "removable" kind that I see carried by Michael's.  I don't know if the "removable" product will work - I just haven't tried it.  Here is what I used: 


 Here are my very important tips for covering the doors with “stainless” film:

  1. The narrow edges of the doors are covered in four separate strips of silver film.  You might think it will be a great short cut to just fold the film over the edges but this is a mistake.  Eventually it will bubble up.  Trust me I have done it many times.  The stuff doesn’t like to be folded (I even tried scoring the fold with the back of an X-Acto and it still won’t stay flat and square where it was folded).  
  2. Glue film to the narrow edges of the doors but DON’T put any glue on the front of the doors.  Even though it has an adhesive back, it needs the extra glue for the edges to stay stuck down.  But glue will make lumps on the smooth front so use the film’s own adhesive there.
  3. Any little spec of dust or dirt will be very visible as a lump when the film is laid on it.  Use scotch tape to remove any particles before applying the film to the door front.


Finished Refrig Door

For the handles of the appliances, I used some long curved silver tube beads.  Because I had about 300 of these to make, I ground down the ends to an angle using my husband’s grinding wheel so they would fit more flush against the front of the door.  But if you don’t have a grinder you can use low grit sandpaper (like 150) or just pinch the tube ends with pliers to make them flatter.  I ran a piece of wire through them and poked the wire into the foam door for a little more ‘grab’ than just glue alone.

Well that covers the hardest part of the kitchenette.  Next blog I will tell how the microwave and stove top were made.  Here is a photo of my finished kitchenette in the tiny house:


Tuesday, March 10, 2020

Miniature Kitchen Faucet Tutorial for the Dollhouse


This is a simple project.  Some of the supplies are not common but if you can find them this is a simple and pretty realistic kitchen faucet.  This was designed for a miniature “tiny house” project.  That may sound redundant (miniature tiny house…) – but it is a 1:12 scale Tiny House, like on all those HGTV shows.  I hope to share more tutorials from the Tiny House in upcoming blog posts.

Supplies:
  • Thick aluminum beading wire, about 2mm in diameter or 12 gauge– jewelry wire (found at a bead store)
  • Metal crimp bead, about 2.5 mm (should fit over the thick wire)
  • Cone shaped bead, about ½ inch tall, that has a hole big enough for the thick wire to pass through (might also be able to use cone shaped cord end caps)
  • Plastic cylinder bead, “perler” type bead.
  • Rhinestone Sequin pins  – Look for these at Hobby Lobby where you find the sequins.
  • Silver spray paint (Rustoleum “Aluminum” finish was used)


Tools & Glue:
  • Wire cutters
  • Ruler
  • X-Acto Knife
  • metal file (round “rat tail” file or square file)
  • Clear bead glue (GS Hypo Cement or E6000)

Cut a piece of the thick wire about 3-1/2 inches long.  Bend one end around something round – such as the small end of an X-Acto knife or a paint brush handle – to make the neck of the faucet an appropriate size.
The “base” of the faucet is a cone shaped bead.  You will put both the faucet (wire) AND the “handle” (plastic sequin pin) down into the hole as in the photo.  I had to use a metal file to sort of ‘carve’ a little groove in the side of the cone bead hole so the sequin pin would fit in.


Check to see if the Perler bead will show when inserted over the BOTTOM of the wire up inside the cone.  If it shows, cut it in half with an X-Acto knife.  Slide it over the thick wire and push it up into the cone then glue in.  This is just to keep the wire centered inside the cone.  It shouldn’t show on the outside.  Glue the "handle" (sequin pin) near the top of the cone, at the side of the faucet.

Add crimp bead as spout

Left - unpainted; Right - painted
On the curved ‘spout’ slide a metal crimp bead to just cover the cut off end of the wire.  If necessary, use the metal file to smooth the cut off end so it will slide on.  Glue on with bead glue.
When dry, spray paint the entire thing silver.  The extra wire at the bottom will go through a hole drilled in your counter top to hold the faucet steady.

Bonus!  Want to know what that sink is made of?  It is a candy tray from Sponge Bob gummy “Krabby Patty” candies.  Look for them at Halloween and Easter at the dollar stores, Walmart and HEB (Texas Grocery stores).  After Halloween you can get a pack of 18 for $1.  Be sure to wash the candy tray out well and dry it then spray with Aluminum paint.  I sprayed the OUTSIDE of the tray.


Above is the "kitchenette" for the tiny house with the faucet and sink.  Hope to share some more tiny house projects in future blogs.

Wednesday, October 30, 2019

Kitchen Project - Final Touches (and some mini tutorials)!

 
This is the last post on the Kitchen Project that began last March 2019.  I'm going to tell how I made the counter, hanging shelf and the little painted stool.  Then I will give resources for items that I didn't make and close up photos.  One thing I still want to do is give the frame some sort of finish but I haven't decided on that yet. 

Kitchen Counter
Below are photos of my paint colors and practice.  My goal was not realism but more 'fantasy' stone look in colors to go with the green cabinets.  I just layered the colors in the order listed and made streaks in the last two colors.

Close up of counter - right

Close up of counter - left

Wall shelf (right side of kitchen)
This was a vintage kit by The Kummerows (I think) purchased from Ebay.  The kit (called "Intricut") made two shelves, one larger (the one I finished) and a small one (you can see it still on the leftover kit sheet).  The instructions were to use a jewelers saw (2nd photo) to cut away the printed blue areas.  I must say I was a little intimidated to try to use this saw but it was a little easier than I thought it would be.  If you have a chance to find one of these kits my advice is to not be afraid to try.  It turned out really nice.  I used a teak oil finish because I wanted it to not be shiny (like polyurethane).


Finished shelf

Painted Stool
The hardest thing about this stool was how to glue the legs so they would be at an angle and sturdy enough to not fall apart.  The stool was made from a 1 inch wood disk, four porch spindles and some scrap wood.  I made two jigs from scrap wood.  One was glued to the bottom of the round disk to glue the legs against.  It was a thick square piece, about 1/8 inch thick.  I 'carved' a rounded area on all four corners using a rat tail file.  I also drilled holes into the disk so the legs would be slightly inset.  I used a second jig with holes drilled for the bottom of the legs.  The second jig was not glued to the legs - only used to hold them at the right angle while glue was drying.

After glue was dry I decoupaged a purple floral design to the top and painted the legs with acrylic paint.
Photo showing jig #1 glued to under side of stool
Photo showing jig #2 for legs (bottom)

Finished Stool

Other items in the photos:

Close Up - Mackenzie-Childs style canisters and Pitcher
 
Left side of kitchen
Upper cabinets - vintage purple transferware tea set by Jean Yingling (Ebay purchase)

Left Wall - fretwork tray by Gary and Carrol Elmer (GWE-CHE).

On countertop: Mackenzie-Childs style wicker canisters (made by me), Soap pump bottles by Wilhelmina Johnson (gift).

On stool  - lavender plant by Alice Guhl (show purchase).


Right Side of kitchen
Upper Cabinets - Purple Chrysnbon decanter and goblets (Ebay); grape pitcher by Valerie Casson (Ebay);  lavender rim plate by Ron Benson (Ebay); lavender platter by Janet Uyetake

On countertop: floral pitcher by Karen Haggard, meatloaf in progress with tiny readable recipe by Lyn Latimer (show purchase).

On shelf: Salt and Pepper grinders (click here for tutorial).

Close up of "meatloaf in progress"
This was another fun project and I am grateful to the S.A.M. organization and specifically the wonderful Houston area clubs that designed and made the kits for SAM.  Can't wait till the next one (February 2020 and my Austin club is in charge!!)  What theme will we pick?  (Here's a hint: there are a lot of these TINY things on TV shows!!)

Hope you liked this kitchen project.  Next time - (don't know yet!!).  Guess it will be a surprise!