Showing posts with label pillows. Show all posts

Wednesday, December 23, 2020

Loft Bed Part 2 – Bedding

Here is Part 2 of the Loft Bed Tutorial.  In this part I will explain how I made the soft furnishings – the bolsters, pillow and soft pom-pom throw.  This bedding (and actually the entire Tiny House project) was a departure from my normal style (vintage, shabby, pink, ruffles, bows, glitter, etc) but I found after making this Tiny House I do like the more simple, less decorated modern style (but I'm not entirely transformed).  I got the opinion of a couple of "Gen-X-ers" on some of the furnishings since I was trying to appeal to a more "youthful" audience with this project.  They felt I did not depart enough from my normal style ("Too much color, Mom!!  Your curtains should be GRAY!).  Oh well, baby steps for this Baby Boomer... 

Supplies - Bedding and Bolsters
Faux “chamois” (soft, fuzzy wash cloths meant for cleaning the car found at Dollar Stores - see photo below)
Tiny craft pom-poms, about 1/8 inch diameter
needle, thread
Craft sand or small no-hole beads for pillow stuffing
Tiny funnel (sand art or perfume) OR small cone made from paper for transferring sand
clear vinyl tubing, about ½ or 3/8 inch in diameter (plumbing -home improvement stores)
Tiny pom-pom trim (miniature show)
Dense Fabric for pillow (that will not let sand through)
Small fabric clips (like some use for sewing instead of pins)
Fabric for bolsters
Thin upholstery foam, about 3/8 or ½ inch thick
Crafter’s Pick Ultimate (best for fabric and almost anything except wood)

Rectangular Bolsters (gray ones in photos)
These were simply pieces of thin upholstery foam, about 3/8” or ½” thick, cut into rectangles and wrapped with fabric like wrapping a package.  I used Crafter’s Pick “Ultimate” glue to seal edges of fabric where it overlapped to reduce thickness (instead of folding over edges).

Round Turquoise Bolsters
For the round bolsters, I cut the clear plastic tubing to about 1-1/2 inches long.  The tubing works well as a bolster because you can stuff the fabric into the center hole making very neat ends.  Cut the fabric about ¼ or ½ inch longer on each end and about ¼ inch longer around the diameter.  Wrap the fabric around the tubing and glue where it overlaps down the center.  This seam side can be glued down to the bed so it won’t show.  On the ends, just stuff the end fabric into the hole.  Use a toothpick to help if needed.  The Pom-Pom tassels will cover any hole if there was one (for instance if using thinner fabric than velvet). 


Close up of velvet bolster from tubing
Pom-Pom Tassels

Basic steps are shown in the photo below.  To make the tassel, wrap sewing thread around a piece of index card about ¾ inch wide.  I wrapped the thread about 30 times.  Use a needle and same color thread.  Run the needle under all the threads and tie a knot gathering all the loops at the top of the card.  Leave long threads here since you will re-thread and use these ties to go through the pom poms later.
With the top of the loops gathered and tied you can cut through the loops at the bottom.  Now tie another thread around the whole bundle about 1/8 inch down from the top tie and knot.  Re-thread the needle with the top ties and poke the needle through the pom poms.  Put some glue on the center end of the round bolster and run the needle through pulling the tassel up against the bolster end.  Trim the tassel to the desired length.

White Pom-Pom Pillow and Throw
The pillow was about 1-1/4 inches square.  First I sewed a pillow from dense white fabric leaving one side open (dense enough so sand won’t sift through it).  The sand or no-hole beads make the pillow much more realistic since you can sort of squash it into a nice shape (or give it that decorator's "Karate-Chop!"). I used a tiny funnel that came from one of my kid’s “sand art” craft toy to help get the sand into the opening.  The opening was sealed with Crafter’s Pick glue and clamped with little clips.  Then I glued on a cover for one side from the dollar store chamois.  Pom-Poms were glued around on three sides only so it would sit level on the bed.  The throw was made from the same chamois and some tiny trim I found at a miniature show.  The trim sort of looks like little pom-poms.  It was glued all around then I added larger pom poms at the four corners.  I draped it so one corner sort of touched the floor and glued it in place.

Dollar Store Chamois

Pillow Front (Chamois side)


Pillow Back (fabric side)

Glued and draped Pom-Pom throw

Hope this tutorial was helpful to some readers who want to make modern bedding. I will try to squeeze one more tutorial in before the end of the year (Yikes!  It’s almost the end of the year!!).  Hopefully some of the accessories you see in these photos.  If I don’t get around to it…

MERRY CHRISTMAS to all my readers!!

Sunday, December 9, 2018

Dome Project - Silk Bolster Cushion Tutorial

Almost done with the Dome project.  I have another group of related projects that I am excited to start when I have wrapped this up.   Below is a tutorial on making the silk bolster cushion on the couch.  Next blog I will describe how I made the 1/144 scale dollhouse in the window behind the loveseat.

This project involves a little hand sewing (but not much!).  You will need:
  • Small piece of aquarium tube 1/4” diameter by 1-1/8” long.
  • 2 Piece of flannel or white felt, about 1-1/2” by 2-1/2” long for padding
  • Fabric scrap, about 2” by 4”
  • Ribbon for bows, thread, needle
  • Fine needle-type glue dispenser/applicator with Sobo fabric glue or Crafter’s Pick Ultimate.
  • Scissors
  1. Roll the flannel around the tube.  Overlap and secure with overcast stitches.  Trim off even with ends of tube.

  2. Make a glued hem by folding up one short end of cover fabric and securing with a fine line of glue.  Roll the fabric around the tube starting with the raw edge (unhemmed) and ending with the hemmed edge on top.  Glue the hemmed edge down.

  3. With needle and thread, run a gathering stitch around one end, just beyond the end of the tube.  Do the same on the other end.  Pull the thread gathering the excess fabric.  Poke it into the tube with the end of a paintbrush.  You can tie off the threads and secure with a little glue.  It shouldn’t show once you have covered the ends with a ribbon bow. 

  4. Make a bow with multiple loops.  I use myBitty Bow bowmaker (see link in the sidebar) to make a 6 loop bow.
    The ribbon used here is hand dyed, from “Trenway Silks” which I purchased at a local Austin needlework store (or maybe it was Dallas?).  The color is “Pink Peony”.   I love the hand dyed ribbons - they give a nice, variegated color. 
  5. In this last photo you can see how I assure my ribbon tails don’t fray. 
    I put a little glue on my finger and just brush the forked tails across it.  If using Crafter’s Pick Ultimate glue, I rarely see any discoloration or staining of the ribbon with glue spots.  To shape the bows so the tails face down I just pinch the loops in the direction of "gravity", so they all "fall" nicely toward one direction.  Do this while the glue is damp.  You might have to hold them in place for a minute or two.

Well, that was a short one!  One more installment then on to the next project!

Monday, November 10, 2014

Throw Pillows from Embroidered Hankies


I wanted to put on my blog how to make these lovely throw pillows.  I have already written about making bed pillows and pillowcases out of old hankies so here I will just give a few notes about these smaller pillows that are made much the same way.

Close up to show lace detail


Below are some of the pillows shown with the cut up hankies used to make them.  Mostly I used the lace from the hankies but also embroidery and cutwork designs.   Silk ribbon, 2mm and 4mm were woven into the lace or just glued on top of the finished pillows for embellishment.

Here are a few notes on these throw pillows:

Backing:  Hankies are usually very old and frail and don’t hold up to sewing and stuffing by themselves (especially stuffing with sand).  So I make the pillow from a solid color or tiny check fabric.  Then the hanky part is overlaid on the solid and sandwiched between the colored fabric layers (much the same way you would sew on a ruffle or piping).  This just means you have to position the piece of hanky between the right sides of the pillow before sewing so that when turned inside out the hanky will show.

Sewing: Just like the bed pillows in my previous blog, I sew all around the pillow without leaving an opening.  Then I cut the thread in the center of the bottom seam (where it won’t show when closed) and remove a few stitches to turn inside out.  This allows all four corners to look consistent (refer to that same link for trimming corners and turning).

Filling: I use a small funnel and white craft sand, “Scenic Sand” to fill the throw pillows.  The sand makes the pillows sit up like a real feather pillow.  I put a small line of glue inside the folded opening (see photo) then press closed and hold a minute or two.  You have to be careful to completely close the opening so no sand leaks out.  Most tightly woven cotton quilt fabrics should hold the sand OK.
Scenic sand, funnel and how full to fill it!
Put a line of glue inside the opening fold

Press, hold, finished!
Embellishments: I used silk ribbon, 2mm and 4mm width to make tiny silk roses and bows.  Where ribbon wraps around the entire pillow I put the glue only on the back since glue soaks through silk ribbon very easily and makes a stain.   I have a bowmaker I made many years ago from nails and a piece of wood that I use to tie tiny bows (similar to this link but using two nails in a block of wood).  The tiny buckle is a vintage doll buckle I purchased many years ago.

There is a very good tutorial on Cynthia Howe’s website on how to make silk ribbon roses.  Click here.

I hope my blog may inspire you to try to make something from all the beautiful embroidered hankies you can find on Ebay.  Enjoy!

Monday, August 4, 2014

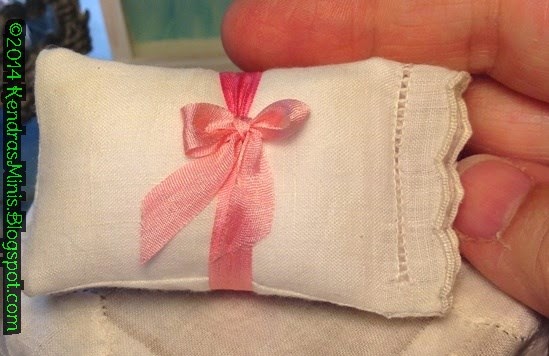
Tutorial - Miniature Pillowcases from Antique Hankies (Part 2)

In my last blog I gave instructions for making the inserts for these pillows from old sheets or men's hankies.  Here I tell how to make the pillowcases from the antique embroidered or lace hankies using a sewing machine.  Some of this is duplicate of the previous blog because some of the same materials and instructions apply here also.

General Supplies needed:
Glue (Crafter’s Pick Ultimate works best and doesn't soak through fabric)
Metal ruler
Mechanical pencil
Sewing Machine
Fray Check (found at fabric and craft stores for sealing raw edges)
Index card (for patterns)
Tweezers or an orange stick for turning pillow inside out

Antique hankies with small design appropriate for tiny pillowcase
Polyester fiberfill stuffing
Ball headed sewing pin
Matching thread
Ribbon for trim (optional)

General Hints:
Fabric – old hankies are beautiful for mini linens.  But they are very thin.  Use caution and see tips below when sewing on your machine.  I used the embroidered or cut work hankies for the outer pillowcases.  These can be found on Ebay in lots for sometimes $1 each.  Look for “cutter” in the description (indicates holes or stains so they are cheaper).

Preparation – hand wash antique hankies in gentle detergent to remove musty odors or stains.  If hankies are very dark you can try to soak them in one of the ‘oxygen’ type cleaners.  I did this with mine and they all remained intact.  If ironing them use a press cloth (I didn’t below because I knew my iron and surface were clean).  Spray them with water before ironing and work out the lace or embroidery so it is very flat.
Sewing on the machine - Adjust and your tension on your presser foot so your thin fabric doesn’t wad up.  Test stitch on scrap sheet or pillowcase fabric.  Also if you are having trouble with the leading edge getting pulled into your machine while starting or reverse stitching, just don’t reverse.  Hold the threads back behind the edge before starting and sew a little past where you want.  You really don’t need to tie threads because the seams will be fray checked and you will be clipping the seams anyway.  Use a stitch length of 1.6 mm if you have a setting for millimeters. If not, test stitch on some scrap pillowcase or sheet fabric to get very small stitches. 

Sealing edges – I used Fray Check (found in fabric and sewing stores) on clipped edges but you have to be careful when using it on very thin, delicate hankies not to get it past the seam line.  It will make a line (sort of like a water line) on sheer fabrics.

When sewing on delicate hankies don’t cut the work out until AFTER all seams have been sewn.   This will allow a larger sewing area and hopefully prevent it from being pulled down into the bobbin area or wadding up under the needle.  If you MUST sew a tiny seam, try a piece of tissue paper under it (remove later after perforated by the needle).

OK- Let's make a pillowcase:
  1. Set up your machine with a small stitch length and tension/pressure (see “General Hints”).  Read the hints relating to sewing on thin hanky material.  You will not cut out the hanky until after you sew the seams so that is why the pattern does not have a seam allowance – the dotted lines are where you will sew; NOT where you will cut!
  2. The pattern above is just 1/16th inch wider and longer than the pillow in the previous section to allow for inserting the pillow.  Cut the pattern above out of index card cutting on the BLACK solid and dashed lines (the red dotted line shows how much excess is allowed for extending beyond the pillow).  
  3. Fold your hanky RIGHT SIDES TOGETHER so that the design /embroidery is centered how you want it.  Place the pattern on the folded hanky aligning the fold mark of the pattern with the fold on the hanky.  Trace LIGHTLY around the pattern on the two black dashed lines with a pencil so it doesn’t show through to the front but is dark enough to see under your sewing machine (these lines are your sewing lines).
  4. If you have trouble seeing the pencil line because your eyes are 50 years old, you can use a piece of blue painter’s tape to mark where to sew then remove it later.
  5. Remove the pattern and pin the folded piece together just to hold it while sewing.  DO NOT CUT THIS FROM THE HANKY YET!
  6. Sew on the lines you marked, keeping just INSIDE of the lines if possible so the pencil marks won’t show.  On the decorative edge you can back stitch (if you trust your machine not to pull it down into the bobbin area) OR just leave the threads long and tie them off. 
  7. Now cut the pillowcase from the hanky allowing about a 1/8 inch seam.  Trim, Fray Check and glue the corners as described in steps 6-12 of my previous blog (click here to go there).  Turn inside out and work on the corners getting them pointed (previous blog again).
  8. To insert the pillow without messing up the stuffing inside and making it lumpy, simply pinch the pillow in half lengthwise and push into the pillowcase.  Use your tweezers or orange stick to get the pillow corners to match up tightly against the pillowcase corners.
  9. Optional: Tie a 7mm wide silk ribbon bow around both pillows for display in a linen shop.
You’re Done!  Sit back and admire all that pretty embroidery you didn’t have to do!

Sunday, August 3, 2014

Tutorial - Miniature Pillows & Pillowcases from Antique Hankies (Part 1)

Recently I purchased some lots of vintage hankies on Ebay and was amazed at how nice the embroidery and cutwork can be – nicely scaled for miniature pillows, tablecloths, pillowcases!  How these ladies of bygone eras were able to make such delicate designs on such wispy fabric is beyond me.  It was so hard to cut them up, too.  Just think, how many tears were dried on these hankies – maybe by someone who lost a loved one to a war or buried a child.  One hanky I found among my grandmother’s things after she died I just couldn’t cut up.  But it’s nice to know these old hankies can be made into another type of heirloom – miniature dollhouse pillows and pillowcases!


Part 1 - Make the Bed Pillow Inserts (pillowcases in a following blog)


General Supplies needed:

Glue (Crafter’s Pick Ultimate works best and doesn't soak through fabric)
Metal ruler
Mechanical pencil
Sewing Machine
Fray Check (found at fabric and craft stores for sealing raw edges)
Index card (for patterns)
Tweezers or an orange stick for turning pillow inside out

Old pillowcase or man’s hanky (for bed pillows)
Polyester fiberfill stuffing
Ball headed sewing pin
Matching thread
Ribbon for trim (optional)

General Hints:

Fabric – I used men’s hankies (solid, no embroidery) or old cut up sheet or pillowcase for the bed pillows.  I used the embroidered or cut work hankies for the outer pillowcases.  These can be found on Ebay in lots for sometimes $1 each.  Look for “cutter” in the description (indicates holes or stains so they are cheaper).


Sewing on sewing machine:  You can get unbelievably tiny stitches using your machine (I learned this from Judee Williamson).  Here are my tips:
  • Adjust and your tension on your presser foot so your thin fabric doesn’t wad up.  Test stitch on scrap sheet or pillowcase fabric.  Also if you are having trouble with the leading edge getting pulled into your machine while starting or reverse stitching, just don’t reverse.  Hold the threads back behind the edge before starting and sew a little past where you want.  You really don’t need to tie threads because the seams will be fray checked and you will be clipping the seams anyway.
  • use a stitch length of 1.6 mm if you have a setting for millimeters. If not, test stitch on some scrap pillowcase or sheet fabric to get small stitches that look about like this:
 -------------------
  • Sealing edges – I used Fray Check (found in fabric and sewing stores) on clipped edges but you have to be careful when using it on very thin, delicate hankies not to get it past the seam line.  It will make a line (sort of like a water line) on sheer fabrics.

OK, now comes the "How-to" part:
Bed Pillows (pillowcase inserts)
  1. Cut a “Bed Pillow” pattern out of index card – 1-1/2 inches by 2-1/8 inches.  You will use this pattern to mark the sewing lines in the next steps.
  2. From an old sheet or pillowcase, cut a piece of intact fabric about 5” x 5”.  Fold in half.
  3. With a light pencil mark, trace two pillows onto the folded fabric using your pattern.  Space them as in the diagram below. (make sure marks are dark enough to see them while under your presser foot but light enough they won’t show through when turned). 
  4. Dotted lines show where you will sew (wavy lines are loose thread ends).  Sew on your pencil lines (don’t leave an opening for turning).  No need to back stitch or knot (you will see why later - using glue and Fray Check).
  5. Cut between the two pillows.  On one of the short ends of one pillow, clip sewing thread near the center of the 1-1/2 inch sewn line (for turning).  Remove about 3 or 4 stitches either side of where you clipped but leave the thread tails.  This is the opening where you will turn the pillow later.  DON’T GLUE THIS OR FRAY CHECK THE THREADS.
  6. Trim all sewn seams to 1/8 inch (yes, this is very small but do it!). 
  7. (Trust me on this step – it seems like you are clipping too close but it will work and make a very sharp turned corner).  ON THE TWO CORNERS WHERE TWO sewn SEAMS CROSS: cut diagonally across each corner leaving only a few fabric threads next to the seam (photo below).
  8. Clip again narrowing the 1/8 inch seam near that corner you clipped (next photo below).  This is to eliminate bulk so your corners will be nice and sharp.   KEEP THE FULL 1/8 in WIDTH OF THE SEAM IN THE AREA WHERE YOU WILL BE TURNING IT INSIDE OUT!  YOU WILL NEED THIS TO CLOSE THE PILLOW!
  9. On the other two corners where there is a fold, clip close to the seam right at the corner removing the bulk from the seam (like the above photo except the one side would be a fold ).
  10. Put Fray Check on the cut edges of the fabric (both layers) all around the pillow (if you don’t have Fray Check you can use a thin line of glue VERY THIN!)  Try NOT to let the fray check spread past the sewing line, into the inner part of the pillow where it might show.
  11. Put a tiny dot of glue on the two corners where the two seam lines cross.  Put dots of glue also on the other two corners where seam crosses the fold (put glue on the line of sewing on both front and back of pillow – 8 dots of glue total on each pillow).
  12. Now QUICKLY BEFORE GLUE DRIES turn the pillow inside out through the hole made when you removed those stitches.  If you have to make the hole a little larger that’s OK.  Just try not to go as far as the corners so they will not be messed up.  Use tweezers or an orange stick or anything EXCEPT your scissor points (you will cut the fabric) to poke and shape the corners sharp.  It will work though it seems impossible.  While that glue is still wet you need to get your corners fully turned and as pointed as possible.  Use a ball headed sewing pin if necessary to pull the folds near the corner on the outside.
  13. Stuff with a LITTLE stuffing (they should be fairly flat like an old pillow).  Push some stuffing into each corner, including the two by the opening.
  14. Neatly fold the edges of the opening to the inside creasing where the seam used to be (you might be able to see the old seam from needle holes).
  15. To close the hole you can either slip stitch by hand or fold the raw edges inside and put just a little glue in the opening and pinch closed (my favorite method).  I think gluing is more invisible (In the photo above the top pillow shows a sewn seam and the bottom one has been sealed with glue). 
That's it!  They get much easier as you make more.  Your first ones might not be perfectly square or maybe the corners won't be very pointed but you learn as you go (as with anything worthwhile!)

Next blog - the pillowcases!