Monday, November 29, 2021

Tutorial - Miniature Faux Carved Gilded Frames

 Many years ago I purchased a collection of framed prints in an auction.  They were nicely scaled and finished, even covered on the back with nice wallpaper and signed “Bob von Fliss”.  Much later I learned Bob von Fliss was one of the original founders of NAME and the first Editor of the N.A.M.E. Gazette (so this is part tutorial, part miniatures history lesson!).  You can download the first issue of the Gazette from the NAME website and see him listed there.

I loved the antique carved ‘gilded’ look and wondered how he did it.  The faux carved look is from embossed foil called “Dresden” foil which you can find on Etsy. [click the keyword "faux carving" in the sidebar for my other posts on that topic]. The trim I used to replicate the Von Fliss frame (Napoleon, upper right of photo above) has a grape leaf or grapevine design but there are lots of Dresden foil borders which would work well for miniature frames.

To find the foil trim, search the words "Dresden foil border" on Etsy or Ebay.

Supplies:

  • Wood trim for frame, 1/16th  inch thick by ¼ inch wide – or however wide you want your frame
  • Wood trim narrower than frame, also 1/16th inch thick or thinner
  • Index card
  • Dresden Foil Border trim –see photo below for the designs I used
  • Picture or art piece to frame
  • Gold acrylic paint (I used DecoArt Dazzling Metallics “Splendid Gold”)
  • Antiquing Medium (I used Plaid brand Antiquing Medium in “Cocoa Bean”)
  • Paintbrush and paper towels
  • X-Acto knife
  • Wood glue

Close up of Foil Border Grapevine Leaf Pattern and Scallop

Here are the instructions for making your own faux gilded frame.
  1. Cut main frame pieces to fit your art piece.  I didn’t miter the wood since the foil will cover it but Bob probably mitered his.  I just butted the pieces together.  Glue them together with wood glue

  2. For extra support, trace around the frame on index card.  Cut out and glue it to the back of the frame.  The photo below shows the back with the index card and the art piece I wanted to frame. Below I am tracing around the art piece so I know how big to make my liner frame (step 7).

  3. Paint the front wood and edges with gold acrylic paint making sure to paint the raw edges of the index card too (I forgot to do this before I glued the first 2 pieces of foil on but it will help if you do it before gluing on the foil).
  4. Line up the outer edge of the foil border with the outer edge of the frame.  Use the X-acto to miter the corners of the foil at the corners of the frame.

  5. Glue foil piece to frame.  Flip frame over and trim off gold foil from the back where it extends to the center of the frame. 


  6. Repeat for the other three frame sides so you have all 4 sides covered with the foil.

  7. If desired, add another narrow edge of trim to finish the inside edge of the frame.  I trimmed a very tiny edge off of a different border, a scalloped border.

  8. Cut another 4 wood strips, (narrower strips this time) to support the back of the frame.  These should be set back from the inside edge of the frame and should be the right size to fit whatever art piece you want to frame.  Again, these don’t have to be mitered.

  9. Paint the entire front and back of the frame with the gold metallic paint.

  10. Add a hanging cord made from thread.  I just cut a piece of thread and glued it against the narrow trim on the back of the frame, let it drape across the opening and glue it again to the opposite side.  Allow enough slack so it will be above the center of the frame when hung.  This makes it easy to hang on a small sequin pin pushed into your wall with very tiny hole and makes it removable.   The thread is kind of hard to see in this photo.

  11. When dry, brush on some Antiquing Glaze then wipe off immediately for an antique look.


  12. Let dry and slip your art work between the frame and thread hanger.  Here are both the new frame (left) and the original by Bob von Fliss (right). The painting I framed was by Lynn Trenary.
Below is my finished frame hung above a fireplace.  Sometime in a later blog I will finish that room (I call it the "Guys from Texas Room").  I think the gold foil makes a very nice hand-made frame and nicely scaled.  It amazes me sometimes what nicely scaled items those early miniaturists could make by hand without access to Ebay,  miniature shops and the abundance of commercially made items available to us now.  There is a lot of charm in those vintage 1970s miniatures and we can learn a lot from them!

Until next month...Yikes!  Christmas is almost here!

Sunday, October 31, 2021

Tutorial - Mini Pom Pom and Tassel Baskets

Love those storage baskets with pom-poms and tassels on them.  I made these for the playroom of my big dollhouse and filled them with toys. Here is a tutorial to make some for your dollhouse from simple supplies.  


You will need:

  • Basket forms (see left side of photo above). I used a clear plastic 35mm film container (yeah...remember those - from before we all had cameras on our phones???), a rubber chair leg cover and a clear cap from a spray bottle.
  • Fabric with a basket weave design - such as upholstery fabric
  • fabric glue or thick craft glue - such as Crafter's Pick fabric glue
  • Tiny pom-poms (3mm?)
  • Embroidery floss to make a tassel
  • 7mm Silk Ribbon, about 12 inches or so
  • fine tip glue applicator (good for attaching the pom-poms) 
  • small, sharp scissors

1. For fabrics I used some upholstery fabric scraps.  One fabric was just a loose weave linen type fabric. 

2. Cut the fabric about 1 inch taller than the basket form and wide enough to wrap around to the back.

3. cover a section of your form with fabric glue (after first making sure it won't seep through).  If it seems to seep then let it dry a little on the form before laying the fabric on the glue.

If you are using a tapered form, like the example with the tassel, you might need to cut it even taller than 1 inch (trial fit before cutting).  Center the fabric on the front first so the front will look straight.  As you wrap to the back, the weave of the threads will angle down.

4. Lay the fabric on the glue allowing about 1/2 inch above the upper ridge of the form and 1/2 inch extending below the bottom.  This will be clipped and folded down into the inside later.

5. Cover the remaining sides of the form with the fabric (not the bottom or inside yet).  When wrapped to the back try to neatly cut a seam straight down the back.  With the chunkier fabric I had to individually glue down each group of threads and flatten the seam with my fingernail to make it look neat.  (takes practice - the first one might not be so neat).  

6. For the top edge I used three different techniques:

-on the large basket (with bow) I first threaded 7mm wide silk ribbon all around the top using a crewel needle.  I brought the ends to the front and twisted the ends tightly then glued a bow on the twist.  I sealed the top inside edge of the fabric with glue then trimmed it off.  I didn't fold this one down to the inside of the basket.

- on the medium (tapered, tassel) basket, I left it longer on the top and folded the fabric to the inside above the edge of the rubber and glued it. I wanted this basket to be taller than the form but I liked the rounded bottom of this form. 


- on the small (pom-pom) basket I clipped the fabric in a couple of areas and folded and glued it down covering the rim.  It's not as neat as I would like but when the basket is filled you can't see the clips . 

7. Covering the bottom - again practice makes this neater.  The one with the more rounded bottom (tassel one) was a little harder to hide the seams.  Clip the fabric that extends below the bottom with sharp scissors just up to the bottom of the form.  Fold the fabric to the bottom and remove some of the bulk trimming the tabs to an angled shape.  Use the small glue syringe to get glue under any stray threads or thick er seams and try to smash them down with your fingernail.  I really focused mostly on any areas that would show instead of the very bottom.  But you might need to eliminate some bulk on the bottom so the basket will sit flat. 


8. For the tassel, I made one full tassel then glued two more bunches of thread behind the first tassel so it looked like a three-layered tassel.  I found that trying to glue three tassels together was too bulky.

Hope you enjoy these little storage baskets!  The colored blocks in the smaller basket (meant to look like large Legos or Duplos) are enamel beads from Michaels (clearance).

Monday, September 27, 2021

Tutorial: Kitchen Cupboard Hardware - French Country Handles and Knobs

French Country Kitchens may not be as popular as they once were but I still love the style.  In fact, I'm REALLY thinking about updating my Brooke Tucker Kitchen in a more modern country style...(doesn't everyone renovate their dollhouse displays???)...but I digress.   Here is a tutorial for making drawer pulls and knobs that would be great for French Country but also, any style.  The upper cabinet knobs are supposed to simulate those “bird cage” style popular with French Country (handles or knobs with a hollow basket look). It's so hard to find nice hardware that doesn't look manufactured - that's why I like to make my own.  Also I think it can be more delicate and scaled when made from scratch.

 Drawer Pulls

Supplies:

  • Fine wire, about 24 gauge
  • Scrap wood about 1/16th or 1/18th inch thick (wire bending jig)
  • Straight pins or sequin pins (for wire bending jig)
  • Seed beads, a couple different sizes
  • Eye-pins from commercial drawer pulls (such as Houseworks #1124 Batwing pulls)
  • Hand drill and Wire drill bits to fit your wire and eye pins
  • Wire cutters
  • Spray paint (and acrylic paint same color for touch ups)
  • Super glue

First, make a bending jig with pins and the wood scrap, drilling holes using the pin vise (hand drill) and tiny drill bits.  You can see the measurements and spacing of the pins from the photo.


Cut the wire into small lengths – about 2” long and wrap around the pins to make the “U” shape (narrower spaced pins face down in these photos and form the bottom of the "U".  Thread on beads in a pattern you like.  I put one larger seed bead in the center with two smaller seed beads on each side (for a more hollow "birdcage" style use a filigree bead in the center and flatten it to more of a tube shape first).

Glue these in place with super glue.  Then glue on the two eye pins as in the photos.  Finally glue on the upper beads that will hold the eye pins in place.  DON’T CUT WIRE YET.

Spray paint this assembly and let dry.  Then cut the wire just beyond the upper beads.  You will touch up the cut off wire after gluing them to your cupboards.

Drill holes in your drawers to match the spacing of the eye pins.  CAREFULLY Glue the eye pins in with super glue (they may fall off easily because they are very thin).  Then use acrylic paint to touch up the cut off wires.

“Bird Cage” cupboard knobs

Supplies:

  • Metal filigree beads, 4mm (I used Darice brand)
  • small crimp beads – about 1.3mm inner diameter
  • brass head pins
  • Spray Paint
  • Super Glue
  • Hand drill and Wire drill bits to match your head pins

These are very simple.  Just thread a filigree bead onto the head pin followed by the crimp bead.  Glue with super glue and let dry.  Spray paint and cut off the wire.  Drill a hole and glue in.

Here is a photo of the kitchen I used these in. 

The kitchen cabinets in the photo above were kits from B. H. Miniatures (I think)?  Upper cabinet doors were backed with nylon netting that I spray painted black (to look like chicken wire).  I faced the drawers with molding (might have been door/window trim).  The stove was a workshop I taught some years ago (2008?).  The counter tops are just printed photos of granite glued to illustration board and glossed with Mod Podge.  I hope you enjoyed this little tutorial!  I will stew over what to post next month.  It may be simple since my daughter is getting married right before the time when I usually make my monthly blog post!

Tuesday, August 31, 2021

Embellished Chandelier - Part 2 - Tips and Hints


Last blog I told how I embellished an old chandelier with jewelry findings and crystals.  This time I am sharing some hints and lessons learned I experienced while doing this project.  Hopefully my readers can benefit from my problems and mistakes!  We learn from each other, right?  I know I appreciate all the blogs I have read which have helped me and saved me a lot of time!

But before I get into the hints I wanted to say that I appreciate my followers and hope you are able to continue following now that Blogger (or Google, should I say?) has taken away the Feedburner email subscription function.  I haven't found a replacement yet.  I hope my readers can continue to find me.  Please let me know if you have suggestions or problems (I don't know yet how to solve this but first I just need to know if it really is a problem...)

Hints for working with a vintage or used chandelier:

  • Test your fixture immediately before you do any work on it.  This prevents a lot of wasted time.  If you don’t have a tester, you can just hold both wires to the snap connectors on a 9V battery (separate the two wires and strip off a section of insulation first).
  • Old wires can be brittle - Even though this chandelier had never been used, the two copper wires were sealed together inside a hard, clear coating. I finally got a small section of wires to separate and used my pliers to pull the two apart but they seemed as if they would break off at any moment.  
  • Brittle wires are hard to connect just by twisting!  When I tried to twist them with the wire of a micro plug (to plug it in to my dollhouse system) it didn’t make a connection.  Took some time troubleshooting but eventually I had to strip off the heat shrink tube and solder them all together in order for it to work.
  • Too-short wires – beware that some vintage chandeliers are sold “as-is” and many times sellers don’t check that they work.  If you find one that is not in the original package, ask whether it works.  Also – make sure wires haven’t been cut so short that there is not enough wire to work with.

So how do you hang it??
I have hung a few chandeliers now (6 to be exact; 7 if you count the one I had to replace).  I learn something every time.  But here are my tips for mounting through the floor above where the chandelier will go:

  • Drill a hole in the ceiling for pulling the wires through to the floor above.  This means your flooring in the room above must be removable (I could probably write a blog just on this).  This also means you must have previously run tape wire across the floor to the center of the room to attach to the chandelier.

  • If using a ceiling medallion, you can either glue it to the ceiling now over the hole (line up its hole with the one in the ceiling).   OR glue the chandelier canopy to it, let that dry then glue the medallion to the ceiling after connecting the wires.  Here is a photo of how I held my ceiling medallion in place while the glue dried (using bamboo skewers and a wood circle held against the medallion). I carved two small grooves in the wood circle with an X-Acto knife so the skewer end would sort of rest there and "catch". Strips of scrap basswood would also work.
    Bamboo skewers and wood circle to hold medallion while gluing

    Toothpicks to help align the medallion with the hole (before bracing)

  • Use a canopy (dome shaped piece with a ring that holds the chandelier to the ceiling) and a chain to permanently hold the chandelier.  Don't just let it hang by the wires alone.  It's not  so much the weight but this: if your wires are tight with no slack then they take the force when the chandelier is bumped, instead of the chain and canopy.  If they break, you will throw the chandelier away because they will be too short to connect again.  I have had first hand experience with this (link to my first ever blog post).
  • Make your connection.  Pull the wires through the medallion and ceiling hole and tape them down to the floor to make the connections.  Follow the instructions in your lighting kit and attach the chandelier wires to the tape or round wire of your house using grommets or solder.  I solder my connections because I have had several connections that have come apart.  But soldering is optional.

  • Now glue the canopy to the medallion (or the ceiling if not using a medallion).  Hopefully it is light weight enough you can just hold it a little while until it sets.  Or use removable painter’s tape to hold it in place overnight.  I like Crafter’s Pick Ultimate glue because it is thick and dries fast.  But some like to use solvent glues for metal – such as E6000.

I didn't go into the details on running tape wire or making the grommet connections or soldering because there are so many kits and books that describe this.  Recently I have also started putting micro plugs on the chandelier then soldering the female end of the plug to the tape run (but this is for another blog… ).  I don't consider myself an expert in hanging chandeliers but here are some links to two people who have much more experience.   Both Carl and Tina are very familiar with the Cir-Kit products and have several videos on using their chandelier adapters which can be used on the ceiling (as opposed to through the floor above, as I have done). I use Carl's products for my lighting - power supplies, etc.  He has an AWESOME book that is so helpful and includes information about LEDs and converting your dollhouse from the old 12 volt transformer to DC power (which I have now done - maybe a future blog post??).  I love Tina's videos because, even though she has been building dollhouses for 25 years, she gives a very honest review of products from the perspective of a "newbie" (or "noob" as my grandson would say) including the problems she has encountered with those products.  You learn more from these people than from the Cir-Kit website because they actually show you the components in the bag and what each little piece is used for.

Carl Sahlberg of CR2S - Creative Reproductions 2 Scale

My favorite book on miniature lighting from CR2S

Tina Kaminska Dickenson

In the near future I will have to hang some fixtures on the ceiling of the top floor.  I will let you know how that goes!!

Thanks to my readers for your interest.  Remember to let me know if you are having problems with the loss of Feedburner.   Thinking of what to do next...any suggestions?

Wednesday, July 28, 2021

Tutorial: Embellishing a Miniature Chandelier

I feel it is very hard to find miniature light fixtures that aren’t dated-looking or that look like they were from a big-box hobby store (common).  I don’t like most of those battery fixtures – the bases are very thick and the bulbs very squared off, they don’t look like candle flames when on sconces and chandeliers.  They have their place – like maybe in a room box, where there are only a few fixtures but who would want to turn on many of these every time you display your dollhouse?  This is why I have so many blog posts for making sconces, lamps, etc.

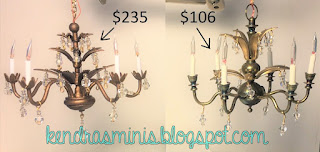
I like traditional fixtures but want a modern spin on it.  I found one that I really like at Lighting Bug.  I purchased it but it was kind of expensive (absolutely worth it when you consider the artistry!).  But when I decided I needed another one, I wanted to try to replicate it using a less expensive chandelier to start with. Here is the one I purchased (left) and the one I embellished (right).

Here is how I did it. Supplies and tools are in bold and also listed with cost at the end.

  1. Find moderate cost working chandelier with graceful curved arms, simple lines and narrow sections of post that you could fit a brass flower around (with a center hole).  Mine was a vintage Clare Bell Brass 6 arm Williamsburg-type with large turned balls on the post.
    Vintage Chandelier purchased for $75 with shipping

  2. Find brass petal findings with long, slim petals, about 1-1/2 inches tip to tip, 6 petals. I found these searching "layered flower finding" on Etsy.

  3. If you can only find them riveted together (as mine were), they can be easily separated by drilling through the rivet.  Use a drill bit a little larger than rivet hole.  If possible, use a drill press for straight vertical drilling (or your Dremel with steady hands and pliers to hold finding so it doesn’t move when drilling).  Notice in the photo that these were kind of rusty.  It will buff out with steel wool.
  4. I used two findings, they were the same size but one was flatter and the other one was taller, with the petals pushed together sort of like a crown (photo below, the one being drilled).  The crown shaped one I used near the top of the chandelier – to mimic the one I was trying to replicate.
  5. Cut through the center ring between two petals to open the ring (I just used my wire cutter).  Use pliers to open it up wide enough so it will fit around the chandelier.  I just found some spots where the center post of the chandelier was very narrow and fit the open ring over two of those spots (but don’t put it on yet).
  6. Drilling holes for crystals - I used my Dremel and wire drill bit (#64?)

    • Its easiest to turn the flower upside down and drill through the back of the petal.  This way the drill bit didn’t ‘walk’ as much as when I tried to drill it from the top
    • My findings were kind of thick brass and it took a while for the wire bit to get through.  After about 7 holes I had to re-charge my Dremel.  Let it do the work and don’t press down very much.  It may take a while.
    • Any scratches from the drill bit ‘walking’ can be removed in later steps with sandpaper and steel wool
  7. Once drilled, sand lightly with 400 grit sandpaper over the holes to remove snags.  Then smooth all the scratches with 0000 (‘four ought’) steel wool.  This should make the brass very shiny, smooth and golden.  If the underneath side of the holes will show, then sand and steel wool there too.  I found the steel wool was able to remove some rusty looking spots that must have been there for years (these were vintage findings).   In the photo below, the petal near the knife tip was buffed with steel wool while the petal right below it still has some scratches from the sandpaper.

  8. Preserve that golden brass glow by spraying the finding front and back with a clear acrylic spray.  I used an old product “Triple Thick Glaze”.
  9. The crystals – I used some tiny clear ‘delica’ beads (cylindrical, very tiny) and larger 2mm (hard to find) and 3 mm Swarovski crystal beads.  I used some thin brass non-tarnishing beading wire and cut two pieces (since it was so thin).  I threaded one delica over both pieces of wire then brought the four ends up together with the bead at the bottom of the fold of wire.  Then I threaded the bigger 2 or 3 mm bead on the four wires.  Then another 1 or 2 delicas – threading all 4 wires through them.  I put all 4 wires through the BACK of one of the drilled holes in the finding, folded it around the petal and twisted the wire about 3 or 4 times.  The steps are shown in order in the first photo below.


  10. Clip off the excess wire with flush cut pliers.  Put all the crystals on the finding before trying to put the finding on the chandelier.  Repeat for the other finding (if you are also doing two).  
  11. When ready to put the findings on the chandelier, use pliers to open it up and slip it onto the stem of the chandelier.  Try not to scratch it (but it may be inevitable).  I did not glue my findings – they are just wobbling around.

  12. I also put crystals hanging from each of the 6 arms using the same process.  I used the bigger (3mm) crystals with the delicas on the arms.
  13. Even though my chandelier was brand new, still in the box and never been connected there were some rusty spots in the brass I noticed AFTER I did the work of embellishing.  So I brushed over them with clear nail polish (actually used some old Fimo glaze but it is the same thing).  I didn’t want these to continue rusting or make the fixture look patchy after a few years though it still might.  Time will tell.

Costs:
Vintage Clare-Bell Chandelier - $74.50 (with shipping, Ebay)
2mm Swarovski crystals - $5 (with shipping, Ebay; from China)
3mm Swarovski crystals - $5 (with shipping, Ebay; from China)
Crystal Delica beads - $8 (with shipping, Etsy store “Seaofbeadstx”)
Tarnish resistant brass beading wire, 34 gauge (Artistic Wire brand) - $6
Vintage flower findings -  $8 (with shipping, Etsy “BossJewelrySupply”)
(total = $106)

Hope this inspires you to embellish a chandelier.  Next time - some hints on working with vintage or used chandelier and hints on hanging a chandelier.

Monday, June 28, 2021

NAME Window Shopping and Decoupaged Palace Chest

A few years back, NAME (National Association of Miniature Enthusists if you haven't heard of it) had a NAME Day project called Window Shopping.  It was a small display with lots of shelves to display a grouping of minis like they were in a shop window.  Ingenious! 

NAME Window Shopping Prototype from Gazette July 2015

I LOVED seeing all the examples of this project sent in by Gazette readers and was so jealous of their lovely displays.  Hats and wood-turned vases, and every kind of subject.  When my club did our orders, I selected a kit in walnut from Tom Walden.  It was beautiful! But then I had a problem – the lovely walnut was so dark that many items were just lost against it.  I didn’t want to paint it.  So I decided to display light colored things – PINK!

So I gathered together my most favorite pink minis and tried to come up with a pleasing arrangement.  They looked great against the dark walnut.  (Scroll down to the end for the artisans of the minis I put in my display.)  I used shaped brackets for the wall shelves instead of the simpler column provided and I didn't use the platform that came with the kit because I needed some height to display the chest and painting on top.


The Decoupaged Chest

In case you didn’t recognize it (if you are not a Baby Boomer!) the pink toile chest is just the Petite Princess Palace Chest with wallpaper applied to the drawers.  Petite Princess items are actually a little smaller than 1:12 scale but I still think they can work in 1:12 miniature scenes.  What I like about this chest is 1) the faux marble top and 2) the serpentine drawer fronts.  Those serpentine drawer fronts would be SOOOooo hard to reproduce in miniature!  But disguised plastic can look great!

I accented some of the edges and the pulls with acrylic gold paint.  When I had my drawer front pattern made (with markings for where to punch holes for the knobs) I just cut them from wallpaper so the design continued down the front so the drawers matched up.

After gluing the wallpaper on using Crafter’s Pick Ultimate glue, I let it all dry then antiqued it with a faint wash of Burnt Umber acrylic watered down and just brushed over here and there.  Then I finished with a water based acrylic varnish.

Here is another one I did in green (below).  On this one I filed down the top two pulls and instead, put a tassel in the center of the top drawer.

If you have the opportunity to find one of these Window Shopping kits, snap it up!  Sometimes the kit cutters (see recent NAME Gazette) have leftover kits.  I loved this project because it was small, not intimidating to complete, viewable up close, could be protected using a piece of glass and wall hung!  It checks all the boxes for mini displays!  Its a great way to display minis with painted details where they can be viewed up close!  In a dollhouse, these details, like painted dishes, tatting and pins in a pincushion would be almost invisible.

If you are not a NAME member, I highly recommend joining!  NAME is a wonderful organization dedicated to the education and support of the miniatures hobby.  Every year there is a "NAME Day" project and they are all very nice.

See below for the artisans of the minis I displayed in my Window Shopping display:

Clockwise from top of chest: (right click photo to open larger)

Painting - Josephine Meyer
Staffordshire dogs -  Metal Minis (painted by myself)
Rose glass candlesticks - Phil Grenyer
Urn jar - Jean Tag
pink lotus flowers in white bonsai dish - Small Time Operators
Tea cup, with pink flowers - unknown artist
pink lotus bowl - Deborah McKnight
pink, green lotus plate - Amanda Skinner
Cat Doll (on pillow by myself) - Ethel Hicks
Painted coffee set - Amanda Skinner
Framed tatted doily - Julie Felzien
shoes - Doll's Cobbler
Stool with petit point - Bespaq with Petit Point designed by Lucy Iducovich
hydrangea - Laura Crain
Bowl, oval scalloped bowl - unknown artist
Painting - Josephine Meyer
Porcelain pin cushion - Patty Caster (kit)

 That's all for this month.  Thanks for visiting!