French Country Kitchens may not be as popular as they once were but I still love the style. In fact, I'm REALLY thinking about updating my Brooke Tucker Kitchen in a more modern country style...(doesn't everyone renovate their dollhouse displays???)...but I digress. Here is a tutorial for making drawer pulls and knobs that would be great for French Country but also, any style. The upper cabinet knobs are supposed to simulate those “bird cage” style popular with French Country (handles or knobs with a hollow basket look). It's so hard to find nice hardware that doesn't look manufactured - that's why I like to make my own. Also I think it can be more delicate and scaled when made from scratch.
Drawer Pulls
Supplies:
- Fine wire, about 24 gauge
- Scrap wood about 1/16th or 1/18th inch thick (wire bending jig)
- Straight pins or sequin pins (for wire bending jig)
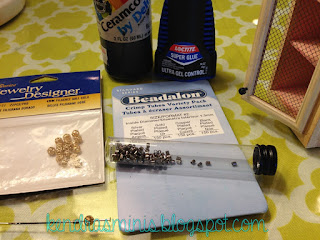
- Seed beads, a couple different sizes
- Eye-pins from commercial drawer pulls (such as Houseworks #1124 Batwing pulls)
- Hand drill and Wire drill bits to fit your wire and eye pins
- Wire cutters
- Spray paint (and acrylic paint same color for touch ups)
- Super glue
Cut the wire into small lengths – about 2” long and wrap around the pins to make the “U” shape (narrower spaced pins face down in these photos and form the bottom of the "U". Thread on beads in a pattern you like. I put one larger seed bead in the center with two smaller seed beads on each side (for a more hollow "birdcage" style use a filigree bead in the center and flatten it to more of a tube shape first).
Glue these in place with super glue. Then glue on the two eye pins as in the photos. Finally glue on the upper beads that will hold the eye pins in place. DON’T CUT WIRE YET.
Spray paint this assembly and let dry. Then cut the wire just beyond the upper beads. You will touch up the cut off wire after gluing them to your cupboards.
Drill holes in your drawers to match the spacing of the eye pins. CAREFULLY Glue the eye pins in with super glue (they may fall off easily because they are very thin). Then use acrylic paint to touch up the cut off wires.
“Bird Cage” cupboard knobs
Supplies:- Metal filigree beads, 4mm (I used Darice brand)
- small crimp beads –
about 1.3mm inner diameter
- brass head pins
- Spray Paint
- Super Glue
- Hand drill and Wire drill bits to match your head pins
These are very simple. Just thread a filigree bead onto the head pin followed by the crimp bead. Glue with super glue and let dry. Spray paint and cut off the wire. Drill a hole and glue in.
Here is a photo of the kitchen I used these in.


I have a chest of drawers that I made from a kit and never liked the handles that came with it. Now I will try and make my own.
ReplyDeleteWhat a wonderful tutorial, thank you.
Anna
Very cute and creative way to make the handles. Will you show your counter marble technique another time/
ReplyDeleteThe bending jig is such a good idea and your resulting French style hardware is Perfect! You have a gift for upscaling everything you do, which from my end, is a joy to behold! :)
ReplyDeleteYour cabinet hardware is so effective. Thanks for the tutorial.
ReplyDeleteWow! Love them! Thanks for the tutorial!
ReplyDeleteMuy ingenioso y además queda genial.
ReplyDeleteHi Kendra, please don't ask me why I missed this post for almost a month! A very nice tutorial. The bending jig is a great idea. It also shows me that I run to a shop too quickly. I need to make the hardware for a strongbox. I intend to use your jig idea for the handles made from bend 'iron' staves. Rather than looking to buy ready made handles.
ReplyDeleteHuibrecht
Thank you, Huibrecht, Isabel, Jodi, Sherrill, Elizabeth, Benzz61 and Ana for viewing, commenting and always supporting my posts! Hope to get another squeezed in before the end of the month! Yikes! Its almost here!! Kendra
DeleteEstoy maravillada!!!! GRACIAS POR COMPARTIR!! Eres simplemente genial! Saludos desde Uruguay.
ReplyDeleteHermoso y muy bien explicado gracias
ReplyDelete