
 |
| Dining Room, 1996-ish |
 |
| Dining room after (2021) |
Does anyone else
redecorate their dollhouse? I purchased
mine in 1996 (while on maternity leave).
I SLOWLY worked on it room by room and now, 25 years later I still have
2 of the 13 rooms unfinished. I'm curious if anyone else is in the same boat? I guess it follows actual life because we sometimes update the kitchen without updating the bedroom but a 25 year difference in decorating styles within the same house?
Anyway, that's my situation. Most of the house was decorated in the 1990s and only recently did I start working on the last 3 rooms. Regarding this dining room, in 2011 I had a
problem with electricity. I had to peel
back the wallpaper to repair the wiring in the dining room and decided that would be a good time
to change that wallpaper since I really didn’t like it anymore. I did like it at the time I papered it but ... changed my mind.
I was really into toile back then (2011). I love the kind of odd combination of green and purple (see my green & purple kitchen HERE.) So I really wanted to switch to a toile wallpaper. I was inspired by some lovely vintage green toile wallpaper by Beehive Studios (from the 1970s). It was sort of papery, not very thick so I decided to mount it onto some poster board then glue the poster board to the walls (over the top of the old wallpaper). The poster board would also cover the wiring where I had to solder some connections.
In the room I had to remove all the trim around doors and windows (I hadn't gotten as far as putting in baseboard or crown molding at that time). Then I glued in the papered poster board starting with the back wall. I used the brayer again to remove bubbles before bracing.
Photo below is of how I glued and braced the wallpapered poster board using a book and wood strip scraps wedged between the walls. The book was to hold the poster board to the wall as flat as possible and take up some space since my wood scraps were too short. I used clamps and more wood scraps around the doorway.

Below - old and new wallpaper. You can see here why I let the green toile paper extend on both sides of the poster board - so there would not be any gaps or old wallpaper showing through at the corners.

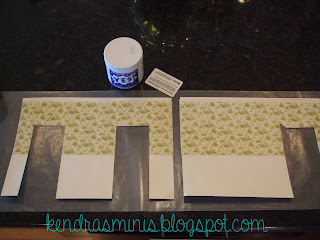
I left the bottom section of the walls un-papered because I wanted to simulate faux paneling on the lower half of the wall. I really liked some woodwork I saw on another blog that were French style, sort of scallop shaped. I cut paper patterns for the different areas using different sizes for the areas below the windows, and between the windows.
For the lower panels, I cut the shapes out of very thin 1/32nd inch thick basswood and then sanded the outer edges so they were beveled and sloped toward the wall.

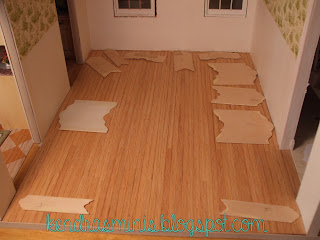 |
| Deciding on sizes and positions of panels to fit in wall sections |
I glued the panels (probably with Ultimate
glue, I can’t remember) and used wood to brace again because they kind of
curled from the glue.


I painted over the panels and wall in the off-white color (“buttermilk”). Then I aged them – just a tiny bit with diluted paint – mixture of burnt umber and raw umber.

 |
| Above photos shows aging wash before some was wiped off |
 |
| Lightly aged panels - has just a little 'wear' from grubby hands and dust |
Finished Room (back in 2011):

Here is the same room with chandelier (finally hung!) and drapes I recently made (May 2021). I was trying for the green and purple color scheme with the carpet and drapes. You can't tell in the photo but the dishes on the table are purple too (see close up below). Carpet was an Etsy purchase, artist unknown but it may be a Harry Whalon design.

Vintage 1980s(?) magenta dishes by Jo Parker and Jo Berbiglia petit point dining chair seats to keep with the green and purple color scheme.

Well, readers, hope you can use this info to redecorate when you get tired of your current wallpaper! It can be done!
Ha quedado una habitación muy elegante y fresca.
ReplyDeleteUn saludo
What a clever to use poster board. And also very clever how to adhere the poster board with the wood, clamps and book. Great job!
ReplyDeleteI totally enjoyed reading this post- Thank You Kendra!
ReplyDeleteI've recently gutted an 80's dollhouse of mine and am on the re-wallpapering stage, so many of your tips will come in handy.
Also- your drapes are SUPERB! I have admired your drapery skills for a very long time and I love their color, their soft swags, their contrasting edging and the brass rods you've hung them on each well thought out choice of yours has provide a lovely backdrop for your elegant dining set and a compliment to your delicate wallpaper.
Two Thumbs Up!
elizabeth
p.s. and the cute video featuring your dollhouse is another feather in your cap! ❤️
I LOVE the new dining room! First of all, the beautiful colour but also it's amazing the big difference wall panels and crown molding make, isn't it? Beautiful room! - Marilyn D.
ReplyDeleteHa quedado mucho mas armonioso y acogedor.
ReplyDelete