


For this project, here is a photo of some of the supplies you will need:

- polymer clay artichokes. You must be able to be cut through these (not resin or porcelain)
- 3/32 outer diameter brass tubing, about 3 inches total
- Sconce plate or base (I used a 3/8 inch square brass piece (JAR-JAF Miniatures Item #213) with a hole to accept the brass rod)
- Candle Cup (JAR-JAF Item 626 or 1579)
- Straight pin with a metal bulb on the end (dressmaker pin?)
- Aquarium type clear tubing for shades, 3/8 diam (about 1” piece)
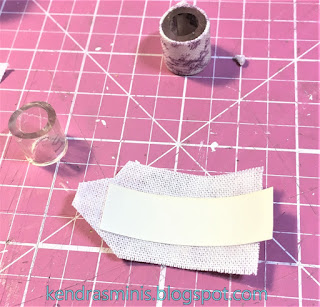
- Fabric to cover the shade
- Index card
- X-Acto knife
- Razor saw and miter box (to cut brass tubing)
- LED light bulbs (Evan Designs) - I used the 1.8mm but smaller will work too.
- Crafter’s Pick Ultimate glue
- needle nose pliers
Instructions
- Cut into the artichoke from the center top make a slice approximately half way down. Hollow it out if necessary. You will need to be able to fit two brass rods in the center. I had to remove a bunch of cotton stuffing from mine

- “Drill” two holes in the artichoke (using the pointed tip of a #11 X-acto knife). One hole at the center top and one at about halfway down the side. The holes must fit the 3/32 brass rods. (only 1 hole shown in the photo).
- Sand a little off the very tip of the bulb to make the light spray out (fine emery board). Otherwise it will make a kind of ‘cone’ pattern on the wall or inside the cabinet where you mount it. Don’t sand too much or you will damage it!
- Bend the bulb in a “U” shape being very careful not to cut the wires or break the plastic. I used a small needle nose pliers. It must fit into your shade so that the shade completely covers it (see also photos, step 14).

Close UP of bent bulb - I painted it gold to disguise the black - Test your bulb after you bend it (hold the wires to your battery connector wires - red to red and black to black!)
- If desired (to make the light warmer) paint the bulb with a yellow-ish paint.
- Shade – Find some tubing the size you need. I found clear tubing (Home Depot) 3/8 inch in diameter. Cut it to the length you need (mine was 3/8 inch).

- Cut a strip of index card to cover the tube and overlap about 1/8 inch. Cover index card with fabric clipping corners and allowing one angled flap. Fold fabric over on both long edges to cover the card. Don’t fold fabric over the short edges or it will be very thick.

- Wrap the shade around the tubing and overlap the fabric at the back. Try to keep it neat with no frayed strings.
- Note: I use Crafter’s Pick Ultimate glue for the following steps. It seems to hold pretty quickly and grabs well. Depending on your sconce, size of your artichoke, and how much tubing you want to protrude through the wall, decide how long each ‘leg’ of brass tubing ‘elbow’ should be. Cut the brass tubing into two pieces using a razor saw and miter box.
- Thread the bent bulb down through the top piece of tubing then through the other piece. Leaving a little wire showing between the two, bend them at right angles. TRY NOT TO CUT THE WIRE WITH THE EDGE OF THE TUBE.

- The two pieces will be secured at a right angle in the middle of the artichoke and held with glue.
- After the brass tubes are glued inside the artichoke, glue the brass plate to the artichoke. Try to keep the plate parallel to the upright tube and hold it until it is somewhat set.
- When the tubes are dry, glue the lamp shade over the bulb. It will not get hot since it is an LED so no worry about the glue melting.


- One more thing I did was to make a finial for the bottom of the artichoke. I used a pin (painted the pin head gold) stuck through a candle cup finding and up into the bottom of the artichoke.
- Attaching Sconce to Cabinet:
Since the cabinets were cardboard, it was not hard to poke holes where I wanted to mount the sconces. I brought the wires to the inside of the cabinet then cut another exit hole through to the back of the cabinet and pushed them through to the back. I glued them against the cabinet side using a piece of scrap wood and small clamps to hold wires.

- I painted the wires to match the inside of the cabinets. (in this photo you can also see the very tiny LED glued to the inside top of the cabinet for interior cabinet lights – next post!)


Finished sconce mounted on side of cabinet. - Next time I will show how the wires are combined with the other lights (under cabinet in inside cabinet). Also how I hid the battery and switch.


What a super informative tutorial, Kendra! Thanks so much for sharing! The kitchen photos are a treat to see, and I am excited for the next installment in the series!
ReplyDeleteThanks, Jodi! I appreciate you reading my blog and posting comments. Hope my next installment can live up to your expectations!
DeleteThank You Very Much for this FAB lighting tutorial! :D
ReplyDeleteI love the fact that you've made your kitchen fixtures using LED's and rather easily obtained materials as your HD tubing for the shades is perfect!
Your artichoke and toile combination, really add to the romantic ambience of your little kitchen, as does the lovely cafe curtain which you have draped So Prettily over the window!
I am really looking forward to Part 2 re: your lighted kitchen cupboards and know I'm in for a Treat!
Thanks, Elizabeth, for your sweet comments. Glad you are looking forward to the next update!
DeleteUn fantástico y muy creativo tutorial!! Muchas gracias por las explicaciones,las lámparas alcachofas te han quedado geniales,me encantan!!
ReplyDeleteBesos.
Thanks, Pilar, for keeping up with my blog and for your positive comments!
DeleteA great tutorial! I really try to avoid electricity because I would not know where to start. But now I really want to give it a try. Thank you. :-)
ReplyDeleteHuibrecht
Thanks, Huibrecht, for your comments. Hope to have more electricity related posts in the future. Glad you're not afraid to give it a try.
Delete