
Glue (Crafter’s Pick Ultimate works best and doesn't soak through fabric)
Metal ruler
Mechanical pencil
Sewing Machine
Fray Check (found at fabric and craft stores for sealing raw edges)
Index card (for patterns)
Tweezers or an orange stick for turning pillow inside out
Antique hankies with small design appropriate for tiny pillowcase
Polyester fiberfill stuffing
Ball headed sewing pin
Matching thread
Ribbon for trim (optional)
General Hints:
Fabric – old hankies are beautiful for mini linens. But they are very thin. Use caution and see tips below when sewing on your machine. I used the embroidered or cut work hankies for the outer pillowcases. These can be found on Ebay in lots for sometimes $1 each. Look for “cutter” in the description (indicates holes or stains so they are cheaper).
Preparation – hand wash antique hankies in gentle detergent to remove musty odors or stains. If hankies are very dark you can try to soak them in one of the ‘oxygen’ type cleaners. I did this with mine and they all remained intact. If ironing them use a press cloth (I didn’t below because I knew my iron and surface were clean). Spray them with water before ironing and work out the lace or embroidery so it is very flat.


Sealing edges – I used Fray Check (found in fabric and sewing stores) on clipped edges but you have to be careful when using it on very thin, delicate hankies not to get it past the seam line. It will make a line (sort of like a water line) on sheer fabrics.
When sewing on delicate hankies don’t cut the work out until AFTER all seams have been sewn. This will allow a larger sewing area and hopefully prevent it from being pulled down into the bobbin area or wadding up under the needle. If you MUST sew a tiny seam, try a piece of tissue paper under it (remove later after perforated by the needle).
OK- Let's make a pillowcase:
- Set up your machine with a small stitch length and tension/pressure (see “General Hints”). Read the hints relating to sewing on thin hanky material. You will not cut out the hanky until after you sew the seams so that is why the pattern does not have a seam allowance – the dotted lines are where you will sew; NOT where you will cut!

- The pattern above is just 1/16th inch wider and longer than the pillow in the previous section to allow for inserting the pillow. Cut the pattern above out of index card cutting on the BLACK solid and dashed lines (the red dotted line shows how much excess is allowed for extending beyond the pillow).
- Fold your hanky RIGHT SIDES TOGETHER so that the design /embroidery is centered how you want it. Place the pattern on the folded hanky aligning the fold mark of the pattern with the fold on the hanky. Trace LIGHTLY around the pattern on the two black dashed lines with a pencil so it doesn’t show through to the front but is dark enough to see under your sewing machine (these lines are your sewing lines).
- If you have trouble seeing the pencil line because your eyes are 50 years old, you can use a piece of blue painter’s tape to mark where to sew then remove it later.

- Remove the pattern and pin the folded piece together just to hold it while sewing. DO NOT CUT THIS FROM THE HANKY YET!
- Sew on the lines you marked, keeping just INSIDE of the lines if possible so the pencil marks won’t show. On the decorative edge you can back stitch (if you trust your machine not to pull it down into the bobbin area) OR just leave the threads long and tie them off.
- Now cut the pillowcase from the hanky allowing about a 1/8 inch seam. Trim, Fray Check and glue the corners as described in steps 6-12 of my previous blog (click here to go there). Turn inside out and work on the corners getting them pointed (previous blog again).
- To insert the pillow without messing up the stuffing inside and making it lumpy, simply pinch the pillow in half lengthwise and push into the pillowcase. Use your tweezers or orange stick to get the pillow corners to match up tightly against the pillowcase corners.

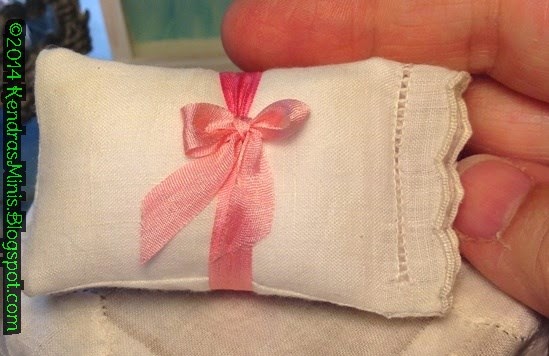
- Optional: Tie a 7mm wide silk ribbon bow around both pillows for display in a linen shop.
I absolutely love you pillow cases! They are beautifully made and so pretty! Thanks for the brilliant tutorials!
ReplyDeleteHi, Jusst discovered you through Studio E - pinterest,
ReplyDeleteThank you for this tutorial, some excellent hints. I have such a collection of old hankies, tablecloths, runners etc. I cannot resist rescuing them from thrift stores and friends who have no interest in the fine workmanship and history.
regards Janine
Amei o tutorial, tenho alguns lençol nhos antigos e vou fazer. Obrigada 😊😊
ReplyDelete