Thursday, May 26, 2022

You can Print a Velvet Rug for the dollhouse??

(...with Spoonflower, Yes!) 

First let me apologize for my lateness and not keeping up with posting since February and to thank my readers for their patience!! (clap clap)

Onto the rugs...I have been trying to find rugs printed on velvet that look nicely scaled.  Most are just printed on a woven cotton and don’t have a nap.  I like the velvet as a base for a rug because I think it is more like a real rug.  So… I thought, why not try Spoonflower?  I love it for custom fabrics. You can find any design you want!  And if you want to design your own fabrics you can do that too (if you have the graphic gene)!  It takes a little bit of effort to learn how to use the website but worth the effort.

What is Spoonflower?  It’s a website where people who design fabric sell their designs (Sort of like Etsy for textile products).  You pick a design, then pick what type of fabric you want the design to be printed on, like cotton or linen or velvet, then decide how much you want to order (full yardage, fat quarter or sample).  You can even buy textile items printed from the design, instead of yardage – things like curtains, pillows, and duvets. 

If you want to create your own design, you make an account, upload your design, use a little gadget to arrange the design (like mirror image, tiled images, etc) then you can order your own design and have it printed on whatever type of fabric you want.  This is how I made the rugs (though I don’t sell them - you also have to be aware of copyrighted designs if you plan to sell them).  

Of course you could select any type of fabric to print your rugs.  I chose velvet.  There are two kinds of velvet available from Spoonflower.  See the photos below for comparison of the two types.  Both velvets cost about $39 per yard but you don’t need to pay that much.  I ordered just a fat quarter (yes you can get a fat quarter of velvet) for $20 but then there was a 50% off sale so I got it for $10.  I was able to print 5 rugs on one Fat Quarter for $10 plus shipping.  They run sales occasionally so watch their website for the sales (or get on their mailing list).  This sale was close to Thanksgiving 2021 (I think).

Here are some hints:

  • Find photos of rugs you like "birds eye view" so it will be perfectly square on the corners.
  • Start with the best quality photo you can  find (highest pixels)
  • If you don’t want them all the same design, create a “collage” (I used Microsoft Paint tool) so they are all in one photo (you can see what mine looked like in the next photo below).
  • Upload the photo or collage to Spoonflower.
  • Select the Fabric (velvet) and Size/yardage from the drop downs (select “Fat Quarter”).
  • It takes a little trial and error working with the uploading / arranging on the website.  Depending on the arrangement, parts of some rugs may get cut off but just try to optimize to get them to print as many full rugs as you can in the correct size.

Try these hints to get the rugs sized while displaying on the grid:

  • Play with the “Repeat” and “Smaller” and “Bigger” buttons and “Change DPI” setting.  Check the displayed design to see if rugs will be correct size (it has a grid marked in inches).  Do this while you have the final size selected (fat quarter) so you can see exactly how many rugs you will get from that size of fabric.
  • If that doesn’t work and you can't get the rug to be small or large enough, you might have to resize your original photo (change pixels width and height) and re-upload (save under a new name).   Generally, if you can't get it small enough, your photo is too big (reduce the pixel size) and vice-versa.
  • Note that your Fat Quarter will have a different number of full rugs if you select a 45 inch wide fabric than if you select a 54 inch wide fabric. 

Photo of the Spoonflower editing screen:

Above you can see my rug collage as it would look if printed on a fat quarter.  The “Celosia” velvet is slightly more transparent than “Performance” velvet (you can see the cutting mat through the Celosia velvet). 


Below are two fat quarters showing both types of velvet.  The Celosia (on top) has more of a nap, like plush velvets.  It is woven, has a slight sheen and a little thinner than the Performance.  The Performance velvet (bottom) seems to be non-woven, sort of like soft suede cloth, very white, slightly thicker and more opaque than the Celosia.  The photo below shows both fat quarters overlapped.  I think the design is a little brighter and crisper on the Performance velvet.  But my preference for miniature rugs would be the Celosia due to having a plush nap or pile and warp and weft threads you can see. 

To finish the rug after cutting it and trimming, I glued 6 strand embroidery floss around the edge using a fine tip glue applicator (fabric or white glue) so I could apply the glue to the very thin edge of the velvet.  It was hard to get it to stay on.  I only did about half the side of a rug at a time and let it sit a while to make sure it got stuck on. 

For fringe, I had some linen upholstery fabric where I had trimmed off the selvage.  It had a perfect fringed edge (glad I don't throw anything away!).  So I trimmed off a little and glued it on as fringe.


Resources: Pink rug – from www.esmailirugs.com; other rug photos from various rug manufacturer websites.  The finished rug in the photos was made from the Performance Velvet on the Spoonflower website.

I hope this inspires my readers to check out Spoonflower!  Leave a comment and tell me how you might use Spoonflower for miniatures! Maybe print some lampshades?


Monday, February 28, 2022

Dealing with Deep-angled Dollhouse Attic Walls

If you have a dollhouse with a roofline that angles all the way to the floor, for instance an upper floor or attic you might have the problem I have had – how to furnish those deep angled walls?  These angled walls present a few decorating problems:

  1. the angled wall is slightly taller than any side walls so wallpaper has to be a little taller.
  2. Placing furniture in that low angle made by the roof – this area is mostly unusable space
  3. Window treatments – since the wall is angled, any curtains would fall away from the wall and hand straight down.

 Here are the ways I have dealt with these problems in my third floor ‘attic’ space.  

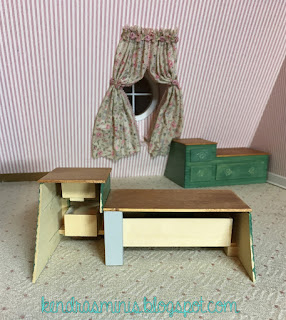
Girls bedroom – for this space I pushed the bed all the way into the tiny dormer so it had a little more room for the headboard.  Then I made built-in drawers fitted around the bed.  
 

Here is the room without the furniture.  Notice wallpaper starts about ½ inch above floor; gap is covered by built-ins (so if your wallpaper is too short for the roof wall this is one way to disguise that).
 

Built-in drawers (green) across wall on either side of the bed.
 

Here is a close-up of the left drawer section. Notice the angle of the back edge of the built-in where it fits into the angle of the roof/wall. To make these built-ins you have to use trial and error to get the right angle.
 

Front of built-ins with drawers.
 

Back of built-in. The built-ins came to a point at the back and were pushed all the way into the angled wall.  I used some scrap wood to support the drawers.
For the curtains for this room, I used the headboard to keep them against the wall so they wouldn’t fall forward.

Playroom – this room is still under construction but I did something similar to the girls bedroom.  Instead of drawers I made open shelves.

The sides had the deep angle and fit all the way into the wall.  But I put a false back behind the shelves so toys wouldn’t push back too far.  Also this area behind the false back hid some wiring in the area.


For window treatments in this room I did a simple curved shade with tassels that fit into the dormer.


Well there are my solutions.  I still have a third room on this floor to come up with angle wall solutions for.  Anyone else solved this problem with a creative solution?  I’m interested in your suggestions.

Monday, January 31, 2022

Re-Wallpapering the Dollhouse


Dining Room, 1996-ish

Dining room after (2021)

Does anyone else redecorate their dollhouse?  I purchased mine in 1996 (while on maternity leave).  I SLOWLY worked on it room by room and now, 25 years later I still have 2 of the 13 rooms unfinished.  I'm curious if anyone else is in the same boat?  I guess it follows actual life because we sometimes update the kitchen without updating the bedroom but a 25 year difference in decorating styles within the same house?

Anyway, that's my situation.  Most of the house was decorated in the 1990s and only recently did I start working on the last 3 rooms.  Regarding this dining room, in 2011 I had a problem with electricity.  I had to peel back the wallpaper to repair the wiring in the dining room and decided that would be a good time to change that wallpaper since I really didn’t like it anymore.   I did like it at the time I papered it but ... changed my mind.

I was really into toile back then (2011).  I love the kind of odd combination of green and purple (see my green & purple kitchen HERE.)  So I really wanted to switch to a toile wallpaper.  I was inspired by some lovely vintage green toile wallpaper by Beehive Studios (from the 1970s).  It was sort of papery, not very thick so I decided to mount it onto some poster board then glue the poster board to the walls (over the top of the old wallpaper).  The poster board would also cover the wiring where I had to solder some connections.

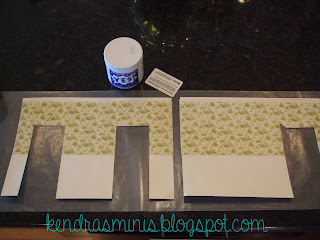
I measured and cut pieces of poster board for the 3 walls and cut out the window and door openings.  Then I glued the wallpaper to the poster board using “Yes” wallpaper glue and an old credit card to spread it.  You can see in one of the photos below I allowed the new wallpaper to extend about ¼ inch beyond the poster board on both vertical sides of the back wall piece.  You’ll see why below.  I also used a brayer to remove bubbles and weighted it down overnight.

In the room I had to remove all the trim around doors and windows (I hadn't gotten as far as putting in baseboard or crown molding at that time).  Then I glued in the papered poster board starting with the back wall. I used the brayer again to remove bubbles before bracing.

Photo below is of how I glued and braced the wallpapered poster board using a book and wood strip scraps wedged between the walls.  The book was to hold the poster board to the wall as flat as possible and take up some space since my wood scraps were too short.  I used clamps and more wood scraps around the doorway.

Below - old and new wallpaper.  You can see here why I let the green toile paper extend on both sides of the poster board  - so there would not be any gaps or old wallpaper showing through at the corners.

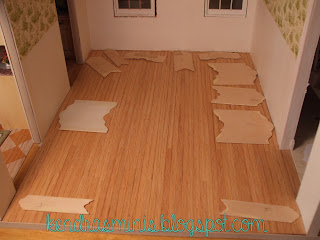
I left the bottom section of the walls un-papered because I wanted to simulate faux paneling on the lower half of the wall.  I really liked some woodwork I saw on another blog that were French style, sort of scallop shaped.  I cut paper patterns for the different areas using different sizes for the areas below the windows, and between the windows. 

For the lower panels, I cut the shapes out of very thin 1/32nd inch thick basswood and then sanded the outer edges so they  were beveled and sloped toward  the wall.


Deciding on sizes and positions of panels to fit in wall sections

I glued the panels (probably with Ultimate glue, I can’t remember) and used wood to brace again because they kind of curled from the glue.


I painted over the panels and wall in the off-white color (“buttermilk”).  Then I aged them – just a tiny bit with diluted paint – mixture of burnt umber and raw umber.

 
Above photos shows aging wash before some was wiped off

Lightly aged panels - has just a little 'wear' from grubby hands and dust

Finished Room (back in 2011):

Here is the same room with chandelier (finally hung!) and drapes I recently made (May 2021).  I was trying for the green and purple color scheme with the carpet and drapes.  You can't tell in the photo but the dishes on the table are purple too (see close up below).  Carpet was an Etsy purchase, artist unknown but it may be a Harry Whalon design.

Vintage 1980s(?) magenta dishes by Jo Parker and Jo Berbiglia petit point dining chair seats to keep with the green and purple color scheme.

Incidentally, here is a fun fact.  No one really knows this BUT my dollhouse was used as the background for a children's music video produced by Joe McDermott - a musician in Austin.  Here is the link if you want to check it out.  It's called "Holiday Cooking Set".  He found me through my blog and came to my house to photograph the dollhouse then used it as a background.  Those chairs the kids are sitting in are the chairs from this dollhouse.  And the thanksgiving dinner I made that was in the dining room above.

Well, readers, hope you can use this info to redecorate when you get tired of your current wallpaper!  It can be done!