Are you a miniaturist and not sure what glue to use for a particular project? Something that is unique about the dollhouse miniatures hobby is that incorporates many other hobbies such as woodworking, sewing, paper crafting, jewelry/beading, etc. This can be daunting and intimidating for new miniaturists. How does one know what glue is best for wood furniture kits? How to glue fabric to cardboard? How to glue Foam Core together? What is the best glue for beads?
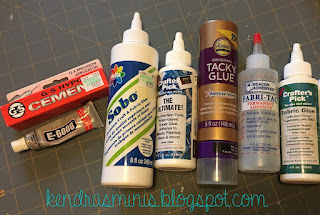
For my last blog of 2021 I have assembled some hints and tips for dollhouse miniaturists on different types of glues. Here are some of the glues I refer to below:
Chart of Glue Uses for Miniatures:
|
|
Paper, card-board
|
Wood
|
Foam Core
|
Plastic
|
Fabric
|
Crystal, beads
|
Metal
|
|
Crafter’s Pick Ultimate
|
Yes
|
Yes (to paper)
|
Yes
|
Yes (to wood)
|
Yes
|
|
Small items
|
|
Sobo
|
|
|
|
|
Yes
|
|
|
|
Fabri-Tac
|
|
|
|
|
Yes
|
|
|
|
Spray Adhesive
|
Yes (Wallpaper)
|
|
|
|
|
|
|
|
Wood Glue
|
|
Yes
|
|
|
|
|
|
|
GS Hypo Cement
|
|
|
|
|
|
Yes
|
Jewelry Findings
|
|
E6000
|
|
|
|
|
|
Yes
|
Yes
|
|
Loctite Super Glue (Gel)
|
|
|
|
Yes (to plastic)
|
|
|
Yes
|
|
Two-part Epoxy
|
|
|
|
|
|
|
Yes
|
Here are the glues I like best and what I use them for:
For paper, fabric, cardboard, foam core and gluing any of those things to wood I use Crafter’s Pick “The Ultimate” glue. This glue really lives up to its name since it can be used for almost anything! Though I don’t use their bottle (ever!). Instead, for a tinier line of glue, I transfer it into paint bottle with a small tip [see hints below]. I have tried it in those needle tipped bottles and it is too thick for those. The only thing I don’t like about this glue (besides its bottle) is that it balls up if you try to sand it so I never use it for gluing wood to wood. Here are two hints for using "The Ultimate" glue:
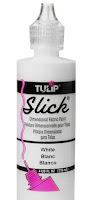 |
Alternate Glue Bottle
|
Hint #1 – get the slick paint (dimensional paint) or glass stain in plastic bottles with a tiny tip on clearance and dump out the paint. Rinse well with water then rinse with Isopropyl Alcohol (rubbing alcohol) to remove all the water. Let dry then fill with glue.
Hint #2 - It’s a pain to transfer it into the new bottle. I use a small skinny spatula and tap, tap, tap it down into the new bottle allowing air bubbles to come to the top to make room for more glue. I don’t know why glue manufacturers don’t package glue in bottles with tiny tips (for miniaturists, eggers, modelers, etc!
For ribbon bows and anything requiring a very tiny line like upholstery cord trim I use Sobo glue in one of the needle type glue applicators. The only reason I don’t use “The Ultimate” is because it is too thick for the needle applicator.
For fabric, I use either Fabri-Tac, Sobo, or Ultimate Fabric glue. Fabri-Tac is a solvent glue but very tacky and doesn’t seem to seep through most fabrics. It holds very well but is smelly and hard to clean off your fingers. Sobo is a thinner white glue and may seep through silk so be careful. When using Sobo and gluing to cardboard, let it get a little tacky first (on seam or edge where it won't show) before pressing to the other surface. Examples of things I have used fabric glue on are hats, upholstering (wrapping fabric around a cardboard form covered with padding), draperies (gluing pleats to cardboard backing), lampshades. I usually don’t use solvent glues when I’m teaching a class because someone in a room will be bothered by it.
Another product for fabric, not a glue but for sealing edges of fabric seams, I use Fray Check. It’s amazing how you can seal a very narrow clipped edge then sew it, turn it inside out and it will hold! I’ve even made tiny stuffed animal bears out of velvet ribbon using the tiniest cut pieces sealed with Fray Check. See my earlier blogs on making pillows from vintage hankies where I have used this product.
For gluing wood to wood I use any wood glue because it can be sanded. Wood glue also grabs pretty quickly and holds strongly.
For Mini jewelry or rhinestones or crystal beads glued to metal or glass I use GS Hypo Cement. This glue doesn’t fog up crystals like some of the other Super-type glues. But it does try to ooze out while you are holding it due to the heat of your hands. Also get the smallest tube (unless you do TONS of rhinestones) because it does dry out if you don’t keep it tightly capped. Uses: beads, cabinet hardware, jewelry findings.
For metal to anything I have these favorites:
- Loctite Gel Super Glue. I especially like that it doesn’t seem to clog (you can leave it open for a long time) and I like how the bottle is easy to squeeze to get only a tiny amount. If it does close up I use a long ball head pin to unclog the opening.
- E6000 (see photo above). This is a solvent glue so it has a smell and dries very fast. But if you get it positioned before it dries it is very strong. Use for gluing jewelry findings together, also works for beads (as in gluing lamps) and it doesn’t fog crystals. Other uses: gluing hardware into wood drawers, cabinets. Also gluing acetate windows into cabinets (since it doesn’t fog plastic). I also use it for gluing brass parts for light fixtures where they don’t need to be supportive (for that I use two-part Epoxy).
- Two-part epoxy. a little harder to use than the E6000 because you have to mix equal parts from two tubes with a toothpick then apply. But I have never had it not set up – or in other words I haven’t used too much from one tube such that it didn’t work. You have to work fast and have your parts all ready to go, trial fitted, etc. I use this for making light fixtures where metal has to be glued to metal and it has to stand up to being knocked around or holding the weight. Also good for jewelry findings.
For Plastic to plastic – I also like the Loctite Super Glue especially if I need a quick set. For plastic glued to wood, paper, etc I would probably use Ultimate glue.
For Wallpaper – I started out using Yes glue up until about a year ago. My entire dollhouse was wallpapered with this. You have to use a credit card to smooth it on and a brayer to smooth out the bubbles. But recently found that when using a very old container which had turned quite brown, it did show through a light background wallpaper. So very recently I have been using a spray adhesive for my wallpapering. I am not brand loyal yet as I have only used what I had on hand (Elmer’s brand and another one from the dollar store). I spray the back of the wallpaper outdoors on a piece of cardboard then apply the paper to the surface. I find this to be less messy and you can find the repositionable kind. Crafter’s Pick Ultimate could also be used for small sections of wallpaper but I wouldn’t use it on large areas unless you were able to smooth it out really well.
Special Circumstances
For any situation where you need strength plus immediate ‘grab’ and can’t really clamp – use a combination of Ultimate (or Tacky type glue) PLUS a dot of Super Glue. This is a trick I learned a long ago from Brooke Tucker when I took one of her workshops. She used this for gluing wood braces in place behind the false walls. The super glue provides the immediate ‘grab’ to hold the piece in place until the Tacky dries (Tacky provides the long-term strength). You can even put the dot of Super glue right in the center of the Tacky blob. Or spread out dots of each along the length of the piece, Tacky, Super, Tacky, Super, etc. You just have to hold the piece in place until the super glue is dry then let the white glue dry on its own. I find it helpful for mounting brackets on exterior walls, exterior wood trim, things that are kind of heavy but can’t be clamped.
Hanging pictures or objects on dollhouse walls (non-permanently) – instead of “Blue Tack” (which
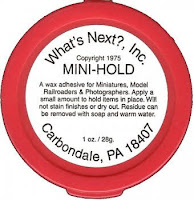
I used to use for years) I now use only
Mini Hold wax. This is a sticky wax for holding vases on mini furniture but I have found it very useful to temporarily hang objects on walls. I don’t like to permanently mount anything on my dollhouse walls because I like to re-decorate. A few years ago I purchased an old 1980s dollhouse. All the items on the walls had been mounted with that sticky wax. I was able to scrape it off with a palette knife and there was ALMOST NO RESIDUE AT ALL!! Also no 'grease' stain like you see from the white or blue tack poster hold products. And scraping didn’t damage the wallpaper, either. I couldn’t even tell afterwards where the items had been on the wall. That wax had been there for about 30 years. The lady even hung her curtains with it. The only caveat may be that it might not be so easily scraped off of papery wallpaper (non-vinyl type – like J. Hermes or scrapbook paper) or textured paper. I use Mini Hold wax to mount plates, artwork, sometimes even shelves holding light items.
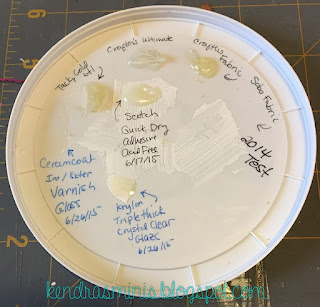
Yellowing - some glues dry more yellow than others. Here is a test plate I made back in 2014 of several different glues. For some reason I forgot to ever put a blob of Sobo on this test plate but from all the other glues you can see that Crafter’s Pick Ultimate is the most clear after 7 years. The regular “Tacky” (in the gold bottle) seems to be the most yellow.
One final note - there is one glue I have never used for miniatures: Hot Melt (glue gun). I haven't ever assembled a dollhouse kit so I don't know if hot glue is useful for tab and slot kits but I don't see glue guns as very useful in miniatures.
I hope this has been helpful to my readers to prevent your buying expensive glues unnecessarily. Please leave me any questions you might have about glues and I will try to answer them. HAPPY NEW YEAR to all my blog readers!