Sunday, August 3, 2014

Tutorial - Miniature Pillows & Pillowcases from Antique Hankies (Part 1)

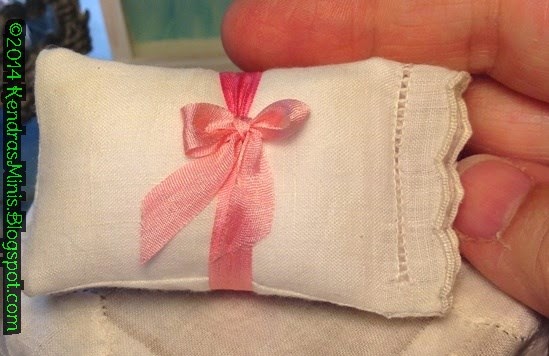
Recently I purchased some lots of vintage hankies on Ebay and was amazed at how nice the embroidery and cutwork can be – nicely scaled for miniature pillows, tablecloths, pillowcases!  How these ladies of bygone eras were able to make such delicate designs on such wispy fabric is beyond me.  It was so hard to cut them up, too.  Just think, how many tears were dried on these hankies – maybe by someone who lost a loved one to a war or buried a child.  One hanky I found among my grandmother’s things after she died I just couldn’t cut up.  But it’s nice to know these old hankies can be made into another type of heirloom – miniature dollhouse pillows and pillowcases!


Part 1 - Make the Bed Pillow Inserts (pillowcases in a following blog)


General Supplies needed:

Glue (Crafter’s Pick Ultimate works best and doesn't soak through fabric)
Metal ruler
Mechanical pencil
Sewing Machine
Fray Check (found at fabric and craft stores for sealing raw edges)
Index card (for patterns)
Tweezers or an orange stick for turning pillow inside out

Old pillowcase or man’s hanky (for bed pillows)
Polyester fiberfill stuffing
Ball headed sewing pin
Matching thread
Ribbon for trim (optional)

General Hints:

Fabric – I used men’s hankies (solid, no embroidery) or old cut up sheet or pillowcase for the bed pillows.  I used the embroidered or cut work hankies for the outer pillowcases.  These can be found on Ebay in lots for sometimes $1 each.  Look for “cutter” in the description (indicates holes or stains so they are cheaper).


Sewing on sewing machine:  You can get unbelievably tiny stitches using your machine (I learned this from Judee Williamson).  Here are my tips:
  • Adjust and your tension on your presser foot so your thin fabric doesn’t wad up.  Test stitch on scrap sheet or pillowcase fabric.  Also if you are having trouble with the leading edge getting pulled into your machine while starting or reverse stitching, just don’t reverse.  Hold the threads back behind the edge before starting and sew a little past where you want.  You really don’t need to tie threads because the seams will be fray checked and you will be clipping the seams anyway.
  • use a stitch length of 1.6 mm if you have a setting for millimeters. If not, test stitch on some scrap pillowcase or sheet fabric to get small stitches that look about like this:
 -------------------
  • Sealing edges – I used Fray Check (found in fabric and sewing stores) on clipped edges but you have to be careful when using it on very thin, delicate hankies not to get it past the seam line.  It will make a line (sort of like a water line) on sheer fabrics.

OK, now comes the "How-to" part:
Bed Pillows (pillowcase inserts)
  1. Cut a “Bed Pillow” pattern out of index card – 1-1/2 inches by 2-1/8 inches.  You will use this pattern to mark the sewing lines in the next steps.
  2. From an old sheet or pillowcase, cut a piece of intact fabric about 5” x 5”.  Fold in half.
  3. With a light pencil mark, trace two pillows onto the folded fabric using your pattern.  Space them as in the diagram below. (make sure marks are dark enough to see them while under your presser foot but light enough they won’t show through when turned). 
  4. Dotted lines show where you will sew (wavy lines are loose thread ends).  Sew on your pencil lines (don’t leave an opening for turning).  No need to back stitch or knot (you will see why later - using glue and Fray Check).
  5. Cut between the two pillows.  On one of the short ends of one pillow, clip sewing thread near the center of the 1-1/2 inch sewn line (for turning).  Remove about 3 or 4 stitches either side of where you clipped but leave the thread tails.  This is the opening where you will turn the pillow later.  DON’T GLUE THIS OR FRAY CHECK THE THREADS.
  6. Trim all sewn seams to 1/8 inch (yes, this is very small but do it!). 
  7. (Trust me on this step – it seems like you are clipping too close but it will work and make a very sharp turned corner).  ON THE TWO CORNERS WHERE TWO sewn SEAMS CROSS: cut diagonally across each corner leaving only a few fabric threads next to the seam (photo below).
  8. Clip again narrowing the 1/8 inch seam near that corner you clipped (next photo below).  This is to eliminate bulk so your corners will be nice and sharp.   KEEP THE FULL 1/8 in WIDTH OF THE SEAM IN THE AREA WHERE YOU WILL BE TURNING IT INSIDE OUT!  YOU WILL NEED THIS TO CLOSE THE PILLOW!
  9. On the other two corners where there is a fold, clip close to the seam right at the corner removing the bulk from the seam (like the above photo except the one side would be a fold ).
  10. Put Fray Check on the cut edges of the fabric (both layers) all around the pillow (if you don’t have Fray Check you can use a thin line of glue VERY THIN!)  Try NOT to let the fray check spread past the sewing line, into the inner part of the pillow where it might show.
  11. Put a tiny dot of glue on the two corners where the two seam lines cross.  Put dots of glue also on the other two corners where seam crosses the fold (put glue on the line of sewing on both front and back of pillow – 8 dots of glue total on each pillow).
  12. Now QUICKLY BEFORE GLUE DRIES turn the pillow inside out through the hole made when you removed those stitches.  If you have to make the hole a little larger that’s OK.  Just try not to go as far as the corners so they will not be messed up.  Use tweezers or an orange stick or anything EXCEPT your scissor points (you will cut the fabric) to poke and shape the corners sharp.  It will work though it seems impossible.  While that glue is still wet you need to get your corners fully turned and as pointed as possible.  Use a ball headed sewing pin if necessary to pull the folds near the corner on the outside.
  13. Stuff with a LITTLE stuffing (they should be fairly flat like an old pillow).  Push some stuffing into each corner, including the two by the opening.
  14. Neatly fold the edges of the opening to the inside creasing where the seam used to be (you might be able to see the old seam from needle holes).
  15. To close the hole you can either slip stitch by hand or fold the raw edges inside and put just a little glue in the opening and pinch closed (my favorite method).  I think gluing is more invisible (In the photo above the top pillow shows a sewn seam and the bottom one has been sealed with glue). 
That's it!  They get much easier as you make more.  Your first ones might not be perfectly square or maybe the corners won't be very pointed but you learn as you go (as with anything worthwhile!)

Next blog - the pillowcases!

Monday, April 14, 2014

Vintage Dinnerware & Faux Table Top


I love scouring ebay for vintage miniature dishes.  I was so lucky to win an auction recently of a set of dinnerware by an artisan from the 1980s, Jo Parker.  Her dinnerware is very delicate, thin and the painting is very fine.  The china is very formal - 5 piece place setting.  I don't even own such a thing in full scale.  Sometimes it's hard to tell if it will match your room when looking at it online but see how nicely it matches my dining room chairs:
My dining room has only a table and chairs, no drapes (yet).  The table and chairs are cherry and were made by Jo Berbiglia.  She did the petit point seats also.

Since I now have nice china I just had to set a table.  But I didn't want to glue anything down to my nice table so I made a faux table top.  I made a box to go over the top of the table from illustration board- just a little bigger than the table.  Then I took an old pillowcase with nice, soft close woven cotton and cut it to cover the box and fringed all the edges.


Since I had all those pretty dishes I also had to make a turkey dinner to go on the table.


There!  Now the dining room doesn't look so bare!  When I am tired of the clutter I will just pack away the faux table top, dishes and food and put a nice centerpiece on the table.  But for now I'm just glad that someone was so talented in miniature ceramics and that I can have a piece of her work.

I have to put a plug in for another of my favorite artists: Sue Ayers (Sue's Little Things).  She made the tiered cookie server (shown on the dresser above and in the photo below).  She sells on Ebay and the detail in her cookies and food is awesome. Her prices are very reasonable.

Thursday, February 27, 2014

More Belated Christmas - Diorama Ornaments & TUTORIAL

This blog is overdue.  In January I wanted to update my blog with some Christmas gifts I received and also some I made.  But, a grandbaby, miniature event and several other things have pushed this out so now I am getting it done (diorama ornaments follow below).

Christmas gifts from my sweet daughters:
Mixer from Chelsie & Brad
Ceramic vase from Cara (age 17)

My gifts to both of them were ornaments with scenes inside.  I was inspired by a friend who had shown me some she had made.  she had put cute quarter inch scale Christmas scenes inside a full size ornament:
Charlotte Serrold's Christmas Ornament

 So Charlotte inspired me to make some.   Here are the ones I made my girls.  They are not very traditional in colors but I made them to fit their tastes:
Chelsie's Ornament front
Chelsie's Ornament back
Chelsie's ornament has little dolls representing her (pregnant) self and her husband, Brad.  Also quarter inch scale cat and dog just like their own pets.  I reproduced her Christmas wreath and (loosely) the Christmas stockings Brad's mother made them.  The back of the ornament has a decoupaged scene cut from an old Christmas card.

Cara's ornament front
Cara's ornament side view
Cara's ornament in one of her favorite colors (purple) depicts her doing her favorite thing - sitting with a fire and a blanket with one cat on her lap and the other at her feet.  She also loves nutcrackers so I included a tiny one by the fireplace.

HERE'S THE TUTORIAL PART:


These ornaments were fun to make so I will just briefly tell how I decorated and filled them.  The papier mache ornaments were from Hobby Lobby.  I cut an opening in them.  The double round one was actually plastic underneath the paper mache so a little harder to cut.

I painted the inside with Gesso then two colors of glitter.  I cut a piece of foam core to make a base for the furniture to sit on.
The little figures were just pipe cleaner wrapped with silk ribbon and painted.  I used a small bead for the pregnant belly.

I used scraps of fabric to dress the 'dolls'.  Really just wrapped the arms and legs for sleeves and pants then cut tiny slits in another piece and worked it over the sleeves for the shirt.  Seams were glued down the back.

The sofa and chair were from a kit from Karen Benson


The little figures and chairs.  Quarter inch scale is not my specialty!


Here is a closer look at one of them.

These were fun to make.  I really want to do some more next year.  Hope you are inspired to try some too!

Wednesday, February 26, 2014

Gardener's Retreat (SAM Birthday Party 2014)

Mary Helen Utley's Gardener's Retreat
I just recovered from another wonderful birthday party for a miniature organization I belong to.  Society of American Miniaturists (SAM) exists to further the hobby and expose new miniaturists to great events such as workshops, etc.  You can find their link in "Sites I Love" in the sidebar.  Every year they put on two events.  An all day theme workshop in February (free to members)  and a workshop weekend /convention type event in September.

Both are awesome but the birthday party is always a wonderful time.  This year SAM's birthday party was hosted by clubs from Corpus Christi, TX.  The theme was a Gardener's Retreat.  In addition to a sit-down take home project (garden shed, potting bench, bench seat, shelf, landscaping, stepping stones, etc. etc) we are also treated to raffle items, exhibits and TOTE BAGS!  Yes, a bag full of garden related goodies was handed out.  See photos below of this wonderful event.

Susan Truesdale's project in work

Above is the shed structure.  The walls are strips of actual barn board shaved to about 1/8" thick.  We didn't even have to age it!.  We learned to landscape the base, make awesome stepping stones (from broken hardie board!  Genius!), age the floor (Susan's floor above is checkered).  We also learned to rust the corrugated roof with paint and we made a skylight window for the roof.


Above you can see more of the projects completed during the day long workshop.  Potting table, small slatted bench, a shelf with brackets.  You can also see the outer barn board up close.  The trash can with its own liner was also given to us in the class.

SAM BD 2014 Tote Bag Items

Above you can see all the tote bag items arranged inside the shed (without the roof).

Close up of left side of photo.


Close up of right side of photo (all tote bag items)


Thanks so much to the Corpus Christi clubs and the committee, headed up by Terri Young (also SAM newsletter editor) for another wonderful SAM Birthday Party.

Monday, January 6, 2014

Have A Merry Little (Belated) Christmas


With Christmas now over I am behind in getting anything put on my blog for November or December so here is a belated mini scene for Christmas.  The tree is my interpretation of Mackenzie Childs Christmas tree.  The snowman basket was crocheted by my talented friend, Karen Haggard.  Chair is by Jack Cashmere.

We have a new miniature added to our family - my new grandbaby Landyn Scott born Jan. 3rd.  He is our first grandbaby and very precious!  In the last picture with his eyes open he is 3 days old!


Sunday, October 6, 2013

It Pays to have Talented Friends!

This blog is dedicated to my long time crony and talented friend, Karen Haggard.  I have assembled a bunch of photos of gifts she has given me over the years.  This is not everything -- just a few things.  Almost everything in the photos below was made by Karen.

Crocheted snowman basket by Karen Haggard

Crocheted doily and spool wreath

Hand pieced quilt - flower garden pattern

Same quilt on a quilt rack

Crocheted tea towel and granny square pot holders

Tatted doilies and crocheted antimacassars

More of Karen's pot holders

Crocheted purse, working drawstrings!

Baby blanket and pillow


(can you tell I love mini crocheted things??)


Dainty cross stitched rug with lovely fringe

Della Robia wreath and Poinsettia centerpiece

Crocheted stuffed bear and pot holders

Grouping of items by Karen Haggard

It probably wouldn't surprise you to know Karen was into smocking and French hand sewing in her former life (her life before she discovered miniatures).  Textiles and threads are her specialty.  How lucky am I?  It pays to have talented friends!

Saturday, October 5, 2013

Dollhouse Mitering Shortcut!


Here’s a neat trick to avoid having to miter dentil molding at the upper back corners of a dollhouse room where it is hard to reach.  This helped to solve a problem I had – two different pieces of dentil molding that didn’t match so I couldn’t miter them together.   Make crown corner blocks from scrap wood – uses the trim pieces that you throw away when you miter!  I can’t believe no one makes these for dollhouses!
Here’s an example in full scale:

http://www.crowncorners.com/install.htm
You will need the following:
  •  square strip of basswood with a thickness  that measures at least the depth of your dentil molding --the distance it extends from the wall toward the ceiling (mine was about ½” by ½”).   A scrap about 2 inches long should be enough. 

  • Cornice molding (the kind without the dentil trim) OR if you have saved the little cut off miter corners from previous mitering you can use those.

  • Optional – tiny 1/16 x 1/16 square molding or scrap wood to fill in the open square that forms at the bottom of the mitered triangles (you’ll see in the photos).

  • Miter Box such as the Midwest “Easy Miter” and razor saw.  Saw should be very fine – for delicate cuts.

Cut the larger square molding to a length just a tiny bit longer than the height of your dentil molding (mine was about 5/8 inch).  Cut two of these the same length for two corner blocks.

Looking at the photos, cut two tiny pieces of the cornice molding at opposite 45 degree angles (the two should be mirror images of each other – or use the scraps from previous miters).  They should be just tiny triangles with almost no length – each has a 45 degree cut and a straight or 90 degree cut.  Be very careful you don’t break off the fragile bottom lip (if it does, just let it break off on both pieces, it should still look fine without it).  Cut a second set If you are doing two back ceiling corners.

Glue the two angled pieces to each other, angle to angle, then glue the flat top of them to the end of the square block.   It should look like the photo below.

If desired you can fill in the open area with a scrap of 1/16 by 1/16 square molding.


 After it dries, sand if necessary and paint.

Glue the blocks in the corners and then install your dentil molding using straight cuts.  Finished!  Now you have an excuse to save all those miter scraps!