Wednesday, February 26, 2014

Gardener's Retreat (SAM Birthday Party 2014)

Mary Helen Utley's Gardener's Retreat
I just recovered from another wonderful birthday party for a miniature organization I belong to.  Society of American Miniaturists (SAM) exists to further the hobby and expose new miniaturists to great events such as workshops, etc.  You can find their link in "Sites I Love" in the sidebar.  Every year they put on two events.  An all day theme workshop in February (free to members)  and a workshop weekend /convention type event in September.

Both are awesome but the birthday party is always a wonderful time.  This year SAM's birthday party was hosted by clubs from Corpus Christi, TX.  The theme was a Gardener's Retreat.  In addition to a sit-down take home project (garden shed, potting bench, bench seat, shelf, landscaping, stepping stones, etc. etc) we are also treated to raffle items, exhibits and TOTE BAGS!  Yes, a bag full of garden related goodies was handed out.  See photos below of this wonderful event.

Susan Truesdale's project in work

Above is the shed structure.  The walls are strips of actual barn board shaved to about 1/8" thick.  We didn't even have to age it!.  We learned to landscape the base, make awesome stepping stones (from broken hardie board!  Genius!), age the floor (Susan's floor above is checkered).  We also learned to rust the corrugated roof with paint and we made a skylight window for the roof.


Above you can see more of the projects completed during the day long workshop.  Potting table, small slatted bench, a shelf with brackets.  You can also see the outer barn board up close.  The trash can with its own liner was also given to us in the class.

SAM BD 2014 Tote Bag Items

Above you can see all the tote bag items arranged inside the shed (without the roof).

Close up of left side of photo.


Close up of right side of photo (all tote bag items)


Thanks so much to the Corpus Christi clubs and the committee, headed up by Terri Young (also SAM newsletter editor) for another wonderful SAM Birthday Party.

Monday, January 6, 2014

Have A Merry Little (Belated) Christmas


With Christmas now over I am behind in getting anything put on my blog for November or December so here is a belated mini scene for Christmas.  The tree is my interpretation of Mackenzie Childs Christmas tree.  The snowman basket was crocheted by my talented friend, Karen Haggard.  Chair is by Jack Cashmere.

We have a new miniature added to our family - my new grandbaby Landyn Scott born Jan. 3rd.  He is our first grandbaby and very precious!  In the last picture with his eyes open he is 3 days old!


Sunday, October 6, 2013

It Pays to have Talented Friends!

This blog is dedicated to my long time crony and talented friend, Karen Haggard.  I have assembled a bunch of photos of gifts she has given me over the years.  This is not everything -- just a few things.  Almost everything in the photos below was made by Karen.

Crocheted snowman basket by Karen Haggard

Crocheted doily and spool wreath

Hand pieced quilt - flower garden pattern

Same quilt on a quilt rack

Crocheted tea towel and granny square pot holders

Tatted doilies and crocheted antimacassars

More of Karen's pot holders

Crocheted purse, working drawstrings!

Baby blanket and pillow


(can you tell I love mini crocheted things??)


Dainty cross stitched rug with lovely fringe

Della Robia wreath and Poinsettia centerpiece

Crocheted stuffed bear and pot holders

Grouping of items by Karen Haggard

It probably wouldn't surprise you to know Karen was into smocking and French hand sewing in her former life (her life before she discovered miniatures).  Textiles and threads are her specialty.  How lucky am I?  It pays to have talented friends!

Saturday, October 5, 2013

Dollhouse Mitering Shortcut!


Here’s a neat trick to avoid having to miter dentil molding at the upper back corners of a dollhouse room where it is hard to reach.  This helped to solve a problem I had – two different pieces of dentil molding that didn’t match so I couldn’t miter them together.   Make crown corner blocks from scrap wood – uses the trim pieces that you throw away when you miter!  I can’t believe no one makes these for dollhouses!
Here’s an example in full scale:

http://www.crowncorners.com/install.htm
You will need the following:
  •  square strip of basswood with a thickness  that measures at least the depth of your dentil molding --the distance it extends from the wall toward the ceiling (mine was about ½” by ½”).   A scrap about 2 inches long should be enough. 

  • Cornice molding (the kind without the dentil trim) OR if you have saved the little cut off miter corners from previous mitering you can use those.

  • Optional – tiny 1/16 x 1/16 square molding or scrap wood to fill in the open square that forms at the bottom of the mitered triangles (you’ll see in the photos).

  • Miter Box such as the Midwest “Easy Miter” and razor saw.  Saw should be very fine – for delicate cuts.

Cut the larger square molding to a length just a tiny bit longer than the height of your dentil molding (mine was about 5/8 inch).  Cut two of these the same length for two corner blocks.

Looking at the photos, cut two tiny pieces of the cornice molding at opposite 45 degree angles (the two should be mirror images of each other – or use the scraps from previous miters).  They should be just tiny triangles with almost no length – each has a 45 degree cut and a straight or 90 degree cut.  Be very careful you don’t break off the fragile bottom lip (if it does, just let it break off on both pieces, it should still look fine without it).  Cut a second set If you are doing two back ceiling corners.

Glue the two angled pieces to each other, angle to angle, then glue the flat top of them to the end of the square block.   It should look like the photo below.

If desired you can fill in the open area with a scrap of 1/16 by 1/16 square molding.


 After it dries, sand if necessary and paint.

Glue the blocks in the corners and then install your dentil molding using straight cuts.  Finished!  Now you have an excuse to save all those miter scraps!

Sunday, September 29, 2013

Dollhouse Building Tips - Removable Stairs

I needed a way to remove the staircase so I could clean them and get to the wallpaper behind them.  After some head scratching, I found a way using an overhanging top step and molding on the floor.

I was able to add a lip on the very top stair because my stairs ended at the back of the house where the top stair would not be very noticeable.  I glued a piece of bass to the top step so it ‘overhung’ catching on the upper level floor.  This prevented the staircase from falling down.

On the lower step of the stairs, I glued molding to the floor where the bottom step touched the floor.  The molding was glued around the bottom step (but not glued to the step – glued to the floor only).  This kept the bottom of the staircase in place so the staircase itself didn’t need to be glued to the floor. 
Molding cut to fit around bottom of stairs

To remove the staircase, I just gently lift the entire thing up about an inch to loosen it from the molding and twist and pull it out without hitting the chandelier.  I plan to stain the upper overhang a little so it blends in better with the upstairs flooring.
Upper floor (way back) you can see the overhang

Bottom floor - molding is only glued to the floor, not the stairs.


Hope this helps someone else with the same problem!  I plan to do it with my 2nd floor staircase also because on that level I plan to have a light fixture behind the stairs (those stairs will be see-through – hopefully in an upcoming blog).

Saturday, September 28, 2013

Houston Tom Bishop Show

Show purchases follow.  I met an interesting lady today, Cynthia DuBose.  She works in silver clay (Art Clay Silver)– a medium she molds then fires (with a cooking type butane torch).  It was amazing to watch her.

Cynthia DuBose and her Silver Art Clay

She takes some clay and forms it over a glass button to make a dish.  She trims away the excess (every dust particle is saved) then finishes the edge by sanding.  She dries it out on a candle warming pad (like the ones you can use to keep your coffee warm).  She checks that all the moisture is gone by setting it on a mirror and looking for condensation.  She files and sands the edge with an emery board.  Then she puts it on a stone and hovers over it with the butane torch until it is “peach” colored (glowing) for 2 minutes. 

Then she douses it into water for an instant cooling.  When removed it has a whitish dry finish which she buffs off with a very soft wire bristle brush.  She has smaller tools for buffing in the tiny crevices.  She uses it in several forms: the clay blob that you can roll and shape, a more watery consistency she squeezes from a syringe (for fine lines) and a sort of paper form that can be punched with a paper punch. Items larger than a quarter she fires in a kiln but small items she fires right on the desktop with a torch.

The cost of the silver clay varies with the market but a little blob, about the size of 2 or 3 quarters would be about $30.  But you can make amazing detailed miniatures with it.  She uses it for jewelry, too. Even more interesting, it doesn’t tarnish as fast (or maybe even not at all) as sterling because it is purer.  And even more helpful to miniaturists is that it shrinks 12% - so you can make it bigger then it gets smaller as you torch it.

 If you want to contact her, she only does classes (doesn’t sell her work).  Her name is Cynthia DuBose (cynthiadubose.com) and she is a Senior Instructor with Art Clay World.  Thanks, Cynthia, for sharing with us!

And now for show purchases:


Karen Markland Halloween pails


Paulette Svec Shabby and Halloween Stockings

Paulette Svec tiny fabric pumpkins WITH STEMS!

Brooke Tucker lamp

Buying minis even makes up for all the Houston humidity and rain!!

Friday, September 20, 2013

Christmas Market Stall FINISHED!!

My market stall was a project from a NAME Day held in Saginaw, TX in July 2012 hosted by the Mini Endeavors club.  I finished the market stall back in May 2013 but am just now getting the photos uploaded.  In my last blog (actually 2 blogs ago) I promised that the next one would be some of the finished items.  Well, here it is.


Here are some close ups of the different sides:

Front right side of counter.  The ornaments were made from my Sept. 2012 blog tutorial.  I made the little partitioned box from scrapbook paper edged with a gold paint pen.  The Feather Tree was a project from the NAME Day event.  The stacked tree top ornaments are just beads stacked on a toothpick and lots of glitter.


Front left side of counter.  Victorian cones and ribbon candy under a dome were made by my talented friend, Karen Haggard.  She also gave me the pot of Christmas Cookie pops by Jen Tuttle of Miniholiday.  The soldier is a painted metal miniature.  I made the tray of cookies and ornament under a dome.

Lower front: I dyed the pink Christmas Tree and painted the smaller one white.  All the ornaments and tree toppers as well as the ornament wreath were made from similar techniques mentioned in my earlier tutorials.  The Merry Christmas crate was donated to the NAME Day by Through the Keyhole dollhouse store.  It contains several tote bag items from the event.

Its hard to see but the items on the shelves are:  Top shelf - large nutcrackers are from wine glass charms.  Smaller ones are painted Metal Miniatures.   Middle shelf - Boxes of ornaments including some reproduction "Shiny Brite" ornament boxes from one of my favorite Ebay sellers, Sue's Little Things. Bottom shelf - Glitter house village which I put together from a Carol Kubrican kit (True2Scale).


The left side of the stall has hanging candy items mentioned in my August 10 2013 blog.  The red and white stocking was one of my earliest miniatures purchases from way back in the 1980s.  I wish I knew who the artist was.  The two net stockings were from Lori Ann Potts of Mustard Seed Miniatures - also vintage but purchased recently.  I modified them by adding items inside the socks and adding a paper card and string.


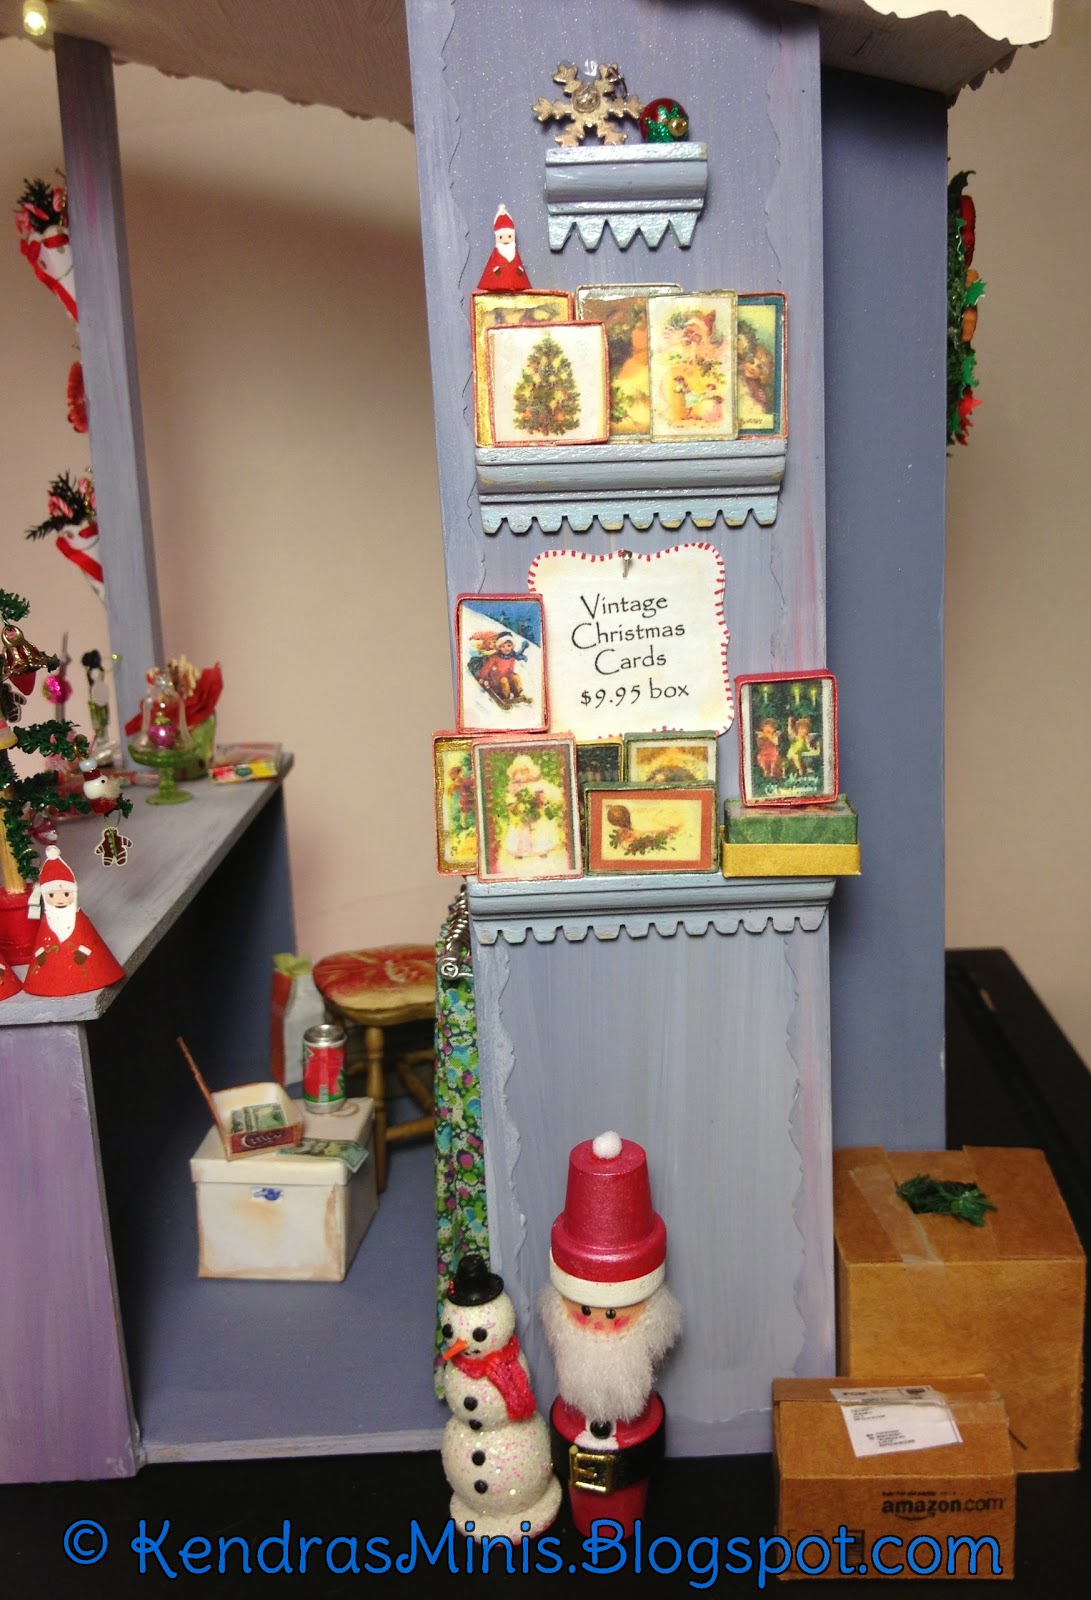
 The right side of the stall:  On the shelves are boxes of Christmas Cards made from some printies provided in the NAME Day tote bag by the late Donna Aldrich.  I wrapped blocks of scrap wood with a strip of folded antique looking scrapbook paper then glued on a card cutout and a thin film of clear plastic cut from a packaging blister.  The flower pot Santa & snowman were projects from the NAME Day event.


Inside the stall I put a little area for the stall owner to sit.  The curtains were described in an earlier blog.  The little stool is the bottom half of a Chrysnbon chair with a chair pad added.  The little filing box is just a block of balsa covered with a metallic gift wrap and a staple for a handle.  The Happy Meal was a tote bag favor.  The little box of ribbon candies (on the counter above the Happy Meal) is another item from Sue Ayers.

Well, glad that I have finished one project...only a hundred more to go!