 It seems tiny plants are IN right now! I’ve even seen a kitchen magnet to hold a tiny (real) succulent on your refrigerator! Even the non-miniaturists are into tiny plants!!
Here is a tutorial for some simple tiny plants to place around your dollhouse room setting. The supplies are fairly easy to find and just require some glue – bead glue (for the crystal parts) and regular craft glue. The photos show the parts arranged as they are glued because I had made up many kits of these for a Society of American Miniaturists event.
General Supplies: use Bead glue for any glass/crystal beads and metal to glass parts. Use craft glue for everything else (Crafter’s Pick Ultimate is my favorite which you know if you have read any of my blog posts).
Plant pots: see descriptions by the photos below.
Plant parts:
For the plants, I just walked the aisles of the Hobby Lobby floral section looking for anything that had tiny parts that could be cut into smaller plants. The ones that looked best were sold as “spheres”. I just cut the smallest snippet of plants that had very tiny lobes or even just a few plastic grass blades. Here are some photos of how they look before you cut them apart:
 |
| This one is "Soft Green Grass Sphere" on Hobby Lobby's Website |
Photo #1 Plants:
 Plant A (succulent dish). Cut a small ‘rosette’ off the succulent pick (not the sphere for this one). For the dish I used a brass #12 “finish washer” (Home Depot - photo below). For 'dirt' I cut a circle of brown craft foam and punched a circle in the middle. Glue the 'dirt' to the washer – stuff it down in the brass dish. Then glue the plant in the hole. For the “feet” I used a pronged stud – the kind usually used to decorate denim items.
Plant B – (long thin leaves) –Just cut a few blades from a grassy looking plant. I found some really nice painted wooden beads in a big package of mixed beads. See photo below. For the top of the wooden bead that looks like brass I used an eyelet. For the brass base I used a small brass cap (I think I may have purchased these from a miniature show – brass findings).
Plant C – goblet – cut the tiniest snippet from the plant with the smallest lobes (see photo above – this was called “soft green grass sphere") and squish and glue them down into the goblet (Chrysnbon type).
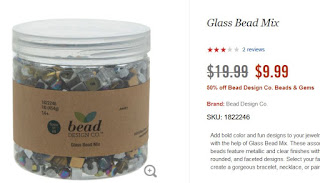
Plant D – cube – the cube is a glass bead that came from a big plastic jar, different shapes from Hobby Lobby. There was a mix of silver, gold, all mostly metallic (photo below). The plant had small round-ish ends. Just cut a small clip and stuff it in with glue.
 |
| Washer for Plant A above |
 |
| Wooden bead mix Plant B |
 |
| Glass bead mix - Plant D above |
Photo #2 Plants
Plant E – copper cup – the copper cup is actually a tube. They are from Home Depot (photo below). Just like for the goblet above, cut a tiny piece of the soft, squishy grass sphere and stuff it in.
Plant F – branch - this took a little more work. It is railroad greenery clumps glued to cloth covered wire twists. The top of the round wooden bead is finished with an eyelet and the base is a small flat washer (Home Depot).
Plant G – this was a snippet from the “Succulent Sphere”. The bead was a faux crystal type with eyelets on both ends of the hole (these are the kind of beads sold for Pandora-type bracelets). I removed the eyelet from one end with pliers so it would glue to the base more easily. I purchased these from Etsy. The base is a 4-pronged stud (denim embellishment).
Plant H – dish garden - a bigger snippet from the soft grass sphere made as described for the “Succulent dish” Plant A from Photo 1 but using a smaller brass washer and smaller stud.
 |
| Plant E Copper 'cup' - Home Depot |
There is one more thing I want to include here – my attempt at those popular “terrariums” with gold edged glass frames. I found a fairly close representation in these hollow ‘cage’ beads that have a faux jewel inside the cage. I just kept the jewel in there and glued railroad greenery clumps to it. See below – another photo from some kits (with my handwritten instructions). The right half of the photo shows another part of the kit which made a set of candlesticks from the glass mix beads described above, eyelets, plastic styrene tubing and cloth covered wire.
Well there are a few tiny plants for you. Hope your 2021 is starting off safe and better than 2020! (something I think most of us are hoping)!


