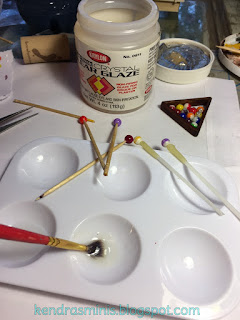
The supplies I used:
 |
| A few of the supplies used |
For the Billiard balls:
5mm acrylic beads (cream or white– from Ebay)
Printed pool ball numbers (attached pdf file)
Tiny paint brush
Circle punches (1/8 inch and 1/16th inch)
White glue (I used Instant Grrrip in a tiny needle dispensing bottle)
Holding sticks – such as “Pic-n-Stick” wax holding sticks
(Micro Mark Tools) OR toothpick with a blob of blue-tack
Krylon Triple Thick glaze (I used brush on but spray is OK too)
Piece of craft foam (art foam)
tweezers (really helpful)
toothpick
Acrylic paint (red, blue, green, yellow, orange, purple, maroon, black)
For wooden triangle:
Thick popsicle stick, or scrap wood ( 1/8” thick by ¼ inch wide - I used one from a corn dog)
Stain pen (to stain wood triangle rack)
Wood glue
Index card and double stick tape
Miter box with 60 degree angle
Sandpaper or emery board (emery board is good for inside the triangle)
15 unpainted 5 mm beads for sizing the triangle
Pool balls come in sets of 16: 8 solid color, 7 striped and one (cue ball) is usually white. Google pool ball sets to see the colors and which numbers are striped, etc. Solid and striped balls are treated a little differently (you’ll see why after they are done).
- Using the tiny 1/16th inch circle punch, punch out about 20 small circles from white paper (printer paper is OK).
- Put a tiny blob of white glue on one hole of one of the beads. Cover the hole with a 1/16th inch paper circle. Let glue dry thoroughly. Do this for all the beads covering only one hole on each. The other hole will be covered with a number later.
- Cue ball – for this one which will not be painted, cover both holes with a paper dot. Set it aside.
Cue ball with small paper dot covering hole - Solid Color Balls – insert a toothpick into the open hole as a handle while painting the balls. Paint the entire bead right up to the toothpick and stick the toothpick into some Styrofoam to dry. Paint one of each color (there should be 8 total).
- Striped balls – the difference here is that the stripe has to cover both holes so it’s too hard to paint up next to the toothpick neatly. Instead of a toothpick I used a “Pic-n-stick” wax holder to hold the beads while painting the stripe. Use a fine brush for painting, you might need 2 coats. There should be 7 of these - in all colors except black.
- Number labels – punch out the numbers on this diagram {pdf - click here!} document with a 1/8th inch punch. Try to center the number. Cup them so they will fit tighter against the bead. To do this, place them printed side down on a piece of craft foam and rub with the end of a paintbrush in a circle pattern until they are slightly cupped. Glue them over the open holes and press down so they are smooth. Let dry thoroughly.
Use paintbrush to cup number labels on craft foam
Cover hole with glue dot and number label - Gloss finish – The Triple Thick brand of glaze dries hard and glassy – perfect for shiny pool balls. Here is the best way I found from experience to get the glossy finish. Since you have no holes now, you will have to use the wax sticks again. Place the ball on the wax end so it touches the bottom (the side opposite the number label). I diluted the gloss with just a little water because mine was too thick (maybe it was a little old). Paint (or spray) the ball with gloss, including the number label, with a sort of thick coat. Try not to let it pool too much where the wax stick is. (I put them in one of those “third hand” holders upside down so the gloss would flow toward the number label).
Paint with gloss glaze. - Let dry overnight. Next day remove and touch up the space where the wax was touching.
Making the Triangle Rack – this was sort of a trial and error process – no specific measurements except for using the 60 degree angle on the miter box to cut the angles.
- First, to determine the size of a triangle I needed, I covered a small area of an index card with a few strips of double stick tape. Then I took 15 plain unpainted beads and placed them on the tape in a triangle shape – sort of mashing them together – just to get the size and length of wood pieces needed. (I used unpainted beads because I thought the tape would damage the painted ones)
- On the wood stick, cut one end to a 60 degree angle using the miter box. Hold it against the triangle of beads and mark where the next cut should be. NOTE: add a tiny bit extra length because when they are painted and glazed they will be slightly bigger (I didn’t account for that and had to sand and re-sand the inside of my finished triangle to fit them). Cut the other end using the 60 degree notch on the miter box.
- Now cut two more wood pieces the same size as the first using the miter box. Trial fit to the bead triangle and adjust by sanding if needed.
- You can stain the pieces now (best for avoiding glue spotting and getting in to the tight corners). The stain pen works well for this.
- After staining, glue triangle together with wood glue. When it is completely dry, round off the outer corners with sandpaper then touch up with the stain pen.
Enjoy your pool ball set!


