Part 1 - Make the Bed Pillow Inserts (pillowcases in a following blog)

General Supplies needed:
Glue (Crafter’s Pick Ultimate works best and doesn't soak through fabric)
Metal ruler
Mechanical pencil
Sewing Machine
Fray Check (found at fabric and craft stores for sealing raw edges)
Index card (for patterns)
Tweezers or an orange stick for turning pillow inside out
Old pillowcase or man’s hanky (for bed pillows)
Polyester fiberfill stuffing
Ball headed sewing pin
Matching thread
Ribbon for trim (optional)
General Hints:
Fabric – I used men’s hankies (solid, no embroidery) or old cut up sheet or pillowcase for the bed pillows. I used the embroidered or cut work hankies for the outer pillowcases. These can be found on Ebay in lots for sometimes $1 each. Look for “cutter” in the description (indicates holes or stains so they are cheaper).
Sewing on sewing machine: You can get unbelievably tiny stitches using your machine (I learned this from Judee Williamson). Here are my tips:
- Adjust and your tension on your presser foot so your thin fabric doesn’t wad up. Test stitch on scrap sheet or pillowcase fabric. Also if you are having trouble with the leading edge getting pulled into your machine while starting or reverse stitching, just don’t reverse. Hold the threads back behind the edge before starting and sew a little past where you want. You really don’t need to tie threads because the seams will be fray checked and you will be clipping the seams anyway.
- use a stitch length of 1.6 mm if you have a setting for millimeters. If not, test stitch on some scrap pillowcase or sheet fabric to get small stitches that look about like this:
- Sealing edges – I used Fray Check (found in fabric and sewing stores) on clipped edges but you have to be careful when using it on very thin, delicate hankies not to get it past the seam line. It will make a line (sort of like a water line) on sheer fabrics.
OK, now comes the "How-to" part:
Bed Pillows (pillowcase inserts)
- Cut a “Bed Pillow” pattern out of index card – 1-1/2 inches by 2-1/8 inches. You will use this pattern to mark the sewing lines in the next steps.
- From an old sheet or pillowcase, cut a piece of intact fabric about 5” x 5”. Fold in half.
- With a light pencil mark, trace two pillows onto the folded fabric using your pattern. Space them as in the diagram below. (make sure marks are dark enough to see them while under your presser foot but light enough they won’t show through when turned).

- Dotted lines show where you will sew (wavy lines are loose thread ends). Sew on your pencil lines (don’t leave an opening for turning). No need to back stitch or knot (you will see why later - using glue and Fray Check).
- Cut between the two pillows. On one of the short ends of one pillow, clip sewing thread near the center of the 1-1/2 inch sewn line (for turning). Remove about 3 or 4 stitches either side of where you clipped but leave the thread tails. This is the opening where you will turn the pillow later. DON’T GLUE THIS OR FRAY CHECK THE THREADS.
- Trim all sewn seams to 1/8 inch (yes, this is very small but do it!).
- (Trust me on this step – it seems like you are clipping too close but it will work and make a very sharp turned corner). ON THE TWO CORNERS WHERE TWO sewn SEAMS CROSS: cut diagonally across each corner leaving only a few fabric threads next to the seam (photo below).

- Clip again narrowing the 1/8 inch seam near that corner you clipped (next photo below). This is to eliminate bulk so your corners will be nice and sharp. KEEP THE FULL 1/8 in WIDTH OF THE SEAM IN THE AREA WHERE YOU WILL BE TURNING IT INSIDE OUT! YOU WILL NEED THIS TO CLOSE THE PILLOW!

- On the other two corners where there is a fold, clip close to the seam right at the corner removing the bulk from the seam (like the above photo except the one side would be a fold ).
- Put Fray Check on the cut edges of the fabric (both layers) all around the pillow (if you don’t have Fray Check you can use a thin line of glue VERY THIN!) Try NOT to let the fray check spread past the sewing line, into the inner part of the pillow where it might show.
- Put a tiny dot of glue on the two corners where the two seam lines cross. Put dots of glue also on the other two corners where seam crosses the fold (put glue on the line of sewing on both front and back of pillow – 8 dots of glue total on each pillow).
- Now QUICKLY BEFORE GLUE DRIES turn the pillow inside out through the hole made when you removed those stitches. If you have to make the hole a little larger that’s OK. Just try not to go as far as the corners so they will not be messed up. Use tweezers or an orange stick or anything EXCEPT your scissor points (you will cut the fabric) to poke and shape the corners sharp. It will work though it seems impossible. While that glue is still wet you need to get your corners fully turned and as pointed as possible. Use a ball headed sewing pin if necessary to pull the folds near the corner on the outside.
- Stuff with a LITTLE stuffing (they should be fairly flat like an old pillow). Push some stuffing into each corner, including the two by the opening.
- Neatly fold the edges of the opening to the inside creasing where the seam used to be (you might be able to see the old seam from needle holes).

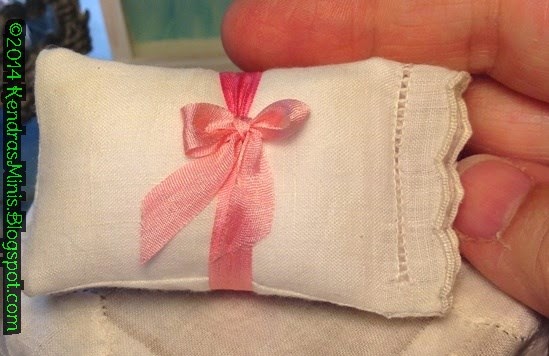
- To close the hole you can either slip stitch by hand or fold the raw edges inside and put just a little glue in the opening and pinch closed (my favorite method). I think gluing is more invisible (In the photo above the top pillow shows a sewn seam and the bottom one has been sealed with glue).
Next blog - the pillowcases!
Just what I needed!! Theses are darling!! :-)
ReplyDeleteSucceed! It could be one of the most useful blogs we have ever come across on the subject. Excellent info! I’m also an expert in this topic so I can understand your effort very well. Thanks for the huge help. Hungarian goose down pillows
ReplyDeleteHello Admin, i found your blog to be really informative your blog raised many modern points of fashion designing but i have also publish a website .
ReplyDeleteembroidery digitizing service
embroidery digitizing company
I came to your site and have analyzed your post. There are excellent details you posted here.
ReplyDeletedigitizing service
custom embroidery digitizing
logo digitizing embroidery service
Thanks for sharing Such a Great information with us , its totally related to my Studies , ill recommend to this information to others.
ReplyDeletevector art conversion service
vector art service